
Embroidered design on linen blends heritage with modern technique, turning flax into wearable art. Its natural slub texture and breathable fibers give depth to stitches on linen that shine in both traditional and contemporary motifs. When you pair thoughtful design with a quality linen base, the result is durable pieces suitable for daily use. This guide explores materials, techniques, care, and finishing touches to help your projects withstand the test of time. Key elements include linen embroidery techniques, care for linen embroidery, embroidered linen projects, and best practices for embroidery on linen, all aimed at supporting makers at every level.
From a semantic perspective, this craft can be described as flax-based fabric decoration that uses thread to enhance texture and color on a breathable textile. Other terms that signal the same idea include linen needlework, fabric embellishment on flax fibers, and textile embroidery for home and wardrobe. When planning projects, consider the weave, weight, and drape of the fabric, as these influence how stitches take shape. Whether framed wall art, napkin sets, or clothing accents, the practice centers on precise transfer, balanced thread choice, and thoughtful finishing.
Understanding Linen Embroidery Techniques for Beginners
Linen’s natural slub and crisp weave make it an inviting canvas for beginners. Understanding linen embroidery techniques helps you plan stitches that sit smoothly on the fabric and learn how the texture affects thread behavior. With a little practice, simple outlines and light shading can become surprisingly expressive on this classic textile.
Starting with the right stitches on linen sets a solid foundation. Running stitch and backstitch are ideal for clean lines, while satin and long-and-short stitch give gentler fill. Remember the fabric’s grain can guide stitch placement, and always maintain a light touch to preserve the linen’s natural texture. When you master these stitches on linen, you’ll see how the material enhances shading and depth.
Choosing the Right Linen and Threads for Embroidered Linen Projects
Choosing the right weight and weave is vital for embroidered linen projects. Light-to-medium linens with even texture provide a forgiving surface for beginner-level designs, while heavier linens invite more texture and bold motifs.
Thread choices matter too. Cotton floss, perle cotton, and silk each bring a different bite and sheen. Plan for the project’s use—napkins, wall art, or garments—and consider how laundering might affect fibers. This planning is part of selecting materials for embroidered linen projects.
Embroidered design on linen: From Concept to Transfer
Embroidered design on linen: From Concept to Transfer Turning a concept into stitch-ready reality starts with a clear design that suits linen’s texture. Consider scale, contrast, and how the weave’s eyelets will interact with lines on fabric. When you keep embroidered design on linen in mind from the start, you can anticipate where shading will read best and where bold motifs will shine.
For transfer, choose methods that respect linen’s weave. Light pencil guides, water-soluble markers, or carbon tracing on the wrong side help maintain alignment, while temporary stabilizers prevent shifting on larger patterns. Testing on a scrap before you stitch is a best practice for embroidery on linen.
Stitches and Stitch Density: Crafting Texture on Linen
Linen invites a wide range of stitches, from fine outlines to bold fills. Understanding stitch density helps you balance visibility and fiber integrity. On linen, you can dial up texture with long-and-short stitches, satin fills, and subtle couching to capture dimension.
Keep tension gentle and consistent, and use a hoop or frame to prevent distortion. The fabric’s natural grip means stitches sit securely, but over-tightening causes puckering. Practicing even spacing and stitch length on linen builds a durable, tactile finish.
Finishing, Care, and Longevity: Caring for Embroidered Linen Projects
Care for embroidered linen projects starts at the finishing stage. After stitching, gentle washing and careful pressing help preserve stitch integrity. Using a damp cloth to press from the wrong side reduces flattening and keeps stitches crisp. For long-term maintenance, follow care for linen embroidery guidelines to protect color and texture.
Store and launder with care. Air-dry away from direct sunlight, use acid-free tissue between pieces, and test colorfastness on a scrap before washing. Proper care ensures your embroidered linen projects endure for years, becoming heirloom-ready.
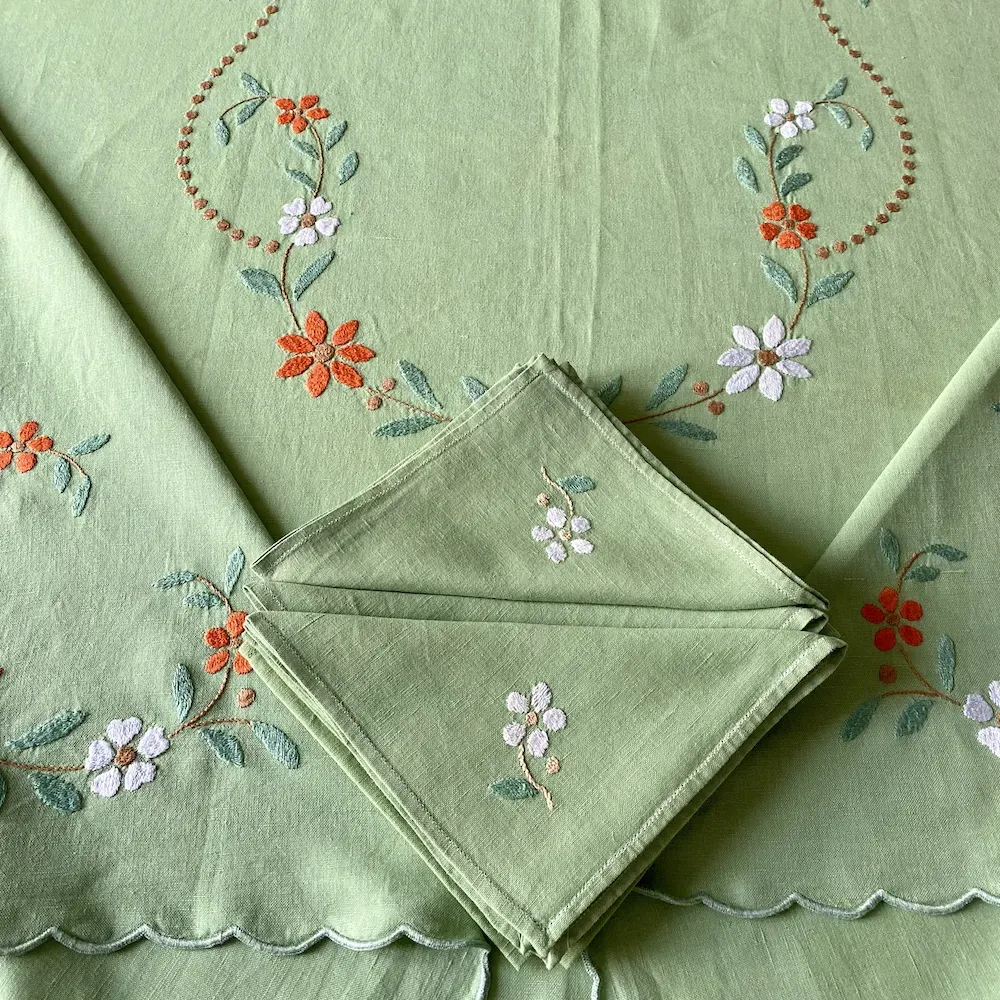
Creative Ideas and Practical Projects to Inspire Your Linen Embroidery
Linen makes a versatile canvas for a range of projects, from everyday napkins to decorative wall art. Exploring embroidered linen projects can spark ideas that balance texture and color while leveraging linen’s natural drape and resilience.
When planning, consider color schemes that respect linen’s natural hue and thread sheen. By aligning designs with linen embroidery techniques and the fabric’s weight, you can craft pieces that are both beautiful and durable for daily use. Following best practices for embroidery on linen helps ensure your pieces endure.
Frequently Asked Questions
What linen embroidery techniques are best for an Embroidered design on linen?
Key linen embroidery techniques for an Embroidered design on linen include running stitch and backstitch for clean outlines, satin stitch and long-and-short stitch for fills, and split stitch or couching for texture. Linen’s weave responds well to these stitches, helping both delicate and bold motifs. Choose thread options like cotton embroidery floss, perle cotton, or silk based on fabric weight and sheen. Start with proper fabric prep (prewash and press) and consider a light stabilizer for larger designs. Finish with a gentle wash and press to set the stitches.
What are the best practices for care for linen embroidery to preserve an Embroidered design on linen?
Care for an Embroidered design on linen begins with gentle washing in cold water using a mild detergent. Hand wash when possible; if machine washing is necessary, use a delicate cycle in a mesh bag. Avoid bleach and high heat, and air dry flat away from direct sun. Iron from the wrong side with a damp cloth and test colorfastness on a small sample before washing the final piece. Store in a cool, dry place to protect the fabric and stitches.
Which embroidered linen projects provide ideas for showcasing an Embroidered design on linen?
Embroidered linen projects offer plenty of inspiration, including linen napkins with a simple border, framed linen art, table runners and placemats, clothing embellishments, and home décor like pillow covers and tote bags. These projects let the natural texture of linen shine while keeping stitches clear and durable.
What are best practices for embroidery on linen to achieve a lasting Embroidered design on linen?
Best practices for embroidery on linen include selecting the right linen weight and weave, aligning motifs with the fabric grain, and using a hoop or frame to maintain even tension. Stabilize as needed, transfer patterns carefully, and maintain balanced stitch density to avoid puckering. Finish with a gentle wash and proper pressing to keep the Embroidered design on linen crisp over time.
Which stitches on linen work best for detailing an Embroidered design on linen?
Stitches on linen that work well for detailing include running stitch and backstitch for outlines, satin stitch and long-and-short for fills and shading, split stitch and couching for texture, and French knots or bullion knots for small accents. Plan stitch order and tension to respect the fabric’s texture, ensuring the Embroidered design on linen reads clearly from both near and far.
How to choose threads and finishing methods for embroidered linen projects featuring an Embroidered design on linen?
For embroidered linen projects, choose threads that suit the weight and desired effect. Cotton embroidery floss is versatile and easy to color-match; perle cotton or silk adds dimension and sheen. Use metallics sparingly with a stabilizer. After stitching, rinse any markers, press from the wrong side, and consider backing to reduce show-through. Finishing touches help the Embroidered design on linen remain vibrant through daily use or display.
| Key Point | Details |
|---|---|
| Why linen for embroidery | Linen’s natural slub texture, breathability, and timeless appeal provide a strong base that enhances embroidery; when paired with thoughtful design, it yields beauty and durability suitable for daily use. |
| Embroidered design on linen: concept | The design can range from delicate to bold; linen’s texture complements classic and contemporary looks, with thread choice affecting sheen and feel. |
| Preparing linen | Choose weight and weave, prewash and press, stabilize as needed, and plan an accurate transfer method to ensure a smooth, even stitching surface. |
| Threads and finishes | Use cotton floss, perle cotton, or silk; use metallics sparingly. Consider linen’s natural color and select threads that complement the fabric’s hue and project weight. |
| Techniques and stitches | Explore running/backstitch, satin/long-and-short, split/couching, and French/bullion knots. Linen’s texture supports both simple and textured stitching. |
| Transfer, stitching, finishing | Align motifs with the grain, maintain even tension, use a hoop or frame, back with a light stabilizer if needed, and finish with a gentle wash and pressing. |
| Care for embroidered linen | Gentle hand washing preferred; air-dry away from heat; store properly; test colorfastness on samples when using dark colors. |
| Project ideas | Napkins, framed wall art, table runners, clothing embellishments, and home décor accents. |
| Common mistakes | Puckering from over-tension, uneven stitches due to fabric texture, distortion on large motifs, and fraying at sharp turns. |
Summary
HTML table summarizes key points from the base content about linen embroidery.