
DIY Embroidered Design invites you into a calm, creative world where simple stitches turn fabric into art. If you’re pursuing beginner embroidery, this approachable guide shows you how to start with confidence. You’ll explore a friendly, step-by-step path that covers basic embroidery stitches, pattern transfer, and the right embroidery hoop setup. By focusing on steady practice rather than speed, you’ll grow confidence in hand embroidery for beginners and produce stitches that look polished on everyday items like totes, pillows, and jackets. With patience and curiosity, this project will become a share-worthy piece you’re proud to display.
For newcomers to fabric art, this hand-stitching journey blends approachable techniques with practical tips that demystify the craft. Think of it as a beginner-friendly stitching project that balances simple embroidery stitches with careful pattern transfer and the comfortable rhythm of embroidery hoop setup. By framing the activity as hand embroidery for beginners and textile art, you’ll see how choosing a design, preparing fabric, and mastering basic stitches fit together into a small, satisfying lesson. This approach emphasizes clarity, patience, and practice, so you can translate ideas into a tangible, decorative piece you can use on bags, cushions, or garments.
DIY Embroidered Design for Beginners: A Complete Hand Embroidery Guide
Starting a DIY Embroidered Design is approachable when you break it into small, manageable steps. This beginner-friendly guide introduces hand embroidery for beginners, focusing on practical embroidery stitches and a simple motif that builds confidence from needle to finished piece.
By focusing on a friendly toolkit, pattern transfer basics, and a calm, methodical approach, you’ll master beginner embroidery skills and produce a polished design you’re excited to share.
Embroidery Hoop Setup and Fabric Prep: Laying the Groundwork for Beginner Embroidery
A stable embroidery hoop setup is the foundation of clean stitches. For beginners, choose a 4–6 inch hoop and pull fabric taut so it sits flat; this reduces puckering and helps embroidery stitches stay neat.
Pair with a smooth, even-weave fabric, and select cotton floss in a small palette; proper hoop setup and thoughtful fabric choice support consistent technique in hand embroidery for beginners.
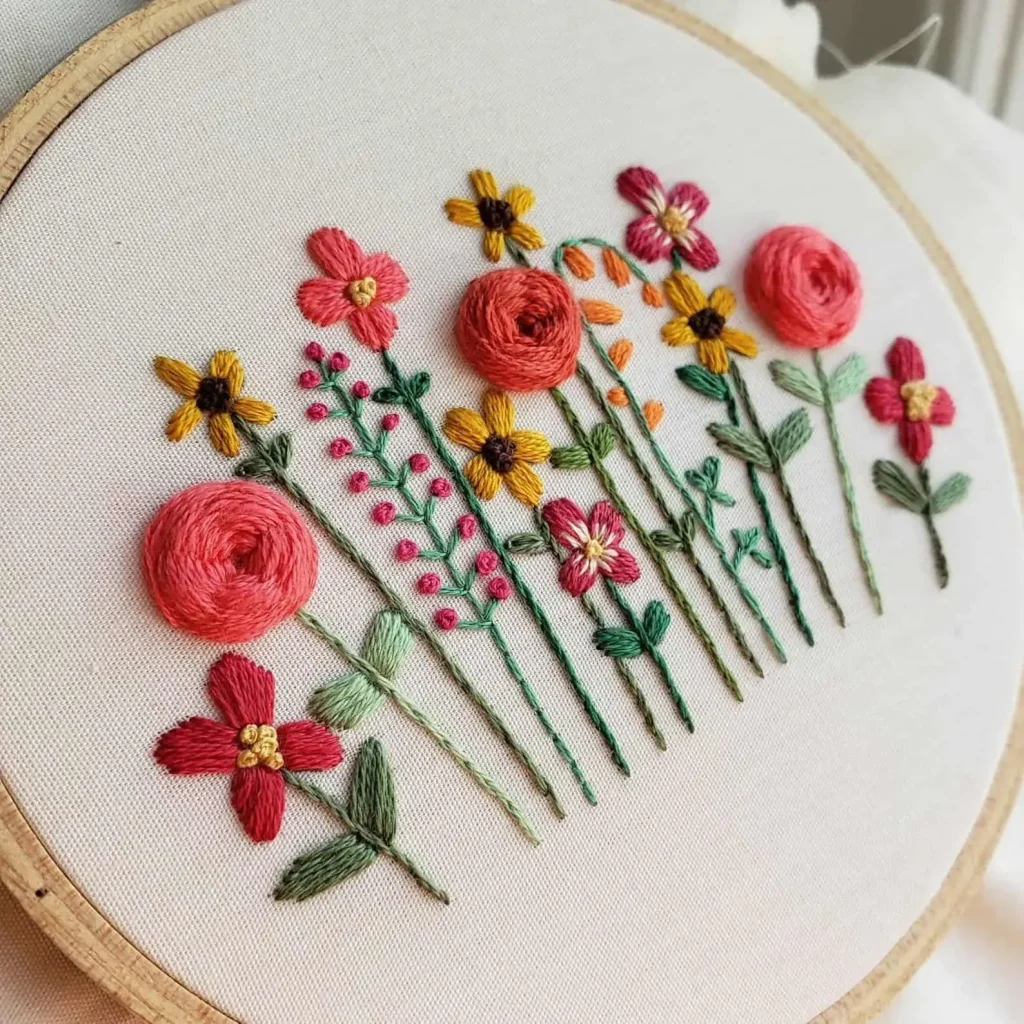
Master Core Embroidery Stitches: Straight, Back, Satin, and French Knot for Beginners
These four stitches—straight stitch, back stitch, satin stitch, and French knot—form the core vocabulary of embroidery stitches. They enable outlines, color fills, and tactile texture for beginner embroidery.
Practice on scrap fabric to tune tension and spacing; as you gain confidence with embroidery stitches, you’ll be ready to tackle more complex patterns in hand embroidery for beginners.
Pattern Transfer Essentials: Techniques for Accurate Hand Embroidery for Beginners
Pattern transfer is the map for your design. Use tracing, water-soluble markers, or print-and-transfer methods to create a crisp guide on fabric before stitching.
Solid pattern transfer ensures consistent results and helps beginners control line placement, improving accuracy in hand embroidery for beginners.
From Outline to Color: A Step-by-Step DIY Embroidered Design Process
From the outline to color, this step-by-step process covers setup, threading, outlining, and filling shapes for a cohesive DIY Embroidered Design.
Color layering, knot management, and stitch direction matter for a polished look; following a structured workflow keeps the project accessible while building skill in embroidery stitches.
Troubleshooting, Finishing, and Care: Keeping Your Embroidered Projects Neat
Common issues like puckering, fraying, and uneven stitches can happen; solutions include adjusting fabric tension, using stabilizers, and practicing shorter thread lengths for tidier results.
Finish with gentle washing, dry flat, and proper storage to preserve colors and fabric; careful care ensures your DIY Embroidered Design ages well and continues to inspire future projects.
Frequently Asked Questions
What is a DIY Embroidered Design for beginners and how do you get started with beginner embroidery?
A DIY Embroidered Design is a small, decorative hand-stitching project created with simple stitches. To start, gather a basic toolkit (embroidery hoop, floss, needle, fabric, scissors, water-soluble marker), set up a comfortable workspace, learn four core stitches (straight, back, satin, French knot), and practice pattern transfer on scrap fabric before you begin your design.
How should you set up the embroidery hoop for a DIY Embroidered Design?
For a clean result, mount the fabric taut in a stable embroidery hoop (4–6 inches is ideal for beginners). Ensure the fabric sits flat and the tension is even, and use a stabilizer if working with fragile fabrics to prevent puckering during your DIY Embroidered Design.
What are the essential embroidery stitches to use in a DIY Embroidered Design?
Key stitches to master for a DIY Embroidered Design are the straight stitch for lines, the back stitch for outlines, the satin stitch for solid fills, and the French knot for texture. Practice these on scrap fabric to build confidence before stitching your project.
What are pattern transfer methods for a DIY Embroidered Design?
Pattern transfer options include tracing the design with a light source, using a water-soluble marker to draw directly on fabric, or printing and transferring with carbon paper or a transfer pen. A reliable transfer helps guide your DIY Embroidered Design while preserving fabric integrity.
What’s a beginner-friendly step-by-step approach to a simple DIY Embroidered Design?
Follow these steps: set up your fabric in the hoop, thread 2–3 strands, outline with back stitch or straight stitch, fill shapes with satin stitch, add details with French knots or small stitches, plan color changes, finish by washing away markers and pressing from the back for a polished look.
What common issues occur in DIY Embroidered Design projects and how can you troubleshoot them?
Common problems include puckering from excessive tension, fraying at edges, uneven stitches, and tangled threads. Troubleshoot by adjusting hoop tension, using a stabilizer for delicate fabrics, practicing consistent stitch length, and keeping thread lengths short to prevent tangling.
| Topic | Key Points |
|---|---|
| Introduction | Embroidery is a quiet, creative ritual and beginner-friendly, step-by-step guide. The goal is to build confidence, produce polished, share-worthy results, and apply techniques to items like tote bags, pillows, or denim. The emphasis is on clarity, patience, and personal expression. |
| Tools and Materials You’ll Need | Essential items for a successful DIY Embroidered Design:
|
| Understanding Basic Stitches | Four essential stitches form the foundation:
Practice to control tension and develop a steady hand before starting the project. |
| Pattern Transfer and Preparation | Transfer methods create a reliable guide for stitching:
Keep fabric taut in the hoop for neat stitches and minimal fraying. |
| Step-by-Step Tutorial for a Simple DIY Embroidered Design | Follow these steps to complete a beginner-friendly design:
Keep the process iterative and focus on accuracy rather than speed. |
| Troubleshooting Common Issues | Common hurdles and fixes:
With practice, stitches become more even and finished projects neater. |
| Ideas for Your Next DIY Embroidered Design Projects | Future project ideas to expand skills:
Each project deepens technique and confidence. |
| Care and Preservation of Your Finished Work | To keep embroidery looking fresh:
Proper care extends life and beauty of the design. |
| Overview | This guide consolidates practical steps for starting a DIY Embroidered Design, emphasizing calm preparation, basic stitches, pattern transfer, and a patient, methodical workflow that yields satisfying, share-worthy results for beginners. |
Summary
This HTML table summarizes the key points of the base content on DIY Embroidered Design, covering introduction, tools, stitches, transfer, step-by-step process, troubleshooting, project ideas, care, and a concise takeaway.