
Learning to patch jeans at home is a practical skill that saves money, extends the life of your favorite denim, and reduces textile waste. Whether you have a small tear or a worn spot, this guide introduces options like jean patch repair and how to mend jeans that blend durability with style. You’ll learn when to choose an iron-on denim patch, how to stitch patches on jeans by hand or machine, and the denim repair tips that prevent future frays. With clear steps, you’ll feel confident selecting the right patch size, avoiding bulky seams, and ensuring the repair remains comfortable through washing and wear. This approach keeps your wardrobe sustainable, giving you a customized look while preserving the fabric you love.
In this companion section, the topic is explored through related terms such as repairing denim at home, different methods of mending jeans, and DIY fabric patches that fit common searches. Readers will encounter synonyms like patching techniques, fabric reinforcement, and upcycling jeans, ensuring broader reach while keeping a practical, how-to focus. By alternating terminology, the content mirrors how people search for denim maintenance, patching methods, and durable repairs for everyday wear.
Patch jeans at home: a practical DIY repair that saves fabric and money
Patching jeans at home is a practical DIY skill that keeps your wardrobe running without breaking the bank. By repairing small tears or worn patches yourself, you reduce textile waste and extend the life of your favorite denim. A successful home patch becomes not just a fix, but a seal of personal style and frugality.
Starting with a clear plan helps you choose the right patch and technique. Consider whether you want the patch to be visible as a design element or hidden for a more polished look. The overall durability depends on pairing the right patch with proper stitching and pressing, which is a core part of denim repair tips and the broader idea of jean patch repair.
How to choose the right patch method for denim repair tips
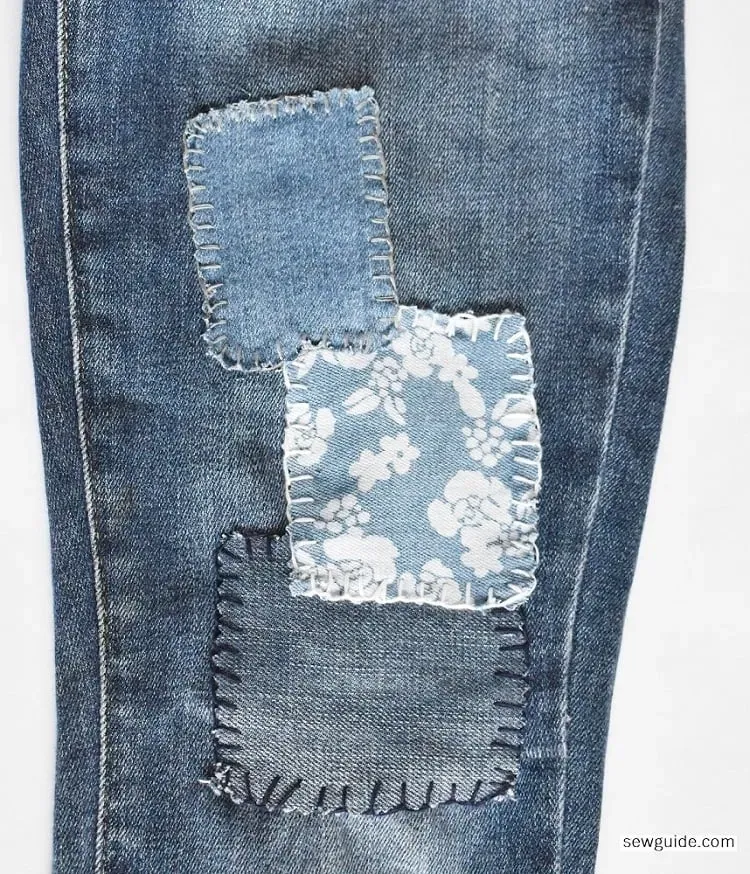
Denim patches come in several styles, each with its own aesthetic and durability. Visible patches on the outside can add character and reinforce weakened areas, while invisible patches from the inside keep the surface clean for dressier or lighter-weight denim. For speed and convenience, iron-on denim patch options offer a quick solution, especially when reinforced with hand stitches.
Understanding when to use each method is part of the art of how to mend jeans. Larger tears might benefit from multi-layer patches or a combination of inside and outside patches to reduce bulk and still preserve movement. This decision process is a practical application of stitching patches on jeans and is guided by the tear size, fabric weight, and your preferred look.
Preparing patches and fabric for durable repairs
Preparation starts with selecting a denim patch that matches weight and weave, or choosing a contrasting fabric for a bold look. Cut the patch roughly 1 inch larger than the tear to ensure full coverage, and round the corners to prevent snagging. This aligns with the jean patch repair mindset: plan, measure, and tailor the patch to the area you intend to cover.
Edge finishing is key to longevity. You can fray patch edges for a rustic vibe or finish with a tight zigzag or satin stitch for durability. If you’re using fusible backing, cut the patch slightly smaller to account for the adhesive area and follow the patch instructions for heat settings and timing.
Iron-on denim patches: fast fixes with lasting hold
An iron-on denim patch provides a quick, no-sew-friendly option to mend jeans. Position the patch on the fabric, cover with a press cloth, and apply heat and pressure for the recommended time, then add a few securing stitches along the edges for extra durability. This method is a popular choice in the toolkit of denim repair tips.
For best results, let the patch cool completely before handling, and consider a light follow-up row of stitches around the edge to prevent future peeling. The technique fits into both casual repairs and more refined looks, especially when you want the exterior to show minimal stitching but still hold up through wear and washing.
Stitching techniques that make patches last: stitching patches on jeans
The stitching around a patch is as important as the patch itself. A basic running stitch, a tight zigzag, or a neat blanket stitch can secure the patch in place while complementing the patch’s style. If you’re patching with a decorative outside patch, choose a visible stitch that enhances the overall look.
Machine sewing offers speed and uniformity, with a zigzag or narrow straight stitch around the edge. When repairing areas under heavy stress, reinforce corners and edges with a second row of stitching. Proper stitch length and tension help prevent rippling and ensure a durable finish that stands up to repeated wear.
Finishing, care, and long-term maintenance after patching jeans
Proper finishing and care extend the life of patched jeans. Turn jeans inside out before washing to shield the patch and stitched edges, and use cold or warm water on a gentle cycle to minimize stress on the repair. Air drying or low heat helps preserve the integrity of both patch and fabric over time.
Periodic checks after a few washes allow you to re-stitch loosened edges and adjust with supplementary patches if needed. Following these denim repair tips keeps repairs looking neat and functional, ensuring that your patch jeans at home remain a reliable part of your wardrobe for many wears to come.
Frequently Asked Questions
What does patch jeans at home entail and what tools do I need?
Patch jeans at home is a DIY repair that extends denim life and saves money. Gather essentials: a denim patch, sharp scissors, a seam ripper (optional), a sewing needle and thread or a sewing machine, pins or fabric glue, a chalk marker, fusible backing or iron-on patch if desired, an iron and ironing board, and a ruler. Cut patches a bit larger than the tear, then prep edges and plan placement before stitching.
How do I decide between a visible patch on the outside and an inside patch when patch jeans at home?
Choose based on style and durability. A visible patch on the outside adds character and can be decorative; an inside patch keeps the exterior clean and professional-looking. For longevity, ensure edges are securely stitched and avoid bulky seams near joints.
How do I use an iron-on denim patch when patch jeans at home?
Place the patch over the tear, cover with a thin cloth, and apply heat and pressure per the patch instructions. For durability, reinforce with a few hand stitches around the edge and let it cool. If needed, use fusible backing and a light press afterward to keep the patch flat.
Which stitching methods are best for patch jeans at home when stitching patches on jeans?
You can sew with a running stitch or a zigzag around the patch edge; a tight blanket stitch also works well for visible patches. Machine sewing with a narrow zigzag around the edge is fast and durable, while hand stitching gives more control and can match your patch style.
What denim repair tips help patch jeans at home last longer?
Use sturdy thread in a color close to the denim, reinforce edges with a second stitch line, and consider two-layer patches for very worn areas. Pre-wash the jeans to reduce shrinkage, align patches away from pockets or seams, and ensure the patch lies flat to prevent bulk.
After patching, how should I care for patch jeans at home to ensure longevity?
Turn jeans inside out before washing, use cold or warm water on gentle cycles, and air-dry when possible to protect the patch. Inspect stitches after a few washes and re-stitch any loose edges to maintain durability.
| Aspect | Key Points |
|---|---|
| Overview | Patching jeans at home saves money, extends life, and reduces textile waste. Process from assessment to finish; choose patch method based on tear, fabric, and desired look. |
| Tools & Materials | Denim patch (matching or contrasting), sharp scissors and seam ripper, needle and thread or sewing machine, pins or fabric glue, chalk/marker, fusible web/backing (optional), iron & ironing board, ruler/measuring tape. |
| Patch Options | Visible patch on outside; Invisible patch from inside; Iron-on patch; Darning/zigzag repair from inside. Choose by tear size, fabric weight, and visibility desired. |
| Step-by-Step Guide | Step 1: Assess tear and plan patch placement. Step 2: Cut patch about 1 inch larger than tear; round corners. Step 3: Prepare patch edges (fray, zigzag/satin stitch) and backing if used. Step 4: Position and secure temporarily. Step 5: Stitch around patch (running stitch, zigzag, or blanket stitch). Step 6: Finish and press; ensure adhesion if fusible backing used. |
| Patch Variations & Tips | Large patches for worn knees; match weight and weave; reversible patches for exterior/internal versatility; decorative patches (felt, leather, embroidery); ensure shapes follow denim lines for natural look. |
| Longevity Tips | Use sturdy thread; reinforce corners/edges with extra stitching; consider two-layer patches for very worn areas; pre-wash or damp cloth to reduce shrinkage; align patches with pockets/seams to avoid movement. |
| Common Mistakes | Patch too small; skip edge reinforcement; patches too light for denim; sewing too loosely; rushing iron-on setup. |
| Maintenance & Care | Turn jeans inside out before washing; use cold/warm cycle; avoid high heat; air dry when possible; re-stitch if edges loosen. |
Summary
Conclusion: Patch jeans at home is a practical approach to repairing worn denim so you save money, extend the life of favorite jeans, and reduce waste. This step-by-step method emphasizes choosing the right patch method for the tear and fabric, and performing careful stitching and pressing for durability. By combining visible or invisible patches with thoughtful placement, you can turn flaws into personalized flair while practicing sustainable fashion. With the right tools, patience, and care, patch jeans at home becomes a satisfying DIY skill that keeps your wardrobe functional and stylish.