
uv dtf transfer has emerged as a game-changing method for decorating fabrics and hard surfaces with vibrant, durable designs, enabling creative projects that withstand daily wear and washing. This uv dtf transfer guide is designed to help you move from concept to finished product by outlining essential materials, settings, application techniques, and troubleshooting steps. If you’re new to this technique, you’ll also learn how to apply uv dtf transfer correctly, optimize color accuracy, and build a repeatable workflow that yields consistent results. You’ll gain insight into uv dtf printing on fabric, including substrate compatibility, color management, and practical tips for achieving sharp details on light and dark backgrounds. By following recommended durable dtf heat settings and aiming for vibrant dtf transfer results, you can standardize your process, reduce waste, and expand your product range with confidence.
In other words, this method is a UV-curable ink transfer process that prints designs onto a specialized film before bonding them to textiles or hard substrates. Viewed through an LSI lens, allied concepts include UV-light cured printing on fabrics, digital transfer films, and heat-press workflows that prioritize color fidelity and durable adhesion. Practitioners describe the same end result—sharp imagery, smooth gradients, and reliable performance after washing—using slightly different names like UV-printed transfers, light-cured ink films, or textile decoration systems.
What is uv dtf transfer? A Clear Overview and Why It Matters
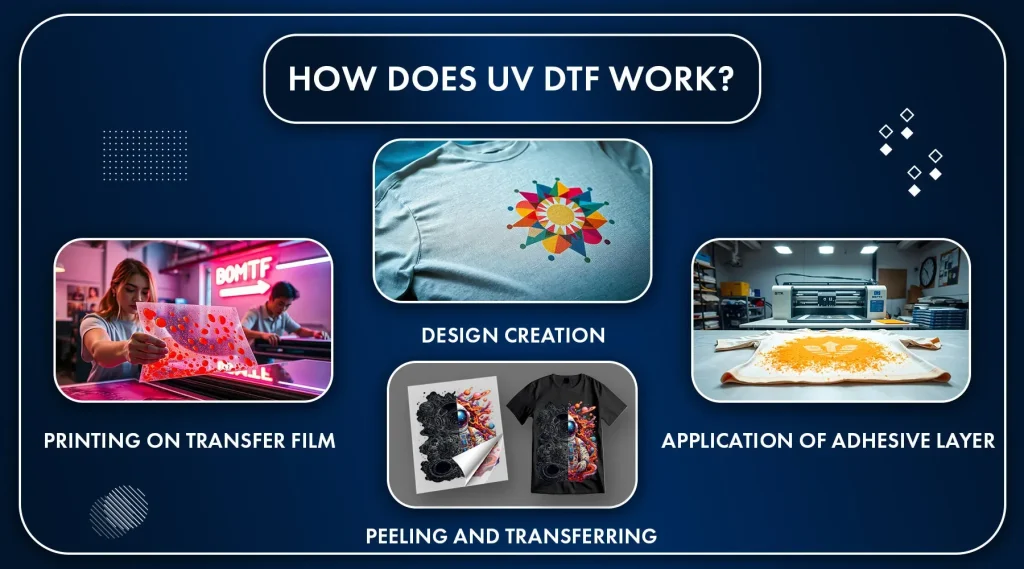
uv dtf transfer is a process where UV-curable inks are printed on a specialized transfer film and then heat-pressed onto your chosen substrate. The UV curing step locks color accuracy and crisp details before the transfer is applied, helping prevent bleed and misregistration. Reading about this approach in the uv dtf transfer guide can help you visualize the workflow, but the essence is a film-backed print that comes to life with heat and pressure.
Because the ink is cured upfront, you get bright color reproduction, smooth gradients, and a durable finish suitable for everyday wear. The technique shines on textiles and hard surfaces alike, enabling vibrant dtf transfer results on cotton, blends, polyesters, and coated substrates, which broadens product lines and simplifies stock decisions.
Choosing Substrates and Inks for Long-Lasting Results
Selecting substrates and inks starts with compatibility. UV-curable inks behave differently than traditional DTG or plastic-adhesive inks, so verifying substrate acceptance, coating requirements, and adhesive performance is essential for lasting results. When planning, look for substrates that accept DTF and consider the substrate’s weave, weight, and finish to maximize bond strength and color fidelity.
Ink choice matters for durability and color latitude. Many shops pair UV-dtf inks with a UV-curable film designed for the method, which helps you achieve consistent color on light and dark fabrics alike. The phrase durable dtf heat settings is a guide to test across fabrics—setting temperatures and dwell times that yield stable adhesion without scorching the fabric. For uv dtf printing on fabric, test on swatches before committing to full orders.
Design and Prepress: From Artwork to Print-Ready Files
Design and prepress set the stage for success. Start with high-resolution artwork (300 ppi or higher) and correct color profiles so that your printed output aligns with your expectations after transfer. Describing this stage in terms of uv dtf printing on fabric emphasizes the integration of design work and the material’s behavior during heat application, highlighting the need for accurate color management and simple vector paths when appropriate.
Prepare the print file with margins, bleeds, and appropriate scaling, then run test prints to check density and edge fidelity. Mirror or flip as required by your workflow, and inspect the transfer film for dust or imperfections that could transfer to the final product. If you’re looking for guidance, consult resources on how to apply uv dtf transfer to ensure alignment and readability, especially on curved or contoured substrates.
Application Workflow: Heat, Pressure, and Timing for Best Results
Application workflow covers heat, pressure, and timing. Place the printed transfer face-down on the substrate, cover with a protective sheet, and apply a calibrated heat press. Aim for a practical range around 315–330°F (157–166°C); however, always start with the manufacturer’s guidelines and adjust based on fabric type and adhesive used to optimize durable dtf heat settings and adhesion. The goal is even contact across the design to minimize edge lifting and color bleed.
Apply medium to firm pressure and maintain it for 12–15 seconds, then decide whether to perform a hot peel or cold peel based on your testing. A post-press cure can help secure bonding; consider a brief additional press at the same temperature. Throughout this stage, practice and documentation support consistent vibrancy and edge sharpness, delivering vibrant dtf transfer results across batches.
Post-Press Curing, Care, and Washing to Preserve Color
Post-press curing and initial care determine longevity. Allow the item to cool fully before handling to prevent shifting, then let the adhesive cure for 24–48 hours before washing. This waiting period is part of the uv dtf transfer care protocol, ensuring the layers fuse properly and reduce future cracking.
When washing is necessary, advise customers to turn garments inside out, use gentle cycles, and avoid high heat drying. Some uv dtf transfers tolerate standard washing, but following substrate-specific guidance extends durability and color richness. Store items away from direct sunlight and high humidity to preserve vibrancy and reduce premature fading.
Troubleshooting, Quality Control, and Continuous Improvement
Troubleshooting and quality control help you maintain predictable results. When color looks faded or uneven, verify print density, ICC profiles, and color calibration; reprint if needed with adjusted density or color profiles. This stage aligns with the uv dtf transfer guide’s emphasis on repeatable settings and careful inspection of the transfer film for dust or residue.
Common issues like peeling edges, cracking after washing, or ghosting often point to inconsistent heat, pressure, or substrate preparation. Revisit pre-press steps, substrate compatibility, and adhesive strength, and document the settings that work best for each fabric. Ongoing QA and process documentation enable you to deliver consistently high-quality results and scalable production, ensuring durable dtf heat settings remain effective across orders.
Frequently Asked Questions
What is uv dtf transfer and why is it highlighted in a uv dtf transfer guide?
UV DTF transfer uses UV-curable inks printed onto a transfer film, then heat-pressed to fabric or hard surfaces. The UV cure locks in color accuracy and sharp detail before final transfer, producing vibrant designs with durability. A uv dtf transfer guide helps you choose the right materials, settings, and troubleshooting steps to achieve repeatable, professional results.
How to apply uv dtf transfer: what are the essential steps from design prep to post-press care?
In a how to apply uv dtf transfer workflow, start with design prep and color management, then print on UV-curable film and pre-press the substrate. Align the transfer, apply heat and pressure (typical ranges) and follow the recommended dwell time. Finish with a post-press cure and test wash or care guidelines to ensure longevity.
What substrates work with uv dtf printing on fabric and how do you choose the best option?
UV dtf printing on fabric works with cotton, blends, and some polyesters, plus certain coated hard surfaces. Choose substrates based on compatibility with the adhesive and ink system, fabric weight, and intended end use. Always pre-press to remove moisture and test on a sample before full production.
What are durable dtf heat settings for uv dtf transfer, and how should you adjust for different fabrics?
Durable dtf heat settings for uv dtf transfer typically fall around 315–330°F (157–166°C) with medium to firm pressure and 12–15 seconds dwell time. Adjust within manufacturer guidelines based on fabric type, adhesive, and substrate, and consider a short post-press if needed to maximize adhesion.
How can you achieve vibrant dtf transfer results with a uv dtf transfer workflow on dark and light fabrics?
To achieve vibrant dtf transfer results, calibrate your color workflow with proper ICC profiles and perform test prints. For dark fabrics, use a white underbase or pre-press adjustments as needed, and ensure accurate color management to maintain brightness and detail across tones.
What common issues arise in the uv dtf printing on fabric workflow and how can troubleshooting improve results?
Common issues include faded color, edge peeling, and misalignment. Troubleshoot by verifying print density and color calibration, ensuring consistent heat and pressure, and checking substrate flatness. Following a structured uv dtf printing on fabric workflow helps improve reliability and repeatability across batches.
| Topic | Key Points |
|---|---|
| What is uv dtf transfer | Definition: UV-curable inks are printed onto a transfer film and heat-pressed onto a substrate; UV curing locks in color accuracy and sharp details before transfer, yielding bright color reproduction, smooth gradients, and a durable finish. |
| Why uv dtf transfer matters | Delivers vibrant colors, sharp detail, and durability suitable for multiple washes. Ideal for apparel, bags, phone cases, and other items where longevity and vibrancy are essential. |
| Key advantages & substrate choices | – Color latitude and vibrancy: sharp details and vivid hues on light and dark backgrounds – Durability: ink adheres securely with proper heat/pressure – Versatility: works on cotton, blends, polyesters, and certain hard surfaces – Faster production cycles: reduced drying time with UV curing – Consistency: repeatable color output across batches – Substrates: cotton, blends, polyesters, and select hard surfaces depending on system |
| Materials & equipment | – UV dtf printer or UV-compatible DTF setup with UV-curable inks – Transfer film designed for UV dtf and compatible adhesive – Heat press with precise temp control and even pressure – Heat-resistant tape, silicone sheets, and a Teflon/parchment sheet – Substrates that accept DTF (cotton, blends, poly blends, coated surfaces) – Pre-press equipment or mat to remove moisture – Design and RIP software for color management – Cleaning supplies for print path and film maintenance |
| Design prep & printing | – Artwork at high resolution (300 ppi or higher) with correct color profiles – Margins and bleed aligned to substrate shape/size – Print test swatches to verify color density and edge detail – Mirror/flip if required by printer/process; ensure text reads correctly post-transfer – Inspect transfer film for dust/debris to avoid flaws |
| Pre-press & substrate prep | – Pre-press garment/item for 3–5 seconds to remove moisture and flatten surface – Align transfer precisely; use light adhesive spray or positioning tape if needed – Check substrate compatibility; may require a protective barrier sheet or bonding layer – Maintain a moisture/dust-free workspace to prevent impressions |
| Applying process (heat, pressure, timing) | – Place transfer film printed side down; ensure carrier sheet is smooth – Cover with silicone sheet or parchment for protection and even heat – Heat around 315–330°F (157–166°C) depending on adhesive/fabric and guidelines – Apply medium to firm even pressure across the design – Time: typically 12–15 seconds; follow tested protocol – Peel method: hot or cold peel depending on design; test to determine optimal method – Post-press (2–5 seconds) if needed to secure bond |
| Post-press care & curing | – Allow to cool fully before handling – Avoid washing for 24–48 hours to let adhesive set – For washing: turn garments inside out, use gentle cycles, avoid high heat drying – Store away from direct sunlight and heat to preserve adhesive |
| Troubleshooting & quick fixes | – Faded/uneven color: recheck density and color calibration; reprint if needed – Peeling edges: ensure consistent heat/pressure and proper substrate prep; adjust dwell time – Cracking/peeling after washing: verify fabric compatibility and curing; consider alternative adhesive – Ghosting/misalignment: re-check artwork alignment, film tension, and substrate flatness |
| Durability tips | – Calibrate color management across screen, printer, and ICC profiles; perform test prints – Test substrates to verify compatibility and performance – Standardize temperatures, times, and pressures for consistency – Maintain cleanliness of heat press, films, and workspace – Document successful settings for repeatable results |
| Design considerations & use cases | – Text and fine lines: use high-resolution artwork; slightly bolder lines reduce loss – Color on dark fabrics: consider white underbase or pre-press to improve richness – Substrate versatility: test on fabrics and coated surfaces for durable results – Branding opportunities: suits apparel, bags, hats, phone cases, and more |
Summary
Conclusion: turning uv dtf transfer into reliable results requires a blend of art and engineering. By selecting the right substrates, preparing artwork meticulously, and mastering heat, pressure, and timing, you can achieve durable, vibrant designs that withstand daily wear and washing. Following these best-practice steps will reduce trial-and-error cycles, increase throughput, and help you grow a reliable line of products that showcase quality and creativity. Whether you’re new to uv dtf transfer or refining an established workflow, consistent processes and attention to detail are key to delivering exceptional vibrancy and durability.