
UV DTF Transfer blends the flexibility of Direct-to-Film with UV-curable inks to deliver vibrant, durable prints across a wide range of fabrics, from cotton tees to textured blends, with color fidelity that resists fading after repeated washings. This approach also expands your options beyond traditional UV DTF printing by enabling sharp details, smoother gradients, and rapid curing that keeps production moving on tight schedules. You’ll find DTF transfer design tips and practical steps that guide you from concept to application with clear, beginner-friendly guidance, while balancing artwork, color management, and substrate compatibility across common fabrics. From design to application steps, you’ll learn how to align designs, manage temperature and dwell time, apply powder if needed, and prevent color shifts that can ruin transfers on busy production days. When weighing UV DTF vs heat transfer, consider DTF curing and finishing requirements to achieve durable, wash-ready results and a finish that looks consistent across fabrics and washes.
In plain terms, the same idea is described using alternative labels such as UV-inks-on-film, film-based direct-to-substrate transfers, or a UV-curable print-and-press workflow. Practitioners may refer to it as UV-print-on-film, digital-to-film transfer, or a light-activated adhesion film process, all pointing to the same end result. Applying LSI principles, related topics such as color management, substrate compatibility, curing speed, powder handling, and post-press finishing are linked to improve search visibility while staying informative. By mapping these terms to your audience’s queries, you can create cohesive, web-ready guidance that supports beginners and pros alike without duplicating content.
Understanding UV DTF Transfer and Its Capabilities
The UV DTF Transfer method blends the flexibility of Direct-to-Film with UV-curable inks to produce vibrant, high-fidelity designs on a broad range of fabrics and surfaces. This approach, commonly referred to as UV DTF printing, offers sharp detail, a wide color gamut, and rapid curing that supports small-batch production and on-demand customization.
Because the inks cure quickly and bond well to many substrates, UV DTF Transfer can deliver professional results from cotton to blends and even some specialty materials. This capability makes it a versatile option for promotional textiles, apparel, and personalized gifts where color integrity and durability matter as much as speed.
UV DTF Transfer vs Heat Transfer: Pros, Cons, and Use Cases
When choosing between UV DTF Transfer and traditional heat transfer, it’s important to weigh color fidelity, durability, and substrate compatibility. UV DTF tends to yield sharper details and stronger adhesion across a wider range of fabrics, but may require careful powder handling and post-press finishing to maintain durability on highly stretchable materials.
UV DTF also shines in small-batch production and rapid prototyping, where you can iterate designs quickly without creating screens or dies. For projects with heavy texturing, gradients, or photographic imagery, UV DTF can provide a cleaner result compared to some heat-transfer methods, while still offering a practical workflow for beginners.
Design Principles for High-Impact UV DTF Transfers
Effective UV DTF transfers start with design decisions that respect the printing workflow. Aim for at least 300 DPI at the final print size to preserve crisp edges, and prefer vector artwork for logos and typography while rasterizing photos at high resolution to maintain detail. This aligns with general DTF transfer design tips, focusing on clean lines, smooth gradients, and controlled color separations.
Color management is essential: set up a color profile that matches the ink system and substrate, and anticipate potential shifts during curing and transfer. Consider the fabric type early—polyester, cotton, and blends interact differently with the adhesive and surface texture—so your design accounts for these interactions and reduces surprises during application.
From Design to Application: A Practical Step-by-Step Workflow for UV DTF Printing
Prepare the artwork and print file carefully, ensuring correct sizing for the garment, necessary bleed, and a color-managed workflow. If working with complex images, export at 300 DPI or higher and keep file sizes manageable to avoid printer slowdowns.
The next steps involve mirroring the design for transfer, printing on UV DTF film with recommended settings, and applying adhesive powder if your workflow requires it. By following a clear sequence—mirror, print, powder application, and curing—you establish a reliable DTF application steps framework that reduces misregistration and color shifts.
Curing, Finishing, and Caring for UV DTF Transfers
Curing and finishing are critical to durability. UV DTF inks cure rapidly, but powder application and a controlled cure help ensure uniform bonding and minimize texture or cracking on stretchy fabrics. Implement post-press finishing like a light cooldown period and optional protective topcoats to extend life and resilience.
Care and maintenance play a key role in long-term appearance. Advise customers to wash inside out in cold water, avoid aggressive detergents, and steer clear of high-heat drying to preserve color fidelity and adhesion. Proper post-press handling and optional protective finishes can significantly improve wash durability and overall wear resistance.
Troubleshooting, Quality Tips, and Common Pitfalls in UV DTF Printing
Common issues include misregistration, color shifts, and powder clumping after curing. These problems often relate to design alignment, substrate fit, or insufficient pre-press preparation, so addressing these areas aligns with solid DTF transfer design tips and preparation best practices.
To prevent errors, use test runs on similar substrates, calibrate the printer and heat press regularly, and verify mirroring, ghosting, and edge crispness before a full run. Following a structured approach to DTF application steps and staying mindful of curing and finishing nuances helps you avoid repeating mistakes and achieve consistent, high-quality UV DTF transfers.
Frequently Asked Questions
What is UV DTF Transfer and how does it work?
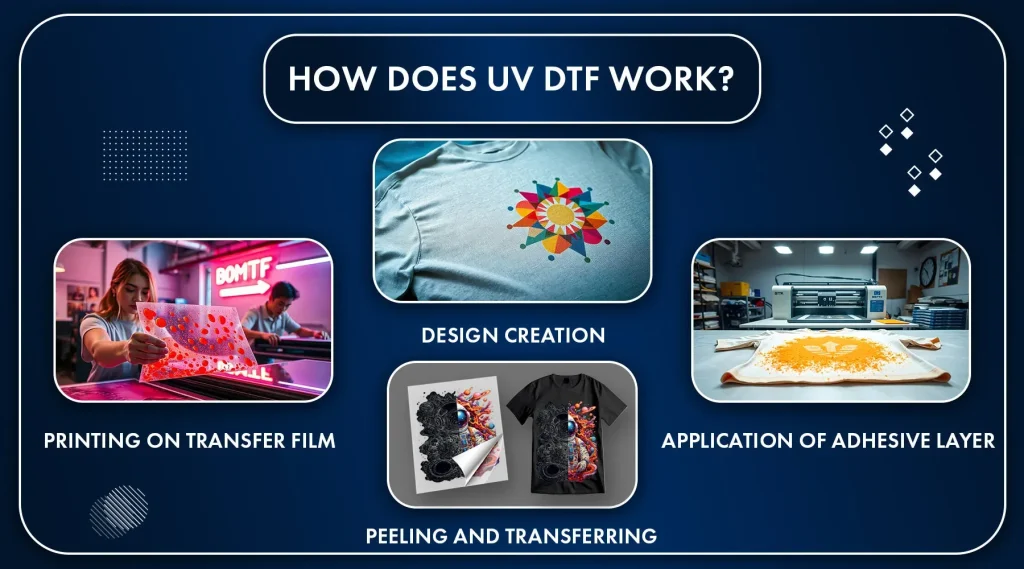
UV DTF Transfer is a variant of Direct-to-Film that prints designs on a transparent film using UV-curable inks and then bonds the film to the chosen substrate with heat and pressure. The UV-curing inks enable rapid cure times, sharp color fidelity, and strong adhesion across a wide range of fabrics, making it well suited for small-batch production and on-demand designs. In a typical workflow, you may still use adhesive powder and post-press finishing to ensure uniform bonding.
What are some DTF transfer design tips for UV DTF Transfer?
Key DTF transfer design tips for UV DTF Transfer include designing at 300 DPI or higher for crisp edges, using vector artwork for logos and typography, planning for mirroring since the image prints in reverse, managing color with ICC profiles, and avoiding extremely fine halftones or gradients that may not reproduce well on the film or fabric. Also consider substrate type and color management to minimize shifts during curing.
What are the essential DTF application steps for UV DTF Transfer?
DTF application steps for UV DTF Transfer typically follow these stages: 1) prepare the artwork with bleed and color management; 2) mirror the design for transfer; 3) print on UV DTF film with recommended printer settings; 4) apply adhesive powder if required; 5) cure the powder; 6) prepare the garment (clean, dry, flat); 7) align and heat-press at the recommended temperature, time, and pressure; 8) post-press finishing and cooldown; 9) care instructions for the finished product.
How does UV DTF Transfer compare to heat transfer in terms of durability and color fidelity?
UV DTF Transfer generally offers sharper details, a broader color gamut, and quicker curing with strong adhesion to many fabrics, often making it more durable for wash cycles and wear. Compared with traditional heat transfer, UV DTF is typically better for small runs, faster turnaround, and less noticeable texture, though finishing steps and powder handling can affect performance on very stretchable fabrics.
What should you know about DTF curing and finishing when using UV DTF Transfer?
DTF curing and finishing are critical for durable results. Cure or bake the adhesive powder as required, then perform a careful post-press finishing step such as cooldown, gentle handling, and optional topcoat to protect the print. Proper curing minimizes cracking, improves adhesion, and helps the transfer withstand washing.
What common mistakes affect UV DTF Transfer results related to DTF curing and finishing, and how can you avoid them?
Common mistakes include under- or over-curing, insufficient powder bonding, misalignment due to poor registration, and using unsuitable temperatures or pressing times for the fabric. To avoid these, test on similar substrates, verify mirroring, monitor powder application, and follow the adhesive and substrate guidelines for DTF curing and finishing, including post-press protection and proper washing care.
| Aspect | Key Points |
|---|---|
| What is UV DTF Transfer | Variant of Direct-to-Film using UV-curable inks; prints on a transparent film, then transferred to fabrics with heat and pressure; offers rapid cure times, high color fidelity, and strong adhesion. |
| Why use UV DTF Transfer | Vibrant colors, sharp details, and compatibility with many fabrics; well-suited for small-batch production, customization, and experimentation; provides durability wash after wash. |
| How it differs from other methods | Ink cures on the film before transfer, with heat/pressure bonding the design to the substrate. UV-curable inks tend to offer better detail and color gamut than traditional pigment inks; may require adhesive powder and post-press finishing; easier design iteration for small runs. |
| Design considerations | Aim for at least 300 DPI final resolution; vector art preferred for logos/typography; high-res raster for photos; plan for mirroring, color separation, ink limiting, and potential color shifts; manage color profiles and substrate interaction. |
| Step-by-step workflow | 1) Prepare artwork; 2) Mirror design; 3) Print on UV DTF film; 4) Apply adhesive powder if needed; 5) Cure powder; 6) Prepare garment; 7) Align transfer and heat press (typical 160–180°C for 10–20s); 8) Post-press finishing; 9) Care and maintenance. |
| Tips for better results | Keep files clean, use correct color profiles, test on similar substrates, handle film properly, calibrate equipment, and consider substrate limitations. |
| UV DTF Transfer vs Other Methods | Faster curing and sharper details with broad substrate adhesion; good for small-batch prototyping; may require powder handling and post-finishing; competitive with traditional heat transfer and screen printing on many fabrics. |
| Care and maintenance | Follow care guidelines: wash inside out, cold water, gentle detergents; avoid high-heat drying until adhesive fully cures. |
| Common questions | Suitable for dark fabrics with proper underbase; durability across many wash cycles; curing must be complete before washing. |
Summary
Table summarizes key points about UV DTF Transfer: its process, design considerations, workflow, tips, comparisons with other methods, care, and common questions.