
UV DTF transfer at home opens up a world of customization for apparel, bags, and decor, letting you design and apply vibrant visuals from your own workspace while maintaining control over every step from concept to finished piece, including choosing fabric types, color strategies, and safe handling practices. This project-friendly approach aligns with a practical DTF transfer tutorial that breaks down the process into design considerations, printing, curing, and precise transfer, so beginners feel confident while seasoned crafters can optimize efficiency. You’ll gain practical steps for how to apply DTF transfers, including alignment, pressure, peel strategies, and troubleshooting tips to prevent common misprints. When you opt for UV DTF printing at home, you benefit from rapid curing, vibrant color reproduction, and the freedom to prototype on a variety of fabrics without outsourcing. Key decisions about heat press settings for DTF and the broader practice of applying DTF transfers at home influence durability, wash-fastness, and edge clarity, so you’ll want to document your go-to temperatures, times, and pressure for each material.
In other terms, this home project relies on an in-house direct-to-film workflow that uses UV-curable inks on a transfer film to bind custom images to fabrics. Rather than relying on a single method, the approach aligns with terms like direct-to-film printing or DIY textile transfer, emphasizing precise curing and strong adhesion. Think of it as a digital-to-fabric printing technique where an adhesive-backed film carries your artwork from design to cloth through a controlled heat process. You’ll see LSIs such as ‘home-based garment printing,’ ‘DTF workflow,’ and ‘UV-ink transfer’ appear in tutorials, all pointing to the same concept from different semantic angles. As you compare equipment and materials, consider factors like fabric compatibility, press temperature, dwell time, and post-press care to broaden the topic across related terms while maintaining practical guidance.
UV DTF transfer at home: definition, benefits, and setup
A UV DTF transfer at home refers to creating a transfer using UV-cured inks on a film that is applied to fabrics with a heat press. The UV element speeds up curing and helps preserve color fidelity on a variety of fabrics, including blends and dark textiles. This approach lets crafters prototype, run small batches, and keep production within a single, controllable workspace. The result is a durable, high-visibility print that can resist washes when the process is followed correctly.
To get started, set up a safe, organized workspace with a clean surface, protective sheets, and a reliable heat press with adjustable temperature, time, and pressure. Ensure proper ventilation and use PPE when handling powders or inks, and store consumables in labeled containers. Establish a simple workflow with a dedicated station for printing, curing, and pressing to reduce errors and improve consistency.
DTF transfer tutorial: planning your project from design to print
Before printing, plan the project as you would in a complete DTF transfer tutorial. Decide on the design, determine the number of colors, and choose the correct image resolution to maintain detail on fabric. Use vector art for logos and text when possible to preserve sharp edges; for photos, aim for 300 dpi or higher to avoid pixelation.
Develop a color-management plan and run swatch tests to verify color density, adhesive behavior, and edge clarity. This is where you document settings and results so you can reproduce successful outcomes on future projects. Include a quick check for alignment, printer calibration, and film handling as part of your ‘DTF transfer tutorial’ workflow.
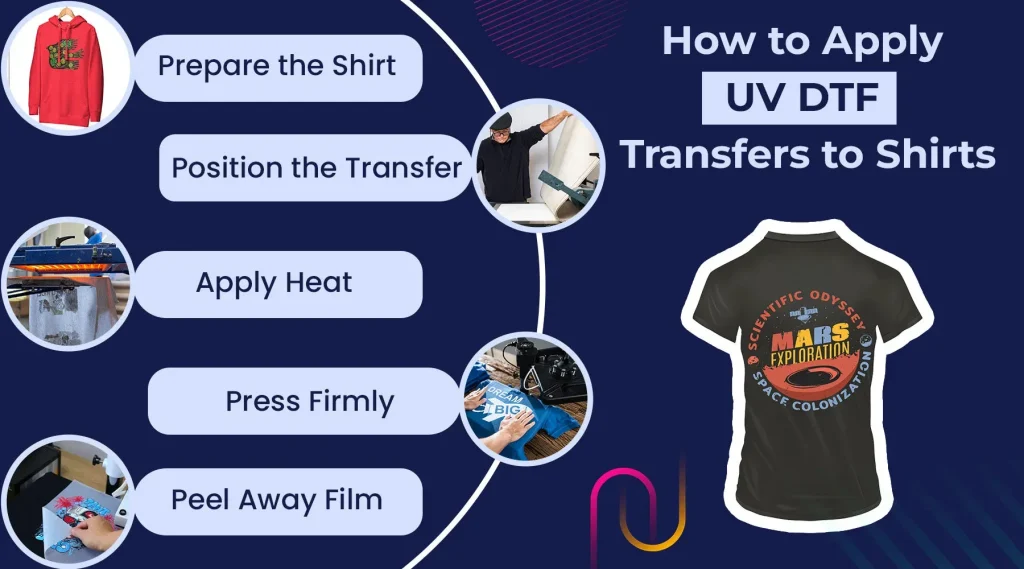
How to apply DTF transfers at home: alignment, curing, and pressing
Alignment is critical for a professional finish. Use a stable surface, clear marks, and alignment tools to position the design precisely, then pre-press the fabric for 5–10 seconds to remove moisture and reduce shifting. Confirm the print orientation and garment features (center seams, collar lines) before transferring.
During pressing, follow your material’s recommended time, temperature, and pressure; the fabric and adhesive may require adjustments. Apply a protective sheet so heat is distributed evenly and scorching is avoided, then press as directed. Peel the carrier warm or cold according to the adhesive guidelines and the transfer system you’re using, testing a sample to determine the best approach for future jobs. This step is a practical part of learning how to apply DTF transfers at home.
UV DTF printing at home: equipment, inks, and film selection
A UV DTF printing at home setup typically involves a UV-capable printer or a compatible workflow that can print onto the transfer film with proper inks and curing. Choose UV inks with a wide color gamut, strong adhesion, and fast cure times to maximize results on textiles. Select transfer films and adhesives that match your workflow and fabric goals, balancing thickness, tack, and wash resistance.
Consider film compatibility with your printer, the adhesive system, and the post-print cure method. Keep spare films and powder close at hand and maintain a clean, dust-free environment to avoid defects. A compact but well-organized space can handle multiple designs, provided you maintain consistent handling and curing practices.
Heat press settings for DTF: optimizing temperature, time, and pressure
Getting heat press settings right is essential for durability; start with a baseline like 320°F (160°C) for 12–15 seconds with medium to firm pressure, then adjust based on fabric weight and adhesive recommendations. Run a small test patch on a similar fabric to confirm color density and adhesion before committing to a final garment.
Consider factors such as fabric type, color underbase, and the press calibration when tuning your settings. Use a thermometer to verify actual platen temperature and adjust dwell time if needed. Always consult the adhesive and film manufacturer guidelines and document the exact temperature, time, and pressure you used so you can reproduce consistent results.
Applying DTF transfers at home: care, finishing, and troubleshooting
After pressing, allow the design to cool fully and avoid handling the area for a few minutes to let the bond set. If your design sits on a heavy or dense fabric, a light second press can reinforce adhesion without overheating the surface. Trim excess film or edges as needed to present a clean final product.
Care and troubleshooting cover washing guidance, drying methods, and potential issues such as color fade, peeling, or edge cracking. Wash inside-out in cold or warm water with a mild detergent, and avoid high heat on the printed area. If problems arise, revisit your test patches and adjust heat, time, pressure, or curing steps in your next project.
Frequently Asked Questions
What is UV DTF transfer at home and why choose it over traditional methods?
UV DTF transfer at home uses UV-cured inks on a transfer film to apply designs with a heat press. It offers sharp color, strong wash-fastness, and quick curing, making it ideal for home crafters. This approach aligns with common DTF transfer tutorials and can be done without outsourcing.
What tools and steps are needed for a successful UV DTF transfer at home workflow?
Key tools include a UV DTF printer or compatible workflow, transfer film and adhesive, carrier sheets, a heat press, and alignment tools. Steps follow a typical DTF transfer tutorial: design and print, cure the adhesive, align the transfer, and press before finishing.
What heat press settings for DTF should I start with for a UV DTF transfer at home?
A practical starting point is about 320°F (160°C) for 12–15 seconds with medium to firm pressure. Adjust times/temperature for fabric type and adhesive guidance, and run a test print to dial in the ideal heat press settings for DTF.
How do I apply DTF transfers at home on dark fabrics using UV DTF printing at home?
For dark fabrics, you may need a white underbase or rely on the UV inks’ opacity. Pre-press to remove moisture, carefully align the transfer, cover with a protective sheet, then press at the recommended settings. A warm peel often works best, followed by a brief cooldown.
What are common issues when performing UV DTF transfer at home, and how can I troubleshoot them?
Common problems include color fading, edge halos, misalignment, and peeling. Troubleshoot by verifying proper curing, ensuring even heat contact, checking adhesive coverage, re-checking alignment, and performing test prints to refine settings.
What post-press care tips help maintain a UV DTF transfer at home design’s longevity?
Allow a 24-hour cure before washing, then turn garments inside-out and wash on a gentle cycle with cold to warm water. Avoid high heat on printed areas and air-dry when possible to maximize life of the UV DTF transfer at home.
| Aspect | Key Points | Notes / Tips |
|---|---|---|
| What is UV DTF transfer at home? | Uses UV-curable inks and film; versatile across fabrics including dark textiles; rapid curing leads to durable color reproduction. | Ideal for on-demand customization in a home workspace. |
| Workflow overview | Design and print → cure and prepare → transfer and finish; UV-friendly workflow yields rapid curing and strong color retention. | Follow supplier guidelines; run small test prints on similar fabrics to verify color and adhesion. |
| Tools, space & safety | Printer/workflow for UV DTF, transfer film & adhesive powder, carrier sheets, heat press, cutting tools, blanks; space safety: clean area, PPE, ventilation. | Follow safety guidelines; handle powders carefully; protect workspace; ensure ventilation. |
| Preparing your design | Use vector files for logos/text; 300 dpi+ for photos; add cut lines if needed; plan color density and underbase considerations. | Test on fabric swatches; consider a white underbase if required by the workflow. |
| Printing and curing the transfer | Print on transfer film; apply adhesive powder; cure adhesive; remove excess powder. | Follow supplier settings; ensure complete cure; align film contact; remove loose powder carefully. |
| Aligning and pressing the transfer | Pre-press fabric 5–10 seconds; center the transfer; use protective sheet; heat around 320°F (160°C) for 12–15s with medium-high pressure; maintain even pressure; peel warm or cold per guidelines. | Do test presses on similar fabrics; ensure garment is flat and wrinkle-free. |
| Post-press care and finishing | Cool 2–5 minutes; inspect edges; optional second press for heavy fabrics; wait 24 hours before washing; turn inside-out; gentle wash. | Avoid high heat on printed area; follow care instructions to maximize longevity. |
| Troubleshooting common issues | Color fade/uneven color, peeling, ghosting, edge halos, or uneven coverage. | Check curing, pre-press, pressure, and film contact; run tests; adjust settings as needed. |
| Fabric and design tips | Light fabrics often appear more vibrant; dark fabrics may need a white underbase; test swatches to verify opacity; consider fabric blends. | Plan for fabric type and desired opacity; adjust accordingly. |
| Advanced tips for ongoing success | Invest in efficiency upgrades: silicone mats, pre-press stands; maintain routine, document settings for fabrics and transfers. | Keep a log of temperature, time, and pressure per fabric to reproduce results. |
Summary
UV DTF transfer at home opens a world of customizable, durable designs you can produce without outsourcing. This descriptive overview highlights the essential workflow—from designing and printing to curing, aligning, and heat pressing—plus practical tips for selecting tools, optimizing heat press settings, and troubleshooting common issues. By practicing and documenting your fabric-specific settings, crafters can achieve reliable results across light and dark textiles, expanding creative possibilities for apparel, bags, and decor. With a clean workspace, test patches, and adherence to manufacturer guidelines, UV DTF printing at home becomes a cost-effective and satisfying method for small runs and personal projects. As you refine your technique, you’ll gain confidence in reproducing consistent outcomes and adapting settings for different fabrics and design complexities.