
Sew on patches like a pro and you instantly elevate worn jackets, backpacks, and jeans into durable, personalized pieces. This guide covers how to sew patches on clothing, from prep to finish. Explore patch sewing techniques that balance speed and precision, such as edge finishes and secure backstitches. Learn when to use hand sewing patches versus machine sewing patches, and how iron-on vs sew-on patches compare. With the right tools, a plan, and practice, you’ll achieve clean edges, sturdy adhesion, and a professional look.
Beyond calling them patches, you can think of them as garment badges, fabric emblems, or decorative appliques that repair and personalize wear. In practice, securing these embellishments involves choosing between stitching methods, backing types, and finish options that mirror patch sewing techniques. The approach may include hand-stitched or machine-attached badges, with iron-on backs or sew-on finishes depending on fabric and desired durability. By framing the task as adding sturdy fabric accents rather than simple decoration, you align with semantic search signals that reward contextual relevance.
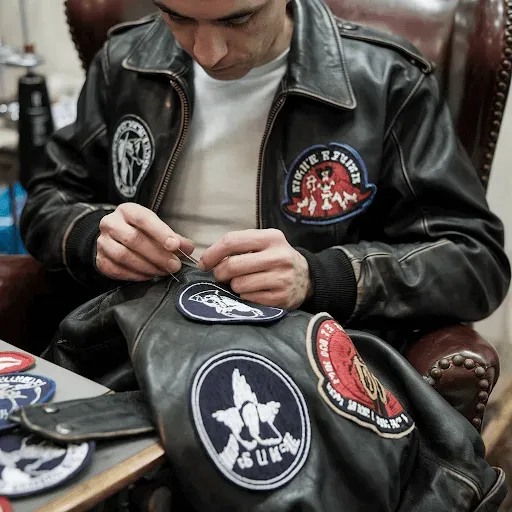
Sew on patches like a pro
If you’ve ever wondered how to sew patches on clothing, you’re about to unlock practical techniques that yield durable, professional-looking results. This guide helps you prepare, align, and stitch patches so edges stay crisp and your repairs withstand washing and wear.
Whether you’re practicing hand sewing patches or machine sewing patches, mastering edge finishes and tension makes the difference between a quick fix and a lasting upgrade. With patience and practice, you’ll sew on patches like a pro, achieving neat edges and secure attachments that look designed for the garment.
Iron-on vs sew-on patches: which method fits your fabric and lifestyle
Choosing between iron-on patches and sew-on patches starts with the fabric type and how the garment will be worn and washed. For sturdy denim or canvas, an iron-on patch can provide quick adhesion, while reinforcing the edge with machine sewing patches ensures durability.
Delicate fabrics may benefit from hand sewing patches or a careful combination of heat and stitching, because the longevity of iron-on backing can depend on movement and washing. Understanding iron-on vs sew-on patches helps you balance convenience with lasting adhesion, especially when you’re learning how to sew patches on clothing.
Hand sewing patches: essential techniques for durable edges
Hand sewing patches gives you control over curved edges and delicate fabrics. Core patch sewing techniques include backstitch, running stitch, and satin finish to create strong edges without bulk.
With practice, hand sewing patches becomes steady, anchored by secure knots and consistent spacing. This approach holds up to wear, washing, and repeated flexing on jackets, jeans, and bags.
Machine sewing patches: fast, durable results for denim and canvas
Machine sewing patches speeds the process while delivering uniform stitches that stand up to wear. Start with a suitable needle (universal or denim), a short stitch length, and guided edges to keep patches aligned.
A zigzag or satin edge around the patch locks the seam in place, adds a neat finish, and helps prevent fraying. Reinforcing corners with extra stitches reduces edge lifting after washing, making machine sewing patches ideal for sturdy fabrics.
Edge finishes and stitches for clean, lasting patches
Edge finishes determine whether a patch looks professionally attached or simply tacked on. Satin stitch, blanket stitch, and small zigzags provide clean borders that wear well over time.
Match the thread color to the patch and garment to hide the stitches, and consider top-stitching around the edge for added durability on frequent-wear items. A thoughtful edge finish can elevate patches from functional repairs to stylish accents.
Patch placement, care, and maintenance for long-lasting results
Proper placement starts with symmetry and planning; use pins or removable markers to position patches before you sew. Pre-washing garments helps prevent shrinkage from distorting patches later.
Care after patching matters: wash cold, inside-out, avoid high heat drying, and re-stitch worn edges as needed to extend life. Knowing how to sew patches on clothing and how to care for patched items keeps edges neat through many wears.
Frequently Asked Questions
How to sew on patches on clothing like a pro?
Whether you’re learning how to sew patches on clothing or upgrading a favorite piece, start with prep: select the patch type, pre-wash the garment, and position the patch where you want it. Decide between hand sewing patches or machine sewing patches, and test any iron-on adhesive on a hidden area. For durability, place the patch, then anchor it with a few stitches or a quick machine zigzag around the edge before your final stitching. If you use iron-on patches, apply heat as directed and then reinforce the edges with stitching for a pro finish.
What are patch sewing techniques for durable edges?
Durable edges come from the right patch sewing techniques. When hand sewing patches, use backstitch or satin stitch along the edge; when machine sewing, use a tight zigzag or satin stitch to secure the border. For curved edges or corners, take small stitches and pivot slowly, then reinforce with extra stitches at stress points.
When should I use hand sewing patches vs machine sewing patches?
Hand sewing patches is ideal for curved edges and delicate fabrics, giving you control over tension and edge finish. Machine sewing patches is faster on sturdy fabrics like denim or canvas and yields uniform stitching. You can also start with iron-on for quick adhesion and then sew around the edges for durability.
Iron-on patches vs sew-on patches: which option lasts longer?
Iron-on patches are quick but may loosen with washing or heavy use. For longevity, reinforce edges with hand or machine stitches after applying heat. If durability is key, sew-on patches provide the strongest attachment; use iron-on only as a backing or initial adhesion and always add stitching along the edge.
What tools and prep are essential when sewing patches like a pro, and how do they support patch sewing techniques?
Essential tools include patches (iron-on or sew-on), thread in a matching color, a suitable needle, sharp scissors, pins, fabric chalk, a thimble, and optional interfacing. Prep the garment by pre-washing, remove any backing, and plan patch placement with pins or light baste. Practice stitches on scrap fabric before working on the garment.
How do you finish patch edges for a clean, professional look when sewing patches like a pro?
Finish edges with methods such as running stitch, backstitch, satin stitch, or a narrow zigzag around the edge. Backstitch is strong at corners; satin or dense stitches conceal the border for a polished look. After sewing, trim tails and gently press to set the stitches.
| Topic | Key Points | Practical Tips |
|---|---|---|
| Goal and purpose of patches | Patches mend wear and express style; options include iron-on, sew-on, or heat-activated backing; edges affect finish and durability. | Plan patch placement with garment use in mind and choose edge finishes that suit the fabric and activity level. |
| Tools and materials | Patch types (iron-on, sew-on, heat-activated); thread (polyester or cotton); needles (sharp for woven, ballpoint for knits); scissors; pins or chalk; thimble; interfacing (optional). | Have a stable workspace and prep patches sized to cover the area with room for seam allowance; test iron-on adhesion first. |
| Preparing fabric and patch | Pre-wash garment to reduce future shrinkage; remove paper backing; test heat-activated backing; plan placement using pins or basting; check for interference from seams or buttons. | Mark symmetrical placement and consider reinforcing delicate fabrics with light interfacing. |
| Sewing approaches | Two main methods: hand-stitching for control and curved edges; machine sewing for speed and uniform stitches; practice on scrap fabric first. | Choose a stitch that secures the patch without excessive bulk; test tension before sewing the garment. |
| Edge finishes and stitch options | Common edges: running stitch, backstitch, satin stitch, blanket stitch or zigzag; machines often use zigzag or satin around the edge. | For durability, reinforce edges at corners and use the stitch that minimizes fraying on the fabric. |
| Iron-on patches: pros, cons, and technique | Iron-ons provide quick adhesion but may need extra stitching for longevity; layer with additional stitching along the edge. | Follow manufacturer’s heat guidance, test on a small area, use a protective cloth, and add stitches after heat to secure. |
| Hand sewing patches (practical method) | Anchor thread, edge-stitch or backstitch around the patch, use satin or dense edges for neat borders, monitor tension, finish with a knot inside. | Practice on scrap first; ensure stitches secure but not visibly bulky on the patch edge. |
| Machine sewing patches (practical method) | Use a universal or denim needle; set short stitch length (2.0–2.5 mm); sew with zigzag or satin around the edge; reinforce corners; trim tails and press. | Test on scrap fabric to dial in tension and stitch length before working on the garment. |
| Common mistakes and how to avoid them | Misalignment, bunched edges, loose edges after washing, and long thread tails; fix with careful placement, balanced tension, full edge coverage, and tail burial. | Always test on scrap fabric and re-check alignment after pressing before final finishing. |
| Advanced tips for durable patch work | Match thread to patch/garment, finish ends, consider top-stitching on wash-heavy garments, pivot slowly for curved patches, reinforce near seams. | Use extra stitches at stress points and combine methods (heat + hand/machine stitching) for longevity. |
| Patch placement ideas for style and function | Symmetrical pairs, grouped patches, mixed textures, and accent patches along frayed edges can define style and function. | Experiment with grouping, balance, and coverage to suit garment shape and movement. |
| Maintenance and care after patching | Wash inside out on gentle cycle cold; air-dry when possible; if tumble-drying, use low heat and remove promptly; periodically re-stitch wear areas. | Inspect patches regularly and re-stitch any edges showing wear to prolong life. |
| Choosing patch types for your project | Denim/heavy fabrics: sew-on patches with machine stitches; a backing can be ironed on. Delicate fabrics: hand-stitch with careful tension. Quick repairs: iron-on for speed, then reinforce. Aesthetic focus: consider satin or blanket stitches for design. | Align patch choice with fabric, wear, and wash frequency; plan for durability and appearance. |
Summary
Table summarizing the key points from the base content about sewing patches, including tools, techniques, care, and patch-type decisions.