
Patch Your Wardrobe is more than a quick fix; it’s a creative way to extend the life of your clothes while injecting personality. Whether you’re repairing a faded patch or adding a new accent, patches are a practical solution for everyday style. This guide highlights iron-on patches and sew-on patches, helping you choose the best method for your fabric and project. You’ll also explore DIY clothing repair tips and patch placement techniques to keep edges neat and durable. From denim jackets to backpacks, fabric patches offer a budget-friendly way to refresh garments and tell your story.
Seen from a broader angle, this topic is a wardrobe refresh powered by fabric adornments, from adhesive-backed appliques to durable stitched emblems. Think beyond the word patches and explore patchwork accents, sew-on badges, and quick DIY fixes that extend life and add personality. When you plan your project, consider heat-activated options versus hand-sewn embellishments, a common discussion in DIY clothing repair circles. LSI-friendly terms like fabric patches, patch placement techniques, and decorative embroidery connect this guide with related ideas and searches. Whether updating a denim jacket or a canvas bag, these approaches offer practical, stylish ways to wear favorites longer.
1) Patch Your Wardrobe: Choosing Between Iron-On and Sew-On Patches for DIY Clothing Repair
Patch Your Wardrobe begins with understanding the two main patching methods: iron-on patches and sew-on patches. Each option offers distinct benefits for DIY clothing repair, from speed and simplicity to durability and customization. By considering fabric type, patch size, and how often the item will be washed, you can select the approach that best fits your project and lifestyle.
In practice, iron-on patches are ideal for quick updates on fabrics that tolerate heat, making them great for beginners or for larger, speedy repairs. Sew-on patches, on the other hand, deliver long-lasting results on thick or textured fabrics and provide greater control over the finish. This subheading sets the stage for a practical decision by aligning your patching goals with the strengths of each method.
2) Iron-On Patches: Quick Coverage and Easy Application for DIY Clothing Repair
Iron-on patches offer a fast, budget-friendly solution for patching small holes or adding decorative accents. The heat-activated adhesive backing bonds to fabric when pressed with a hot iron, which makes this method especially appealing when time is limited or when you’re patching lightweight to medium-weight fabrics. In the realm of DIY clothing repair, iron-on patches empower you to transform items with minimal tools and skill.
When using iron-on patches, it helps to plan patch placement carefully and to protect the fabric with a pressing cloth. While this method is convenient, you should be mindful of fabric compatibility and the adhesive’s durability in high-wear areas. For best results, consider reinforcing with a light stitch after cooling, which adds an extra layer of security without sacrificing the patch’s appearance.
3) Sew-On Patches: Durable, Versatile, and Great for Thick Fabrics
Sew-on patches excel where durability matters. By stitching around the edges, you secure patches onto denim, canvas, or other heavy fabrics with resilience that outlasts typical iron-on bonds. This method aligns well with more serious DIY clothing repair goals, offering a cleaner finish and easier maintenance over time. Sew-on patches also accommodate irregular shapes and textured surfaces, expanding your patching possibilities.
A practical approach to sew-on patches involves selecting thread that matches the patch border or garment color, aligning edges carefully, and choosing a stitching technique that suits the fabric. Common options include tight backstitch, zigzag, or satin stitches around the border. The result is a durable attachment that can be repaired or re-sewn if edges begin to loosen, making sew-on patches a preferred choice for long-lived garments.
4) Patch Placement Techniques: Positioning for Style and Longevity
Patch placement techniques combine aesthetics with performance. Start by marking clean, flat areas and avoiding folds where patches might lift. For jackets, backpacks, or bags, consider symmetrical layouts or deliberate clusters to create a focal point. Using baste stitches or pins during layout helps keep patches flat while you work, ensuring a professional finish.
Layering and spacing are key to a cohesive look. Overlapping patches can create a bohemian vibe, while spaced, thematically linked patches tell a story. Whether you’re using iron-on or sew-on patches, the placement strategy should support both durability and visual appeal, reducing the risk of edges catching on objects or tearing loose during wear.
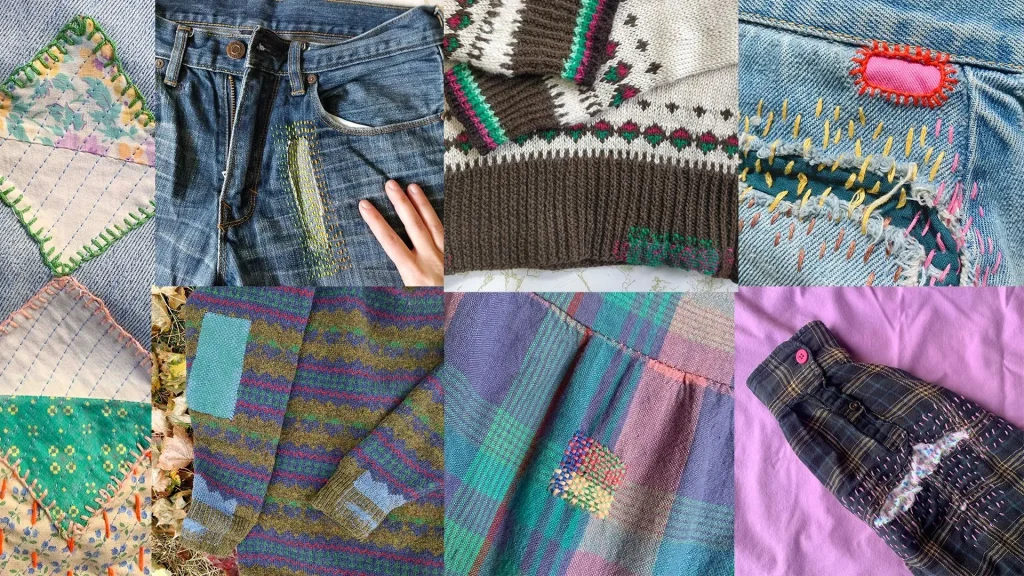
5) Fabric Patches and Design Ideas: Creative Clustering and Thematic Patches
Fabric patches open up a world of design possibilities for revitalizing old pieces. Grouping several patches of similar color families or motifs (nature, travel, music) can tell a visual story on a single garment. Mixing patch materials—fabric patches with occasional leather or faux leather accents—adds texture and contrast to your Patch Your Wardrobe project.
Creative clustering also benefits from alternating patch sizes and shapes to avoid a flat, cookie-cutter effect. You can combine iron-on for quick patches with sew-on for the most used or statement pieces to maximize longevity. Thoughtful patch placement techniques and fabric choices enable you to craft unique, wearable art that stays stylish through countless washes.
6) Care, Maintenance, and Troubleshooting for Patches: Prolong Your Patch Your Wardrobe
Maintaining patches requires mindful washing and drying. Turn garments inside out and use gentle cycles to protect both fabric patches and the patch adhesive or stitching. Air-drying or using a low-heat setting helps extend life, especially for iron-on patches, while sew-on patches benefit from regular inspection and occasional re-stitching when edges loosen.
When issues arise, troubleshoot with a systematic approach. If a patch isn’t sticking, re-check fabric compatibility and consider an extra layer of heat or a second row of stitches. Edges lifting after washing may signal the need to reinforce with sewing, while fraying edges can be addressed with tight zigzag stitches or a small binding. With careful care and timely maintenance, Patch Your Wardrobe can stay fresh, durable, and stylish for years.
Frequently Asked Questions
What is Patch Your Wardrobe and how can iron-on patches fit into it?
Patch Your Wardrobe is the idea of extending clothing life through practical DIY clothing repair and creative patching. Iron-on patches offer a fast, beginner-friendly option for fabric patches on compatible materials, making quick fixes easier, but heat tolerance and adhesive longevity vary by fabric.
In Patch Your Wardrobe projects, when should you choose iron-on patches versus sew-on patches?
For Patch Your Wardrobe, iron-on patches work best on fabrics that tolerate heat and when speed is a priority, while sew-on patches provide greater durability on thicker fabrics and high-wear areas—an important consideration for long-lasting DIY clothing repair.
How do you safely apply iron-on patches for Patch Your Wardrobe?
For Patch Your Wardrobe, follow a simple iron-on patch process: prepare the fabric (clean, dry, flat); position the patch and secure it with pins or tape; place a protective cloth over the patch; press with a hot iron (30–60 seconds, no steam); test adhesion and reapply if needed; optionally stitch around the edge after cooling for added durability; and finally wash only after the patch has fully cooled.
How can you apply sew-on patches in Patch Your Wardrobe to maximize durability?
In Patch Your Wardrobe, sew-on patches should be anchored with careful stitching: position and pin the patch; baste if needed for alignment; stitch around the edge using a backstitch or a tight zigzag/satin stitch; consider an edge finish like a blanket stitch or machine satin stitch; tie off securely, trim excess threads, and follow care tips to protect the patch during washing.
What patch placement techniques should you use in Patch Your Wardrobe to balance style and longevity?
Patch Your Wardrobe benefits from patch placement techniques like planning a cluster for bold impact, creating a cohesive theme by color or motif, mixing iron-on and sew-on patches for longevity, choosing varied patch materials for texture, and slightly overlapping patches for a casual, stylish layered look while ensuring edges are securely finished.
What maintenance tips help Patch Your Wardrobe patches last longer?
For Patch Your Wardrobe, maintain patches by washing inside out on a gentle cycle, avoiding high heat drying, air-drying when possible, inspecting edges regularly, re-sewing or re-adhering as needed, and avoiding direct heat on patches after washing to preserve the adhesive and stitching.
| Topic | Iron-On Patches | Sew-On Patches |
|---|---|---|
| Basics | Heat-activated adhesive backing; quick and convenient; ideal for fabrics that tolerate heat; faster results; not ideal for high-wear areas. | Requires stitching; durable; works on thick/textured fabrics; more control over finish; repairable and easily re-stitched. |
| Step-by-Step Guide |
|
|
| Choosing When to Use | – Fabric type: delicate knits or heat-sensitive fabrics may not suit iron-ons; denims, canvas, and cotton blends handle heat well. – Patch size/shape: large or irregular patches are often easier to sew for durability. – Location: high-motion areas benefit from sewing; decorative/low-stress patches can be ironed on. – Longevity goals: for years of wear or frequent washing, sewing edges provides more durability. |
– Fabric type: versatile across fabrics; stitching offers best durability on tough fabrics. – Patch size/shape: supports larger or irregular patches with strong edges. – Location: choose sewing for high-stress areas; iron-on for decorative placements. – Longevity goals: sewing around edges tends to last longer in regular wash cycles. |
| Patch Placement, Design Ideas, and Aesthetic Tips | – Plan patch clusters for a bold, collage-like effect. – Use a color family or motif to tell a story on a garment. – Mix methods: iron-on for quick coverage; sew-on for the most-used patches. – Consider patch materials (fabric, leather, faux leather) for texture and contrast. – Layer patches with slight overlaps for a casual, bohemian vibe, ensuring edges are secure. |
– Plan clusters and themes to create cohesive looks. – Use versatile materials to contrast textures with denim. – Layering and overlapping can add depth, with sewing reinforcing high-stress areas. – Balance decorative patches with durable, wear-prone patches for longevity. |
| Care, Maintenance, and Longevity | – Wash inside out on a gentle cycle; avoid high heat drying to extend patch life. – Air-dry patches if possible; use low heat to refresh adhesive when needed. – Regularly inspect edges and re-sew or re-adhere as needed. – For iron-on patches, avoid direct re-pressing after washing; reapply heat if bond weakens. |
– Sew-on patches hold up well to washing and drying when edges are securely stitched. – Consider a light wash cycle and avoiding high heat to protect threads and glue remnants. – Inspect and re-sew edges periodically for durability. |
| Troubleshooting Common Issues | – Patch not sticking after ironing: check fabric type and heat setting; use protective cloth and increase pressing time slightly. – Ensure patch is flat with no wrinkles under the surface. – Edges lifting after washing: add a second row of stitches or switch to sewing for durability. – Patch fraying: secure with a tight zigzag or whip stitch and consider binding to cover raw edges. |
– Edges lifting: reinforce with stitching; ensure tension and stitch type are appropriate. – Fraying: finish edges with a secure stitch or appliqué binding. – Patch not adhering: verify iron temperature, fabric compatibility, and use of a press cloth. |
| Practical Applications and Real-Life Ideas | – Clothing: patches on jeans, backpacks, hats, totes, sneakers; denim with leather patches for texture. – Patches on lightweight fabrics for subtle style accents. |
– Denim, canvas, heavy knits, and bags are ideal for durable sew-on patches. – Leather or faux leather patches add texture and contrast on denim or heavier fabrics. |
Summary
Conclusion: Patching is a fast, affordable way to breathe new life into your wardrobe while expressing your personal style. Whether you opt for the speed of iron-on patches or the lasting reliability of sew-on patches, the key is to prepare properly, choose the method that fits your fabric and usage, and finish with care that promotes longevity. By following the step-by-step guides for both iron-on and sew-on patches, you can Patch Your Wardrobe with confidence and transform ordinary pieces into standout favorites. The ultimate goal is to wear pieces you love longer, reduce waste, and enjoy a little DIY creativity with every stitch or press.