
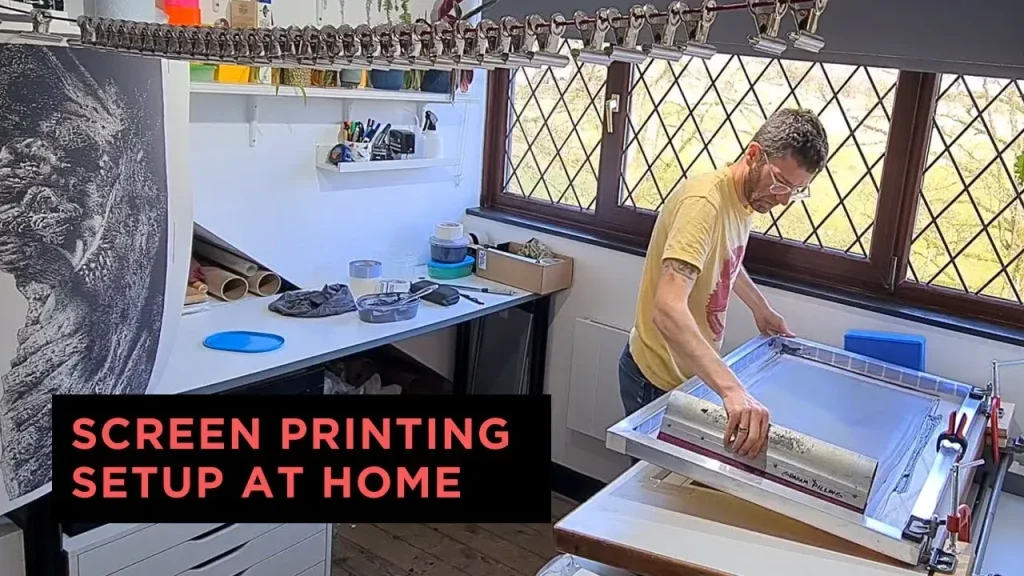
Home Screen Printing Studio Setup is more than a collection of tools; it’s a thoughtful design that supports consistent results and safe workflows. This approach blends screen printing workspace ideas with practical zoning to keep inks, screens, and fabrics moving smoothly. A well-planned space transforms a corner of a garage or spare room into a productive production area. Whether you’re pursuing at-home silk screen printing as a hobby or building a small business, organization and layout matter. This guide outlines a clear path with space-saving studio tips and a screen printing equipment list for home studio to help you get started.
Think of this venture as a small, home-based print shop rather than a bulky commercial studio, where each zone from design to drying is carefully mapped for flow. The terminology shifts to a home-based printing workspace, with emphasis on a practical layout that minimizes movement and dust, and on a DIY silk screening mindset that values repeatable steps. In a compact residence, you will still need a reliable press, screens with the right mesh, basic exposure equipment, a wash station, and a drying rack, but the emphasis is on efficient placement and multi-use surfaces. Ergonomics and ventilation become mental anchors: good lighting reduces eye strain, a height-adjustable table supports comfortable posture, and a fan or hood helps manage fumes in a small footprint. Organization and cleanliness underpin consistent results, so keep a simple, label-friendly storage system and a clear workflow diagram at hand. Embrace the idea of a space-saving, home-friendly design that scales as your projects grow.
Home Screen Printing Studio Setup: Foundations for a Productive Workshop
Creating a Home Screen Printing Studio Setup goes beyond grabbing a press; it’s about designing a functional space that supports consistent results, safe workflows, and scalable growth. This foundation is especially important for at-home silk screen printing, where compact spaces demand deliberate zoning and efficient use of every square foot.
A well-planned setup starts with goals—whether you’re printing as a hobby or building a small business—and translates those goals into a practical footprint. Emphasize home printing studio organization from day one, so inks, screens, and tools stay accessible yet controlled. This approach ensures your space remains productive as you expand and take on more complex projects.
Designing Around Your Goals: Aligning Print Type, Color Counts, and Space
When you design around your goals, you define which substrates you’ll print on, how many colors you typically run, and how often you’ll be printing. This clarity guides your space requirements, budget decisions, and the level of organization needed to maintain workflow efficiency in a home setup.
Whether you’re pursuing screen printing as a hobby or as a small business, plan for a layout that can scale. Consider zoning that minimizes switching costs between jobs and supports a streamlined process. The result is a clean, organized environment that aligns with screen printing workspace ideas while keeping the footprint compact and manageable.
Screen Printing Workspace Ideas and Zoning: Prep, Print, and Dry/Cure
Zoning your workspace reduces cross-contamination and speeds production. A practical setup typically includes three zones: prep (design, exposure, screens, and emulsion management), print (the press area with lighting and a benchtop for squeegees and ink), and dry/cure (a drying rack or dedicated area for curing). This zoning supports space-saving studio tips by encouraging vertical storage and modular layouts.
If you’re exploring screen printing workspace ideas, think about isolating each zone from dust, fumes, and traffic. A clean, organized space not only improves print quality but also boosts mood and consistency during long sessions. Wall-mounted shelves, vertical storage, and portable workstations help you reconfigure the room as projects change.
Effective zoning also enables you to adapt your home printing studio organization to evolving needs, ensuring you can scale without reorganizing the entire space each time.
Essential Equipment and a Practical Screen Printing Equipment List for Home Studio
The core of any Home Screen Printing Studio Setup is assembling the right mix of equipment and consumables. Start with the essentials and grow as your needs evolve. A practical approach includes a manual screen printing press, screens with appropriate mesh counts, an exposure unit, a washout sink, squeegees and flood bars, inks and emulsions, a drying rack, and sturdy work tables.
To support efficient at-home silk screen printing, also plan for ventilation, protective gear, and a sensible storage scheme for inks, cleaners, and emulsions. As you expand, you’ll add more screens, color layers, and specialty emulsions, but the ultimate goal is a reliable, repeatable workflow rather than a cluttered, impromptu setup. This aligns with building a comprehensive screen printing equipment list for home studio that scales with your ambitions.
A thoughtful equipment foundation reduces setup time between jobs and makes onboarding helpers easier, which is especially valuable for home printing studio organization as your operation grows.
Workspace Organization: Storage, Cleanliness, and Accessibility
Organization is a blueprint for productive work. A clean, organized space protects equipment, minimizes waste, and speeds production. Implement home printing studio organization strategies such as labeled, stackable bins for inks and tools, wall-mounted cabinets, and pegboards for frequently used items.
Create dedicated containers for emulsions and cleaners with tightly sealed lids to reduce fumes and contamination. Maintain a regular cleaning routine for screens, squeegees, and work surfaces, and place a small parts tray at the station to prevent misplacing fasteners. A simple workflow diagram near the work area helps everyone follow the print steps, color changes, and washout routines, reinforcing efficient practices.
Vertical and wall-mounted storage often delivers the biggest gains for space-saving studio tips. A compact drying rack mounted above the printing area can free floor space for additional tables or a small workbench, supporting both home printing studio organization and flexible layouts.
Workflow Optimization, Lighting, and Ergonomics for Consistent Quality
A well-defined workflow reduces guesswork and improves consistency from design through print and cure. Start with pre-production steps, separate colors, and prepare screens before moving to setup, alignment, and testing. Document color sequences to reproduce successful jobs later, and aim for repeatable steps that boost throughput without sacrificing quality.
Lighting and ergonomics play a critical role in print accuracy and comfort. Use a combination of bright ambient light and task lighting to minimize eye strain and spot misregistrations. Ergonomic improvements—such as a height-adjustable table, a comfortable chair, properly positioned ink containers, and a spill mat—pay dividends during long sessions and support space-saving studio tips by reducing awkward reach and clutter.
Frequently Asked Questions
What are the essential components of a Home Screen Printing Studio Setup, and how does the screen printing equipment list for home studio support starting projects?
Core gear includes a manual screen printing press, a few screens with appropriate mesh counts, an exposure unit, a washout sink, squeegees, inks, emulsions, and a drying rack. Add stable work tables and proper ventilation, then scale as needed. This setup aligns with a practical screen printing equipment list for home studio and helps you achieve consistent results from day one.
How can space-saving studio tips be applied to a small Home Screen Printing Studio Setup to maximize productivity without compromising safety?
Apply space-saving studio tips by creating three zones (prep, print, dry/cure), using vertical storage and wall-mounted shelves, and choosing modular, portable workstations. Keep essential items within arm’s reach and reconfigure the layout as jobs change. A compact, safe setup supports steady throughput in your Home Screen Printing Studio Setup.
What screen printing workspace ideas and zoning would you implement in your Home Screen Printing Studio Setup?
Use screen printing workspace ideas that emphasize clear zoning, good lighting, and ergonomic stations. In a Home Screen Printing Studio Setup, place the prep area away from dust, reserve the print area for the press and squeegees, and allocate dry/cure space with airflow. This layout minimizes movement and speeds production.
Which home printing studio organization practices help reduce clutter and improve throughput within a Home Screen Printing Studio Setup?
Begin with labeled, stackable bins, wall cabinets or pegboards, and dedicated containers for emulsions and cleaners. Maintain a simple workflow diagram and a regular cleaning routine to protect screens and keep tools accessible. A tidy space reduces waste and boosts throughput in your Home Screen Printing Studio Setup.
What does an at-home silk screen printing workflow look like in a Home Screen Printing Studio Setup, and how should ink and screen management be handled?
An at-home silk screen printing workflow typically follows design and color separation, screen preparation, setup and alignment, printing, and curing. Keep ink, screens, and cleaners organized during each stage and ensure a dedicated drying area to prevent smudges and delays. This structured flow supports quality and efficiency.
How should you plan and expand the screen printing equipment list for home studio growth within a Home Screen Printing Studio Setup?
Start with a basic screen printing equipment list for home studio: a sturdy press and a few screens, plus essential inks and emulsions. As you grow, add higher-mesh screens, a more capable exposure system, and better ventilation. This scalable approach fits your Home Screen Printing Studio Setup and enables you to tackle more complex projects over time.
| Area | Key Points | Practical Tips |
|---|---|---|
| Space Design & Goals | Design a functional space that supports consistent results, safe workflows, and scalable growth; plan for zones (art prep, printing, drying). | Define print types, expected color counts, and growth plans; allocate room for future expansion. |
| Zoning & Layout | Three main zones reduce cross-contamination and speed production: prep, print, dry/cure. | Assign dedicated areas; use modular, reconfigurable furniture; minimize dust transfer between zones. |
| Essential Equipment & Tools | Core gear: manual press, screens, exposure unit, washout, squeegees, inks, drying rack, sturdy tables, ventilation. | Start with core items and add as needed; prioritize reliability and expandability. |
| Storage & Organization | Labeled bins, cabinets/pegboards, dedicated containers for emulsions/cleaners, and a regular cleaning schedule. | Use vertical storage, wall-mounted shelves, and workflow diagrams to keep processes visible. |
| Process Flow | Define steps from design to cure: pre-production, setup, print, post-processing to maintain steady rhythm. | Finalize designs, separate colors, calibrate ink viscosity, and test with scraps. |
| Lighting & Ergonomics | Adequate lighting and ergonomic setup reduce eye strain and improve efficiency. | Use adjustable surfaces and seating; add spill mats and accessible tool placement. |
| Budgeting & Space Planning | Plan by priorities: sturdy press, essential ink/tools, controlled drying; aim for a compact footprint. | Prioritize core gear, then upgrade gradually; consider multi-use surfaces and modular components. |
| Safety, Maintenance & Sustainability | Manage solvents, disposal, PPE; perform regular maintenance; consider eco-friendly inks and cleaners. | Follow local waste regulations; keep tools clean; favor water-based inks where feasible. |
| Workflow Tips | Batch processing, careful color changes, documented sequences; maintain consistent tension and viscosity. | Document color sequences, test on scraps, and rehearse repeatable steps for complex runs. |
| Creative & Upgrading Mindset | At-home silk screen printing blends creativity with structured workflow to enable experimentation. | Use the organized setup to explore new designs and refine color separations while staying efficient. |
Summary
Conclusion: A well-planned Home Screen Printing Studio Setup transforms a small home space into a productive, scalable printing area. By designing clear zones, selecting essential equipment, organizing storage, and refining your workflow, you can achieve consistent quality and efficient production. This approach supports both hobby exploration and small-business growth, enabling you to scale as needed. Start with the basics, adopt space-saving strategies, and gradually upgrade your tools to build a home studio that delivers reliable, enjoyable results.