
DIY DTF transfers open a vibrant path to fabric embellishment, delivering bold color, durable adhesion, and creative flexibility for makers of all levels. As you explore possibilities, focus on the right mix of DTF tools to yield crisp designs, reliable color reproduction, and repeatable results across different fabrics. Understanding safety considerations and practical handling guidelines keeps you productive while protecting yourself, your workspace, and the projects you care about. A well chosen heat press with even heat distribution, a clean workstation, and compatible transfer film are essential for consistent results across runs. Starting with clean fabrics and recording your settings will help you build a repeatable workflow that balances speed, accuracy, and quality over time.
At-home direct-to-film printing offers a practical path to vibrant graphics on textiles, with the same core steps reinterpreted for a smaller workspace. A compact setup can include a reliable heat press, compatible film, and basic ink and powder supplies to reproduce designs with decent opacity on dark fabrics. Focus on precise alignment, proper curing of the adhesive powder, and consistent heat and pressure to lock in color and durability. As projects scale, refine your process with simple QA checks, organized storage, and safety habits that minimize dust and exposure.
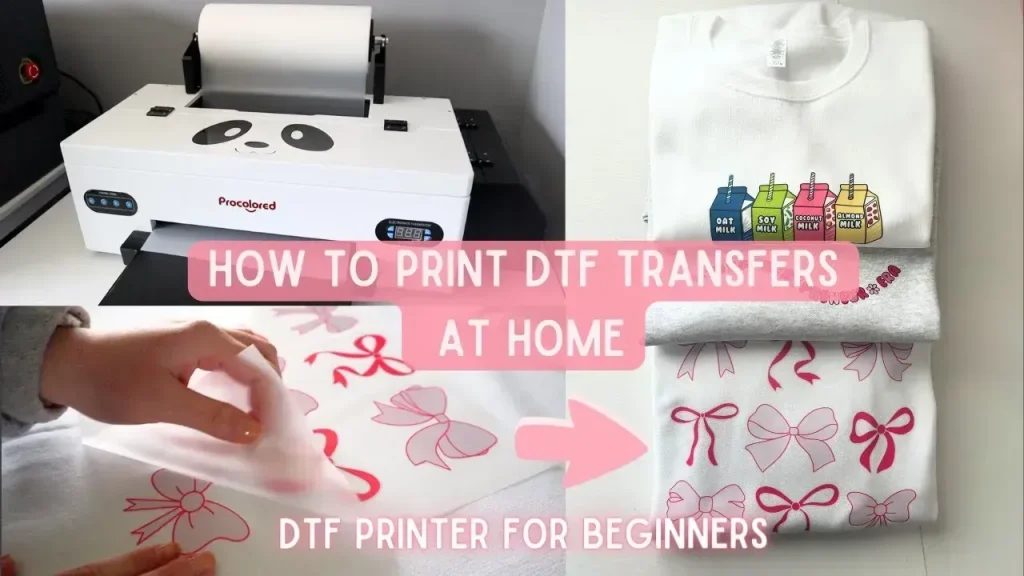
Getting Started with DIY DTF Transfers: Tools, Films, and Setup
Starting with DIY DTF transfers sets the foundation for vibrant, durable designs on a variety of fabrics. This subheading helps you map out a practical setup that aligns with the goals of creating crisp, professional-looking transfers at home or in a small workshop. By prioritizing a reliable toolkit and a clear workflow, you’ll reduce variables that can affect color accuracy and adhesion.
In practice, you’ll want to assemble the core components: a heat press with adjustable temperature and pressure, a DTF printer or a compatible inkjet setup, DTF transfer film, and a white underlayer compatible with your film. Adding adhesive powder, curing tools, and protective sheets completes the essential kit. This foundation supports smooth operation and consistent results when executing DTF transfers as part of your creative workflow.
DTF Materials and Films: Choosing Quality Transfer Film and White Layer
The choice of DTF materials directly influences color vibrancy, opacity, and the overall feel of the final product. Selecting a high-quality transfer film with good release properties helps ensure clean peeling and minimal residue on fabrics. Pair this with a reliable white layer to achieve bright, opaque colors on darker fabrics, reducing the presence of fabric color showing through.
When evaluating films and white-layer supplies, compatibility with your printer settings and the DTF process is crucial. Look for films that are designed for your printer type and for the white-ink underlayer that matches your design needs. Consistency in film quality and white-layer performance translates to more predictable transfers and fewer troubleshooting moments during production.
DTF Tools and Accessories for Consistent, High-Quality Prints
A well-rounded set of DTF tools helps you achieve even adhesion and precise design transfer. Essentials include a squeegee or spreader for even resin-like application, a powder shaker or sifter for uniform adhesive distribution, and a curing unit to properly fuse the powder before transfer. These tools are central to maintaining consistency across batches and reducing variations in color or texture.
Other important accessories include Teflon or silicone sheets to protect surfaces, lint-free cloths for cleaning, and PPE such as masks and safety glasses. Temperature and time meters provide an extra layer of control, helping you reproduce reliable results. Having these DTF tools on hand supports safer, cleaner operations while improving overall transfer quality.
Safety First: DTF Safety Tips and Heat Press Safety Protocols
Safety is foundational when working with powders, adhesives, and heated equipment. Implement practical DTF safety tips by ensuring proper ventilation and using a mask or respirator for handling adhesive powders. Safety glasses protect eyes from dust, and heat-resistant gloves reduce the risk of burns during pressing and handling hot components.
Establish clear protocols for material handling and equipment use. Keep powders sealed and away from open flames, store them in controlled conditions, and follow manufacturer temperature and pressure guidelines to prevent accidents. Emphasize heat press safety by using protective mats, avoiding placing objects on heating elements, and keeping the workspace clean to minimize contamination.
A Step-by-Step Workflow for DIY DTF Transfers
A clear workflow to reproduce high-quality DTF transfers starts with design, then printing, powder application, curing, and transferring to fabric. Begin by preparing your artwork and choosing appropriate color separations and garment sizing. This planning helps optimize outcomes when you move from design to the actual transfer.
The practical steps continue with printing on DTF film, applying adhesive powder while the print remains tacky, curing the powder to create a smooth surface, and preparing the fabric. Align and press the film with a protective cover in place, and finish by peeling at the right moment before allowing the garment to cool and performing a final press for durability. This workflow mirrors best practices for achieving consistent, professional results.
Common Issues, Troubleshooting, and Maintenance for Durable DTF Transfers
Even with careful work, occasional issues can arise. Ghosting or pale colors may indicate calibration problems or insufficient white underlay, while powder not adhering can point to inadequate curing or improper film tackiness. Address these by checking color calibration, ensuring proper curing temperature, and validating film quality before reprinting.
Ongoing maintenance keeps DTF transfers reliable over time. Regular cleaning of the heat press and work area, inspecting films and tools for wear, and storing powders in airtight containers minimize contamination and performance drops. Documenting successful settings for different fabrics helps you reproduce high-quality results and sustain production efficiency.
Frequently Asked Questions
What are DIY DTF transfers and what DTF tools and heat press settings do I need to get started?
DIY DTF transfers involve printing designs on a DTF transfer film with a white underlayer, applying adhesive powder, and heat pressing onto fabric. To start, gather essential DTF tools: a heat press with adjustable temperature, time, and pressure; a DTF printer or inkjet with DTF film; white layer materials; adhesive powder and curing tools; a curing unit or oven; a squeegee; protective sheets; lint-free cloths; PPE; and a thermometer and timer. Starting with a 12×15 inch or 15×20 inch press works well for many apparel projects.
What DTF materials should I choose for successful DIY DTF transfers, and how do I pick transfer film, white layer, and adhesive powder?
For reliable results, choose DTF materials with compatible transfer film that offers good release and a strong white layer for opacity on dark fabrics. Use adhesive powder suited for DTF and follow the supplier’s curing guidelines. Other key DTF materials include pre-washed fabrics, Teflon or silicone sheets, and the appropriate cleaning supplies. Always check compatibility between your film, white layer, and powders to ensure strong adhesion.
What are the key DTF safety tips when handling powders and heat during DIY DTF transfers?
Follow practical DTF safety tips to protect yourself and others: work in a well-ventilated area, wear a mask or respirator and safety glasses when handling powders, use heat-resistant gloves during pressing, store powders in sealed containers to avoid dust, and adhere to manufacturer temperature and pressure guidelines. Keep the workspace away from children and pets and clean surfaces after handling powders.
How can I ensure consistent results with DIY DTF transfers by calibrating my heat press and following DTF safety tips?
To achieve consistency, regularly calibrate your heat press for accurate temperature, time, and pressure. Test settings on sample fabrics, document successful parameters, and maintain the press for even heat distribution. Pair this with ongoing DTF safety tips such as proper ventilation, PPE use, and careful handling of powders and hot equipment for reliable results.
What common issues can arise with DIY DTF transfers and how do I troubleshoot them (e.g., powder adhesion, ghosting)?
Common issues include ghosting or pale colors from improper white underlayer or color calibration, powder not adhering if the film is not tacky or curing is off, a rough texture from excess powder, and peeling or cracking if heat or fabric compatibility is off. Troubleshoot by rechecking printer calibration, ensuring proper powder curing, adjusting temperature and pressure, verifying fabric compatibility, and testing on sample fabrics before larger runs.
How should I care for and maintain DIY DTF transfers to maximize longevity, including storage of DTF materials and powders?
After finishing, clean the heat press and work area, inspect films and tools for wear, and replace worn parts. Store DTF materials and powders in airtight containers in a cool, dry place, and keep spare films and powders on hand. Follow proper post-press finishing, wash garment care guidelines, and minimize abrasion to extend the durability of your DIY DTF transfers.
| Section | Key Points |
|---|---|
| Introduction | DTF transfers offer bold color, durability, and flexibility for artists, crafters, and small businesses. This guide covers essential tools, materials, and safety practices to start making DTF transfers at home or in a modest workshop. It emphasizes workflow, quality control, and best practices to help you succeed with DIY DTF transfers. |
| Essential Tools for DIY DTF Transfers |
|
| What Materials Do You Need |
|
| Safety First |
|
| Step-by-Step Guide |
|
| Tips for High-Quality DIY DTF Transfers |
|
| Common Issues & Troubleshooting |
|
| Maintenance & Care for Longevity |
|
Summary
The HTML-like table above summarizes the key points from the base content, covering essential tools, materials, safety practices, workflow steps, optimization tips, common issues, and maintenance for DIY DTF transfers.