
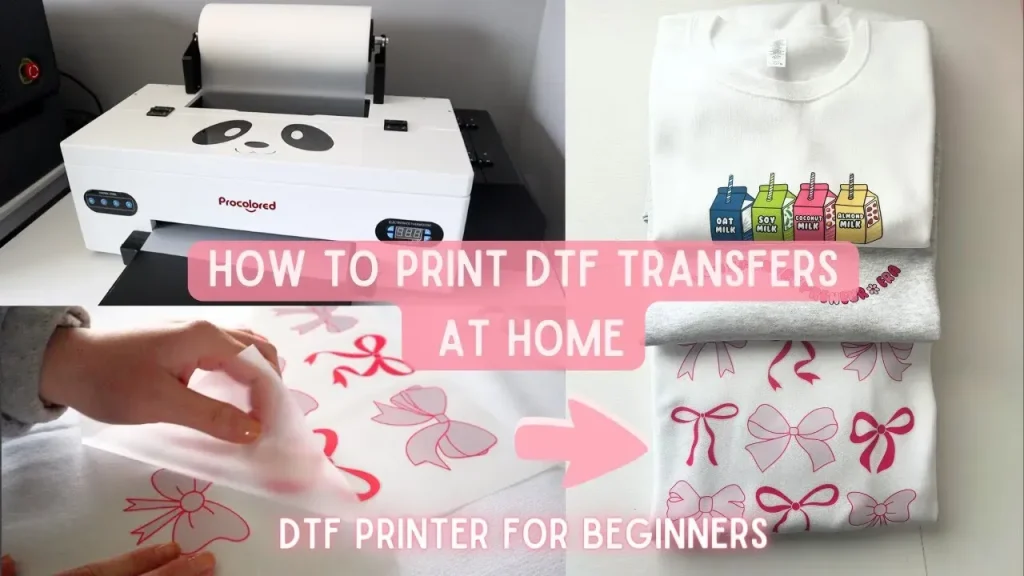
DIY DTF Printing at Home has opened up a world of creative possibilities for crafters, small-business makers, and DIY enthusiasts. Direct-to-fabric printing delivers vibrant designs on a wide range of fabrics with a soft hand and accurate color, and you’ll learn essential heat press tips for consistent results, including direct-to-fabric printing techniques. Whether you’re making tees, totes, or pillows for DIY fabric printing, a home workflow can deliver professional results without the overhead of a studio. This introductory guide outlines an end-to-end workflow—from selecting equipment and designing with color management to printing on DTF film, powdering, curing, and DTF transfer steps. With practical steps and troubleshooting pointers, you can build confidence and scale your DTF printing at home over time.
Seen from a home-based textile perspective, this approach is a form of on-demand garment decoration that couples digital-to-fabric transfer with a compact heat press setup. From an LSI-friendly angle, you can frame it as at-home fabric transfer, DIY textile printing, or personal-brand apparel crafting, all built on a workflow that emphasizes color management and fabric compatibility. This framing helps you apply the same principles to different fabrics and product lines, from T-shirts to cushions and home textiles, while prioritizing consistency, durability, and a soft finish.
DIY DTF Printing at Home: Setting Up Your Studio, Tools, and Workspace
A dedicated DIY DTF Printing at Home workspace sets the tone for consistency. Choose a clean, flat surface with good lighting and proper ventilation, and designate areas for printing, powdering, curing, and testing. A well-organized setup reduces misfeeds, cross-contamination, and workflow interruptions, making it easier to treat your home studio like a mini production floor.
Start with a baseline kit that balances cost with performance and fits your anticipated workload. The core components include a printer and inks (pigment-based or a dedicated DTF printer), DTF film and adhesive powder, a heat press or garment press, powder curing equipment, fabrics and test swatches, along with cleaning supplies, safety gear, and a ventilation solution. Proper storage and climate control for film and powder preserve quality and extend the life of your materials.
Essential Equipment for Direct-to-Fabric Printing: Printers, Films, and Powders
Your core equipment choices dictate color accuracy, adhesion, and durability in direct-to-fabric printing. Invest in a printer that is compatible with DTF film and maintains clean nozzle performance, and choose pigment-based inks or a dedicated DTF printer to ensure stable color reproduction. Stock DTF film and adhesive powder and keep them in a cool, dry place to maintain consistency across projects. A sturdy heat press with adjustable temperature, time, and pressure is essential for credible transfers, with a smaller desktop option available for compact setups.
Complementary gear matters too: curing equipment to set the powder, fabric swatches to test fabric behavior, lint-free cleaning supplies, nitrile gloves, and good ventilation. Build a dedicated workstation that supports flat, uncluttered film handling and easy access to your testing samples. Regularly testing on cotton and polyester fabrics helps you understand how each substrate responds to DIY fabric printing, influencing final color and texture.
Design and Color Management for Accurate DTF Transfers
Design and color management are the foundations of successful transfers in the DIY DTF Printing at Home workflow. Use high-resolution designs (300–600 dpi) and export to PNG with transparent areas or a white underbase as needed. For white fabrics, you may skip the underbase, but on darker fabrics, an underbase helps achieve vibrant color payoff. Working in an appropriate color space (often RGB for screen design) and converting to CMYK when your setup supports it helps maintain predictability in the final print.
Plan for white layers, translucency, gradients, and fine details. Large solid areas should be checked for banding, while fine lines benefit from higher resolution exports and reduced compression. Use layout margins and bleed guides so you can place multiple items on a single sheet without misalignment. Always run small test prints on the chosen fabric to adjust color balance, saturation, and contrast before committing to a full production run.
DTF Transfer Steps: From Film to Fabric with Precision
DTF transfer steps require careful sequencing to maximize adhesion and washfastness. Start with correct film loading and printer setup, ensuring the coated side faces ink and performing any required nozzle checks and head alignments. After printing, apply adhesive powder while the film remains warm, cure it according to the powder’s guidelines, and inspect for even coverage. Following these DTF transfer steps helps create a stable bond and consistent results in the final product.
Position the printed film ink-side-down on the fabric, cover with parchment or a heat-resistant sheet, and apply the press at around 160–170°C with medium to firm pressure for 15–20 seconds. Let the product cool briefly before peeling slowly in a uniform motion to avoid lifting ink. If your process requires a post-press cure, follow the recommended duration and temperature to further set the adhesive and improve washing performance.
Troubleshooting, Cures, and Post-Transfer Care for DIY Fabric Printing
Even with careful steps, issues can arise in DIY fabric printing. Color shifts, bleeding, misalignment, or ghosting can occur if ink hasn’t cured properly, the powder coverage is uneven, or heat/pressure is off. In a DIY DTF workflow, verify the powder type and application, confirm film alignment, and consider applying a white underbase on dark fabrics to minimize halos and color drift.
Post-transfer care and troubleshooting also cover wash testing and long-term durability. Regular maintenance includes cleaning the printer heads and film paths, storing film and powder away from light and moisture, and keeping a simple log of settings for different fabrics. Documenting your results helps you reproduce successful outcomes, reduces waste, and builds confidence in your DIY fabric printing results.
Safety, Maintenance, and Budgeting for a Sustainable DTF Printing Setup at Home
Safety always comes first in a home studio. Work in a well-ventilated area, use masks or respirators when handling powders, wear gloves when dealing with inks, and keep all chemicals out of reach of children and pets. Understanding ongoing costs—printer ink, film, adhesive powder, heat press upkeep, and curing equipment—helps you budget effectively for DIY DTF Printing at Home without compromising safety.
A sound maintenance routine supports long-term quality and cost efficiency. Regularly clean print heads according to manufacturer guidelines, check alignments, and inspect film surfaces for dust or moisture. As you scale, consider bulk purchases of film and powder and optimize your workflow to minimize waste. Build a small color profile library for common fabrics to maintain consistency across DIY fabric printing projects while protecting your equipment investment.
Frequently Asked Questions
What is DIY DTF Printing at Home and what equipment do I need for successful projects?
DIY DTF Printing at Home lets you create custom designs on fabrics using a compact, home-based workflow for direct-to-fabric printing. Essential gear includes a printer with pigment-based inks or a dedicated DTF printer, DTF film and adhesive powder, a heat press, powder curing equipment, test fabrics, safety gear, and a clean, well-ventilated workspace.
What are the fundamental DTF transfer steps for DIY DTF Printing at Home?
The core DTF transfer steps are: design and color management, printing the design on DTF film, powdering and curing the film, transferring the image to fabric with proper temperature and pressure, and post-transfer care or brief curing as recommended by the film and powder suppliers.
How can I achieve color accuracy in DIY DTF Printing at Home using direct-to-fabric printing?
To achieve color accuracy in direct-to-fabric printing, use high-resolution designs (300–600 dpi), export as PNG with transparent areas or a white underbase as needed, work in RGB for design and convert to CMYK if your workflow supports it, and run small test prints to calibrate color balance and saturation for each fabric.
What heat press tips should I follow for DIY fabric printing as part of DIY DTF Printing at Home?
Heat press tips include starting around 160–170°C with medium to firm pressure for 15–20 seconds, pre-pressing the fabric to remove moisture, using parchment paper between the film and platen, and using a slow, even peel after pressing. Adjust time, temperature, and pressure based on fabric weight and the powder you used for best adhesion.
What common issues can occur in DIY DTF Printing at Home and how do I troubleshoot them?
Common issues include color shifts, bleeding, halos, misalignment, cracking, and powder not adhering. Troubleshoot by validating curing time and temperature, ensuring even powder distribution, checking film alignment, performing test prints, cleaning the film surface, and verifying proper heat and pressure during transfer.
How should I care for fabrics after a DIY DTF Printing at Home transfer?
After a transfer, allow any cure time recommended by your materials, then wash fabrics inside-out in cold water with a mild detergent. Avoid high heat in washing and drying; air dry or tumble on low heat. Store prints away from light and moisture and follow any fabric-specific washfastness guidance from the film or powder manufacturer.
| Aspect | Key Points |
|---|---|
| Introduction | DIY DTF Printing at Home enables vibrant fabric transfers with a home workflow, suitable for crafters and small businesses; aims for professional results with accessible equipment and step-by-step guidance. |
| Equipment & Workspace | Baseline kit: printer and inks; DTF film and adhesive powder; heat press; powder curing equipment; fabrics and swatches; safety gear; a clean, well-lit, ventilated workspace. |
| Design & Color Management | High-res designs (300–600 dpi), export PNG; use appropriate color profiles (RGB for design, CMYK if supported); consider white underbase on dark fabrics; plan layouts and run test prints. |
| Printing Workflow | Film loading and alignment; color calibration with test strips; printing the design; let the film rest briefly before moving to powdering. |
| Powdering & Curing | Apply adhesive powder while film is warm; cure per powder guidelines (approx. 150–170°C); cool and prep for transfer; check even coverage. |
| Transfer to Fabric | Position ink-side down on fabric; use parchment; press around 160–170°C for 15–20 seconds; allow to cool and peel evenly; optional post-transfer cure. |
| Post-Transfer Care & Troubleshooting | Address color shifts, bleed, sticking, cracking; ensure ink set and underbase; verify film alignment; perform regular maintenance. |
| Maintenance, Safety & Budget | Ventilated work area; PPE for powders; routine printer maintenance; budget planning, bulk film/powder, fabric wash tests. |
| Best Practices | Document workflows, run test batches for new batches, build color profiles, protect materials, and aim for consistent, repeatable results. |
Summary
DIY DTF Printing at Home opens a world of creative possibilities for crafting custom apparel and textiles from your own workspace. By following a structured end-to-end workflow—from equipment setup and color management to printing on DTF film, powdering, curing, transferring to fabric, and post-transfer care—you can achieve professional-looking results while keeping costs manageable. Start with a simple, repeatable process, document your settings, and iterate as you gain experience with DTF printing at home. With practice, you’ll develop a dependable workflow that unlocks endless design opportunities while maintaining quality and minimizing waste.