
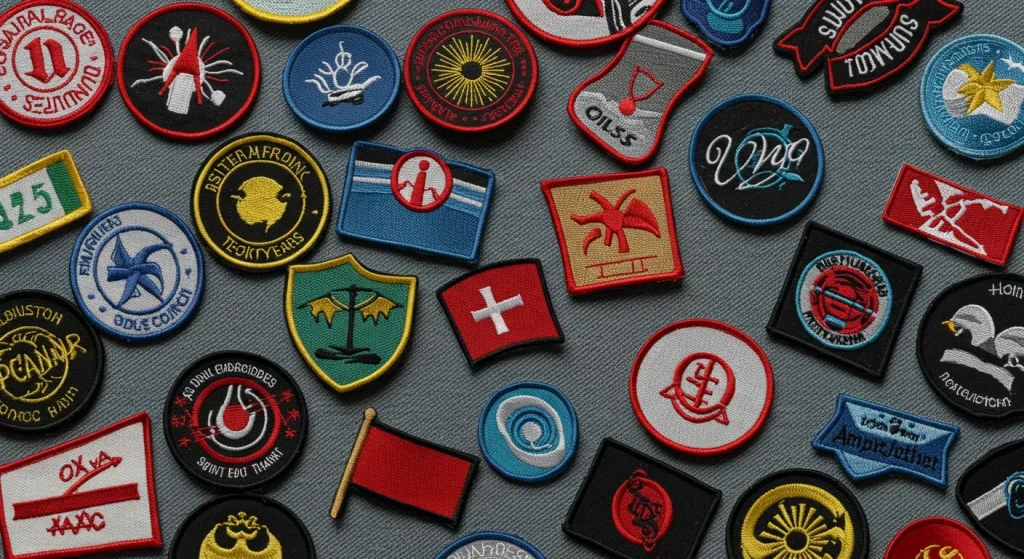
The Design Process for Custom Embroidered Patches blends storytelling with precise craft, turning a simple idea into a wearable badge. From the initial brief to the custom embroidered patches design process and embroidered patch design steps, this path aligns brand goals with production realities. A strong vector art for patches file is essential, giving clean edges and scalable stitching that stays sharp from sketch to stitch. Careful color planning and thread choices feed into the patch production process, ensuring durability and vibrant detail. By following embroidery design tips for patches, teams can communicate clearly with manufacturers, control costs, and achieve a premium finish.
Think of this journey in alternative terms: the patch design workflow that moves from concept art to production-ready files, ensuring that every stitch serves the brand story. In line with LSI principles, the discussion shifts from vector-based artwork to embroidery-ready assets, including stitch plans, thread palettes, and backing options. Framing the topic with related concepts such as branding, manufacturing feasibility, quality control, and durability helps readers understand how ideas become wearable patches.
Understanding the Brief in the Custom Embroidered Patches Design Process
Every successful patch project starts with a solid brief. Before a single stitch is placed, you should answer essential questions about the patch’s purpose, audience, application, size, and stylistic direction. Clarifying these details anchors the Design Process for Custom Embroidered Patches in reality, guiding decisions on backing, edge finish, and overall production considerations.
A clear brief also helps control costs and aligns expectations with designers and manufacturers. It sets ground rules for whether the patch will be bold and graphic or detailed and nuanced, and it informs choices around fabric compatibility, garment types, and potential color strategies. By outlining constraints early, you reduce revisions later in the embroidered patch design steps and keep the project moving smoothly.
From this foundation, teams can begin translating intent into sketches and, ultimately, vector art for patches that preserve the brand’s voice while staying practical for stitching and production.
Sketching and Concept Development for Patches
The journey from idea to embroidery begins with quick sketches. Quantity often beats quality at this stage, as rough silhouettes, multiple concepts, and varying edge shapes help you discover what translates best to stitch.
Focus on composition, focal points, and balance to ensure the final embroidery test yields productive results. Sketches should hint at how the patch will sit on fabric, how edge finishes might frame the design, and where key motifs will anchor the composition. This is the stage where the groundwork for the embroidered patch design steps is laid out.
Early sketches also serve as a collaborative touchpoint with stakeholders, easing communication before moving into vector art and stitch planning.
Digitizing and Vector Art: Turning Concepts into Stitch-Ready Artwork
Once a concept is chosen, digitizing brings it to life. A clean vector illustration ensures edges stay sharp and scalable, which is critical for a design that may be resized across product lines. During this phase, the sketch is converted into vector art and mapped to embroidery-friendly stitches, forming a precise stitch plan.
Key considerations include line weight, negative space, and how areas will be filled with satin, fill, or running stitches. A strong vector file makes color tweaks and size adjustments straightforward, supporting consistency across production runs. The vector art for patches is central to ensuring a repeatable, high-quality result.
This stage also answers practical questions about thread color mapping, stitch density, and how different elements interact when embroidered, all of which feed into the embroidered patch design steps for production.
Color Palettes, Thread Selection, and Finishing Touches
Color is a storytelling tool in embroidery. The right palette, aligned with garment color, patch size, and environment, can elevate a design from appealing to iconic. In the Design Process for Custom Embroidered Patches, designers typically compile a color sheet detailing thread brands, color codes, and Pantone equivalents to guide production.
Choosing thread colors that maintain vibrancy over time and under varied lighting is essential. This is also the moment to discuss finishing options, such as metallic threads or glow-in-the-dark elements, if those features align with the concept. Thoughtful color and finish decisions help ensure the final patch looks intentional and durable across wear and washing.
Color strategy also informs how edges and backing will interact with hues, influencing the overall perception of the patch as a brand asset.
Design Process for Custom Embroidered Patches: Prototyping, Sampling, and Production Readiness
When the vector art is approved, prototyping begins. A physical sample lets you evaluate how well the artwork translates to thread, how colors interact on real fabric, and how the patch sits on garments in motion.
Iterative sampling is common, with several rounds to refine stitch density, edge tightness, and backing compatibility. These iterations are essential for balancing aesthetics with durability and cost, and they pave the way for a successful patch production process.
Feedback from prototypes often leads to adjustments in stitch types, color choices, or backing. This stage emphasizes the importance of a clear stitch plan and a well-prepared production file to ensure consistency in high-volume runs.
Quality Control, Finalization, and Avoiding Common Pitfalls in Patch Projects
Quality control is the backbone of any dependable patch program. Each batch undergoes checks for color accuracy, edge finish, stitch density, and backing adhesion to catch issues before distribution.
Common pitfalls—such as overcomplicating designs for small patches, using too many thread colors, or neglecting fabric interactions—can derail production. To avoid these issues, keep designs streamlined for smaller sizes, limit color palettes, and provide clear color charts and stitched prototypes to the embroidery shop.
A robust finishing phase, including trimming, heat sealing, or hardware attachment, helps ensure patches look premium and stand up to repeated washing. By emphasizing a thorough quality control protocol, brands can reduce revisions and accelerate time-to-market while maintaining consistent, durable results.
Frequently Asked Questions
What is the Design Process for Custom Embroidered Patches and why does it start with a solid brief?
The Design Process for Custom Embroidered Patches begins with a clear brief because goals, audience, application, size, and style shape every decision. By answering questions about the patch’s purpose, where it will be worn, and preferred edge finishes, you set a concrete foundation for the embroidered patch design process. This upfront clarity guides the rest of the design process for custom embroidered patches and helps control costs and timelines.
What are the essential embroidered patch design steps in the design process for patches?
Key embroidered patch design steps include sketching concepts, selecting edge shapes, digitizing to vector art, choosing color palettes, deciding backing, and prototyping. Following these embroidered patch design steps helps translate ideas into stitch-ready files while keeping production realistic.
How does vector art for patches influence the embroidery design process?
Vector art for patches provides clean edges and scalable lines, enabling accurate stitch plans and consistent results in the embroidery design process. A strong vector file supports precise colors, stitch types, and easy tweaks during the Design Process for Custom Embroidered Patches.
What is involved in the patch production process after prototyping?
Production readiness involves applying the finalized vector art, color codes, and stitch plan to embroidery machines, maintaining color consistency across lots, and planning lead times and materials. This patch production process emphasizes repeatability so every patch matches the approved sample.
What embroidery design tips for patches help ensure a successful project?
Keep designs simple for smaller patches, limit colors to 4-6 when possible, test on actual fabrics, choose appropriate backing and edge finishes, and collaborate with a reputable embroidery partner who can advise on thread selection and quality control. These embroidery design tips for patches reduce revisions and improve durability.
How do color palettes and thread selection fit into the Design Process for Custom Embroidered Patches?
Color palettes and thread selection influence vibrancy, durability, and compatibility with garment colors. Designers compile a color sheet with thread brands, color codes, and Pantone equivalents to guide production within the Design Process for Custom Embroidered Patches and ensure consistency across batches.
| Stage | Key Points |
|---|---|
| Understanding the Brief | – Establish purpose, audience, application, size, style, backing, and edge finishn- Aligns design goals with production realitiesn- Sets the tone for the rest of the process |
| Sketching and Concept Development | – Generate multiple quick concepts; focus on shape, edge style, central motifsn- Identify strong concepts that translate well to stitch; aim for balance |
| Digitizing and Vector Art | – Convert chosen concept to vector art; ensure clean edges and scalable stitchingn- Create a stitch plan with colors and stitch types; facilitate color/size tweaks |
| Color Palettes and Thread Selection | – Consider garment color, patch size, environment; prepare color sheet with thread brands, codes, Pantone equivalentsn- Choose threads to maintain vibrancy; discuss finishing options (metallics, glow) if applicable |
| Backing, Edges, and Shape Considerations | – Backing options: iron-on, sew-on, Velcro; edge finishes: merrowed, hot cutn- Patch shape should align with brand identity; test edge finishes on prototype |
| Prototyping and Sampling | – Produce physical samples to evaluate translation, colors, fabric interactionn- Iterate; check stitch density, edge tightness, garment behavior |
| Production Readiness: The Patch Production Process | – Apply final vector art, color codes, stitch plan; plan for high-volume runsn- Confirm lead times, fabrics, adhesives; ensure repeatability across batch |
| Quality Control and Finishing | – Check color accuracy, edge finish, stitch density, backing adhesionn- Finish steps: trim backing, heat seal, attach hardware if needed; ensure durability |
| Common Pitfalls and How to Avoid Them | – Avoid overcomplication, too many colors, poor fabric interactionn- Keep designs simple; limit colors to 4-6; test on actual fabric; provide color chart and prototype; maintain clear timeline |
| Tips for a Successful Patch Project | – Start with a strong concept; use vector art; choose practical backing and edge finishn- Create a precise stitch plan with a balanced mix of satin, fill, and running stitchesn- Test with real fabrics and wear scenarios; work with a reputable embroidery partner |
Summary
Concluding Note: Use the above table as a concise reference to understand the main steps in the patch design process. The design and production journey is iterative and collaborative, ensuring patches are both visually compelling and durable.