
Choosing the right equipment is essential for success, and the best machines for 3D embroidered patches can make the difference between glossy depth and flat stitching. For hobbyists and studios alike, a best 3D embroidery machine with puff-capable features delivers the depth you want. A reliable 3D puff embroidery machine handles foam backing and stabilizers without sagging, keeping the puff consistent. The right embroidery patch making tools complement the machine by supporting foam backing, stabilizers for embroidered patches, and precise thread paths. Mastery of puff embroidery techniques, including density control and underlay, transforms simple designs into tactile, durable patches.
In other terms, think of this as assembling a complete embroidery system for dimensional patches rather than chasing a single gadget, because long-term success depends on a balanced toolkit. This approach links software, hardware, foam backings, stabilizers, and practical finishing steps so you can reliably reproduce raised appliques with consistent depth. From an LSI perspective, terms such as puff backing, stabilizers for embroidered patches, foam sheets, and stable hooping cluster around the same semantic field as 3D texture and dimensional logos. Manufacturers and studios alike prize equipment that offers reliable speeds, minimal bird-nesting, easy maintenance, and software that previews puff height before you stitch, reducing waste and rework. A practical toolkit also includes compatible stabilizers, foam thickness options, and a well-organized set of needles to match dense fills with fabric weight. Software compatibility and design previews help you simulate puff depth, sequence, and underlay, so your final patches meet expectations before you run a full production batch. Ultimately, the goal is a cohesive setup that harmonizes hardware capability, backing materials, and workflow efficiency to deliver eye-catching, durable patches at scale. Consider warranties, service networks, and training options as part of the investment to protect your workflow over time. By framing the purchase around related concepts like multi-needle capability, software ecosystems, stabilizers for embroidered patches, and puff embroidery techniques, you ensure a versatile, future-proof setup.
Understanding Puff Embroidery and 3D Patch Fundamentals
3D puff embroidery adds depth by placing foam or puff backing under dense stitches to create a raised patch that feels plush and tactile. A reliable 3D puff embroidery machine is central to consistent results, especially when you are scaling up. While hobbyists can start with a capable domestic machine, understanding the underlying puff techniques helps you choose equipment that fits your needs and budget.
Choosing the right hardware means prioritizing stable hooping, precise needle paths, and the ability to work with foam backing. When you can control stitch height, density, and backtracking, you avoid flat patches and ensure edges stay bold. Combine this with appropriate stabilizers for embroidered patches to maintain dimensional integrity across wear and wash.
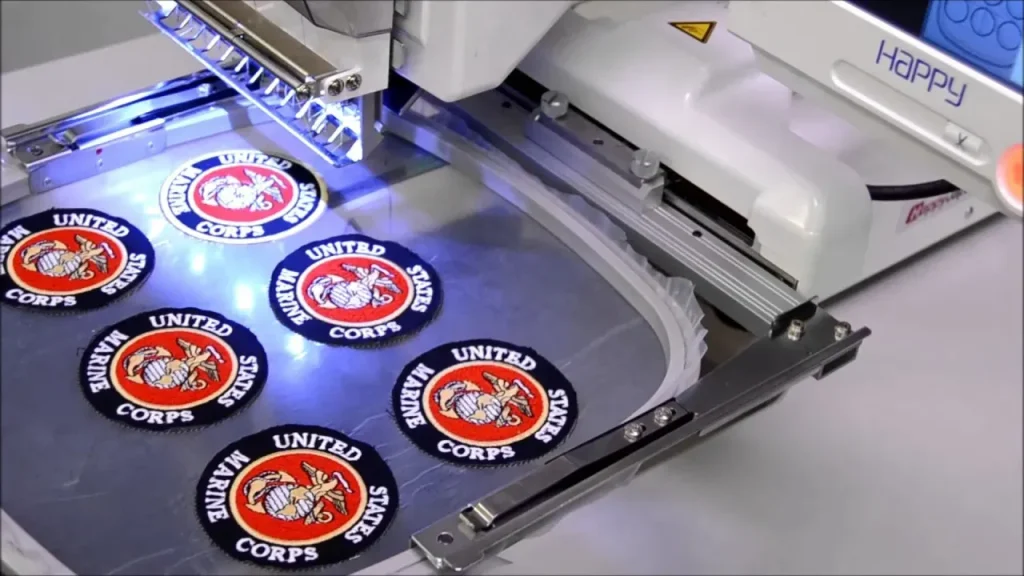
Domestic vs Commercial: best machines for 3D embroidered patches
Domestic, single- or multi-needle machines are ideal for small businesses or hobbyists who want to test puff embroidery on a manageable budget. They provide sufficient hoop space for small to medium patches and allow hands-on learning of puff depth. For 3D embroidered patches, these machines can demonstrate core puff techniques and help you validate designs before scaling up.
When demand grows, commercial multi-needle machines deliver speed, repeatability, and larger production capacity. Look for models with robust bobbin systems, stable frames, a range of hoops, and compatibility with software that can simulate puff depth before stitching. This is where embroidery patch making tools and streamlined workflows become essential for consistent output.
Embroidery Patch Making Tools: Must-Have Equipment for Precision
Beyond the machine, a thoughtful set of embroidery patch making tools ensures consistent outcomes. Core items include stabilizers for embroidered patches (cut-away and tear-away), foam backing in varying thicknesses, and spray adhesives to secure fabric during stitching. These tools work together with the machine to preserve puff height and edge definition.
Investing in sharp scissors, specialized embroidery needles designed for dense fills, and a quality thread stand helps you manage color changes and thread tension more reliably. When combined with well-chosen embroidery patch making tools, your workflow becomes easier and more predictable.
Stabilizers for Embroidered Patches: Foam, Cut-Away, Tear-Away, and Wash-Away
Stabilizers are the backbone of 3D patches. Foam backing sets the puff height, while a compatible stabilizer prevents distortion during stitching and after washing. The right pairing keeps the puff looking raised and even across different fabrics.
Use cut-away stabilizers for durability on woven fabrics, tear-away for lighter applications, and wash-away stabilizers for projects that will be washed frequently. Testing foam thickness with your stabilizer choice helps you predict final puff height and patch longevity.
Puff Embroidery Techniques: Achieving Depth, Texture, and Durability
To maximize depth, calibrate foam height and stitch density, then apply underlay stitches first to create a stable foundation. Puff embroidery techniques rely on controlled layering to keep the puff uniform and prevent fabric sag.
Color selection and thread types influence the look of the puff; high-contrast colors can emphasize edges, while metallic threads can add catches of light. Adjusting stitch direction and backtracking reduces gaps in dense fills and improves realism.
Software, File Prep, and Workflow for Consistent 3D Patches
Even the best machines for 3D embroidered patches depend on clean design files. Convert artwork to embroidery formats (DST, PES, EXP, JEF) and use software that lets you simulate puff depth before stitching. This step is part of smart embroidery patch making tools workflow.
Create a repeatable workflow from design to finishing: test stitches on scrap fabric, hoop with stable backing, monitor thread tension, trim stabilizers, and press patches after finishing. A standardized process reduces errors and speeds up production.
Frequently Asked Questions
What features define the best machines for 3D embroidered patches, and is a 3D puff embroidery machine essential?
Key features include 3D puff embroidery support, stable hooping, foam backing compatibility, adjustable stitch density, reliable threading, and software compatibility. A dedicated 3D puff embroidery machine can help achieve consistent height quickly, but many domestic machines with puff support can produce high-quality patches—evaluate your volume, patch sizes, and maintenance needs.
Should I start with domestic 3D embroidery machines or invest in commercial multi-needle machines for embroidery patch making tools?
For small runs or hobby projects, domestic 3D embroidery machines offer affordability and flexibility. For larger batches, commercial multi-needle machines boost throughput and reduce changeovers. Regardless of choice, ensure compatibility with stabilizers for embroidered patches and foam backing for puff effects.
What stabilizers for embroidered patches work best with puff embroidery techniques on the best machines for 3D embroidered patches?
Use cut-away stabilizers for dense fills and a foam backing to support puff height. Tear-away stabilizers simplify removal on lighter patches; wash-away stabilizers are useful for garments that require frequent washing. The machine should handle foam backing and stabilizers to preserve puff integrity.
How do puff embroidery techniques leverage foam backings and foam height when using a 3D puff embroidery machine?
Plan puff height and foam thickness before stitching, test on swatches, and calibrate foam height to the fabric weight. Use appropriate underlay and stitching order to ensure the puff remains even and durable across the patch.
What software and file preparation steps optimize production on the best machines for 3D embroidered patches?
Convert artwork to common embroidery formats (DST, PES, EXP, JEF) and simulate puff depth in your software. Align patch outlines, monitor stitch density and sequence, and verify hoop size compatibility before stitching to minimize surprises.
What workflow and maintenance tips help maximize efficiency when applying puff embroidery techniques to 3D patches with high-quality machines?
Adopt batch processing with standardized patch sizes, test different stabilizers and foams, and plan for regular maintenance. Keep spare needles, stabilizers, and backup parts on hand, and invest in operator training to reduce mis-stitches and downtime.
| Topic | Key Points |
|---|---|
| Purpose and Context |
|
| Core Machine Capabilities |
|
| Machine Types |
|
| Essential Features to Look For |
|
| Stabilizers and Foam |
|
| Puff Embroidery Basics |
|
| Software & File Prep |
|
| Workflow: Concept to Finished Patch |
|
| Cost, Maintenance & Optimization |
|
| Gear Selection Tips |
|