
3D embroidery stitches bring fabric to life with texture, depth, and tactile color. If you’ve ever wished your textiles could pop with dimensional light, you’re in the right place, because clear steps and practical tips will guide your stitching journey. This guide introduces core techniques that lift details off the surface with careful padding, choosing stitches, threads, and padding strategically to keep the fabric balanced. A practical approach, including a 3D embroidery tutorial, helps you build height through layering, shading, and secure backing for durable results. By the end, you’ll see how this approach elevates floral motifs, geometric shapes, landscapes, and other projects beyond flat stitching, giving you confidence to experiment.
In other words, this craft is about three-dimensional threadwork that builds volume through padding and layered stitching. Think of it as textile sculpture, where raised forms catch light and cast subtle shadows on the surface. LSI-friendly terms you may encounter include dimensional embroidery, padded satin techniques, sculptural stitching, and volumetric seam work. Beginners can start with a small motif, then experiment with different padding amounts, backing fabrics, and color shading to maintain structure. As you explore, seek tutorials and project ideas that emphasize texture, height, and color transitions to reinforce the semantic relationships behind the craft.
Understanding the Core: What Sets 3D Embroidery Stitches Apart
3D embroidery stitches transform flat fabric into a tactile landscape by layering padding, thread, and fabric. This is where 3D embroidered stitch techniques come to life, with raised embroidery stitches lifting details off the surface to create tactile highlights and subtle shadows. The result is a design that feels physically present, inviting the eye to roam across each dimensional contour.
Unlike traditional flat embroidery, 3D stitches intentionally build height and volume, mimicking natural textures such as petals, shells, or fur. The process relies on strategic layering, padding, and stitch selection to craft silhouettes that catch light and add depth, turning a simple motif into a living piece of textile art. Through this approach, you learn to balance height with smooth transitions that keep the composition cohesive.
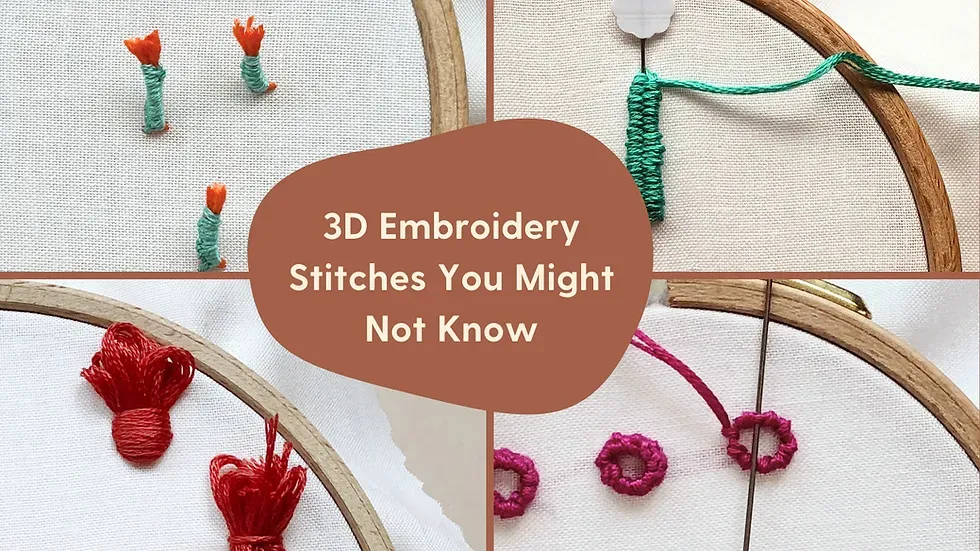
A Toolkit for 3D Embroidery: Essential Techniques and Stitches
A practical toolkit for 3D embroidery begins with core techniques such as raised embroidery stitches, padded satin stitch, bullion stitches, and French knots. These elements form the backbone of most dimensional projects and are frequently referenced in discussions of 3D embroidered stitch techniques.
Together, these methods unlock a spectrum of textures, from plush, rounded pads to springy central details. When you pair padding with satin, you can achieve satin stitch 3D embroidery effects that breathe with light. Integrating these stitches with careful tension and backing supports a durable, sculptural finish for a wide range of 3D embroidery projects.
From Practice to Petals: A Step-by-Step 3D Embroidery Tutorial for a Dimensional Flower
In this practical 3D embroidery tutorial, you’ll follow a step-by-step approach to create a dimensional flower that demonstrates height, texture, and shading. The guide emphasizes planning, padding placement, and the interplay of raised stitches to sculpt each petal so it seems to lift off the fabric.
The tutorial moves from simple base stitching to the purposeful use of padding, then to raised stitches that radiate outward, culminating with bullion or French knots at the center. By the end, you’ll have a tangible demonstration of how 3D embroidered stitch techniques combine to produce a vivid, flower-like form that can be applied to garments, accessories, or wall art.
Color and Layering: Using Shading to Build Depth in 3D Embroidery Projects
Depth in 3D embroidery comes not only from height but also from careful color layering. Light-to-dark shading creates the illusion of form and perspective, especially when you apply lighter highlights on the top layers and use deeper tones underneath. This approach is a natural companion to satin stitch and other 3D techniques, helping to simulate light interacting with curved surfaces.
In practice, layering color across padding and stitches enhances dimensionality, turning simple shapes into convincing objects. This is where the concept of 3D embroidery projects truly shines: you can experiment with color transitions, subtle tonal shifts, and selective highlights to craft a convincing sense of volume and realism that captures the viewer’s attention.
Materials, Stabilizers, and Finishing: Getting Durable 3D Effects
Choosing the right materials is essential for reliable 3D embroidery. Durable fabrics like linen or tightly woven cotton, plus a supportive stabilizer, help preserve the raised forms created by 3D embroidered stitch techniques. Padding options, such as thin batting or felt, provide the core height that makes the stitches pop.
Finishing is the last critical step: a careful press from the reverse side, appropriate washing, and proper securing of layers prevent distortion and flattening. With good padding, stable backing, and a thoughtful finishing routine, your 3D embroidered stitches remain durable and vibrant through handling and wear.
Inspiration Gallery: Creative 3D Embroidery Projects to Try Next
The world of 3D embroidery projects is rich with possibilities, from botanical motifs to whimsical creatures and geometric abstractions. Draw inspiration from the texture and layering you’ve learned, and imagine how raised embroidery stitches and padded forms can bring each motif to life.
Design patches, embellish home decor, or assemble a small wall piece that showcases height, color, and contrast. By exploring various heights, shapes, and color palettes, you’ll expand your repertoire of 3D embroidery projects and find unique ways to express texture and dimension in fabric art.
Frequently Asked Questions
What are 3D embroidered stitch techniques and how do they create texture beyond flat embroidery?
3D embroidered stitch techniques raise and layer stitches to add height by using padding, foam, or felt under the work. They often combine raised embroidery stitches with padded satin stitches to build texture, depth, and subtle light/shadow on the fabric.
How can I use raised embroidery stitches to add depth to a simple floral design?
Work with light padding under the petals and apply longer raised stitches to lift them from the base fabric. Use color shading to enhance depth and keep tension even for smooth, dimensional results.
What is a beginner-friendly 3D embroidery tutorial for creating a small dimensional flower?
A beginner-friendly 3D embroidery tutorial guides you through designing a simple motif, applying base stitches, adding padding, and finishing with raised stitches and a textured center.
Can satin stitch 3D embroidery be used in home projects, and how does padding influence the result?
Yes. Satin stitch 3D embroidery builds volume when backed with light padding, creating plush petals. Add extra satin passes as needed and pad lightly to maintain smooth curves.
What materials are ideal for starting 3D embroidery projects at home?
Choose stable fabrics like cotton or linen, light padding or batting, a soft stabilizer, embroidery floss, sharp needles, scissors, and a hoop or frame to keep stitches even—these basics support many 3D embroidery projects.
What common mistakes should I avoid in 3D embroidered stitch techniques to keep the design clean?
Avoid excessive padding, which can bulk the design; uneven tension that distorts the surface; and skipping finishing steps that stabilize texture. Practice on small motifs to build control.
| Topic | Key Points |
|---|---|
| What are 3D embroidery stitches? | Add height and texture by layering padding, fabrics, and stitches above the base fabric to create tactile, dimensional forms (e.g., petals, seeds, shells, fur). |
| How they differ from standard embroidery | Focus on height and depth rather than flat coverage; stitches lift off the surface to catch light, creating dimension and texture. |
| Core techniques | Raised embroidery stitches; padded satin stitch; bullion stitches and French knots; layering and color shading; stabilizers and padding options. |
| Tools and materials | Backing like felt/foam or soft stabilizer; fabric such as linen or cotton; padding (batting or felt); embroidery floss; needles; scissors; hoop or frame. |
| Tutorial overview (dimensional flower) | A simple project showing design, base stitching, padding under petals, raised stitches over padding, a dense center, and shading to heighten depth. |
| Practical tips for success | Start with a small motif; use light padding; choose stable fabric; plan a color gradient; use a hoop for even tension; secure padding well to avoid show-through. |
| Common mistakes to avoid | Too much padding; uneven stitching or tension; neglecting finishing touches like pressing and setting the texture. |
| Inspiration and project ideas | Create patches for clothing or bags; dimensional flowers and leaves for home decor; combine 3D elements with beads or metallic accents for added texture. |
| Care and finishing considerations | Finish with gentle pressing from the back; wash or spot-clean as needed; store away from heavy abrasion to preserve three-dimensional lift. |
Summary
3D embroidery stitches bring fabric to life by adding texture, height, and tactile depth. This approach builds dimensional forms by layering padding, fabric, and stitches above the base surface, suggesting petals, seeds, shells, or fur. The methods highlighted—raised embroidery stitches, padded satin stitch, bullion knots, and thoughtful color shading—offer a versatile toolkit for both beginners and experienced stitchers. Practically, you can start with a simple dimensional flower project that demonstrates how padding creates lift, how raised stitches catch light, and how a dense center anchors the composition. Success comes from using light padding, stable fabrics, and proper hooping, plus finishing touches like a gentle press to set texture. Whether you’re embellishing clothing, accessories, or home decor, 3D embroidery stitches invite creative exploration and can turn ordinary fabrics into tactile works of textile art.