
If you’re wondering how to start embroidery, you don’t need a fancy studio or years of experience—just a small starter kit, a handful of basic stitches, and a willingness to practice, plus simple routines that make progress feel tangible. This beginner-friendly guide highlights embroidery tools essential for beginners, from hoops and needles to sharp scissors, and explains how each item contributes to even tension, cleaner cuts, and a steadier line; additionally, learn how to test a hoop for proper tension, protect fabric from creases, and store tools to extend their life. You’ll also discover the basic embroidery stitches you’ll use most, plus starter projects that let you learn by doing and build confidence without overwhelm, while you gradually refine tension, alignment, and color planning. In addition, the guide shows how to pick comfortable lighting, a clean workspace, and color palettes, so your practice feels pleasant and consistent as you accumulate experience, with ergonomic tips to reduce fatigue. With steady effort, you’ll move from your first thread to your first finished piece, while enjoying beginner embroidery projects and easy embroidery ideas that match your pace and style, and you’ll start seeing your personal stitching voice emerge and your confidence grow.
From another angle, beginner-friendly needlework offers a warm, practical path to learning the ropes without overwhelm. Using alternative terms like starter stitching, hand embroidery basics, and thread-based projects helps frame the same journey in a way that aligns with Latent Semantic Indexing (LSI) principles. As you explore introductory stitches, fabrics, and hoops, you’ll see how the vocabulary shifts from cautious experimentation to confident, expressive handiwork. The goal is to translate curiosity into steady practice, creating small, personal pieces that reflect your interests while you expand your toolkit and design sense.
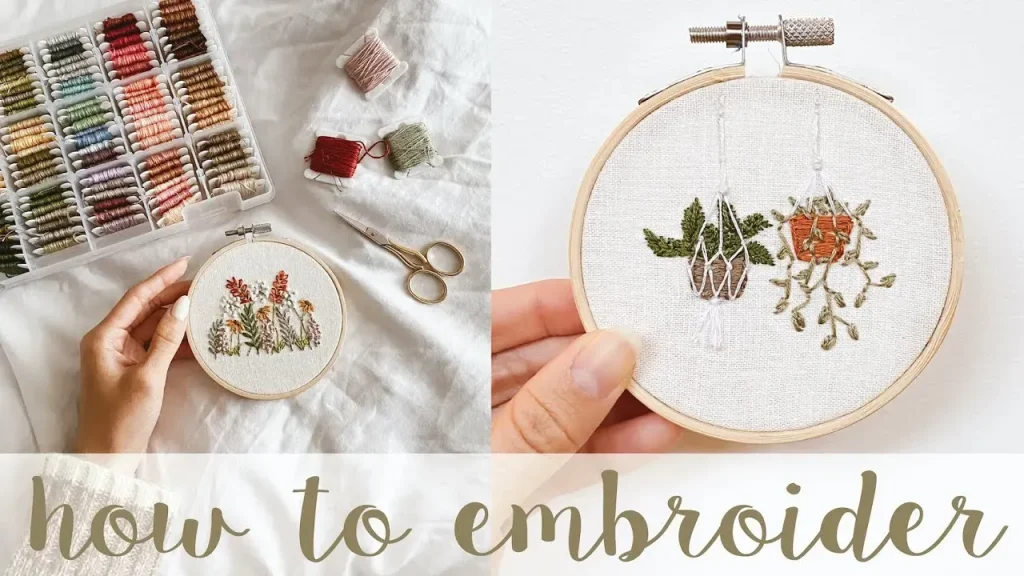
1) How to Start Embroidery: Tools, Workspace, and the Right Mindset
Starting embroidery is less about having perfect gear and more about setting up a simple, functional workspace and knowing which tools are essential. When you’re thinking about how to start embroidery, focus on a small, beginner-friendly kit that includes an embroidery hoop, sharp scissors, and a few embroidery needles. These embroidery tools essential items will help you experience steady progress from your very first stitches.
Create a calm, well-lit area where you can see your fabric clearly and keep threads organized. A tidy workspace reduces tangles and mistakes, making it easier to develop the careful hand motions that become second nature with practice. With this sensible setup, you’ll move from curiosity to confident stitching—one project at a time.
2) Master the Core: Basic Embroidery Stitches You’ll Use Most
The core of any embroidery practice lies in the basic embroidery stitches. By learning a dependable set—running stitch, backstitch, satin stitch, stem stitch, and a French knot—you’ll be equipped to outline, fill, and add little details to almost any design. Each stitch serves a distinct function, and mastering them builds a strong foundation for more complex patterns.
Practice these stitches on scraps first to understand how thread tension and fabric choice affect your line quality. As you gain confidence, you can combine stitches to create simple motifs or text, which is a great entry point for beginner embroidery projects. Consistent tension and even spacing will turn simple lines into polished designs.
3) Starter Projects: Easy Beginner Embroidery Projects to Build Confidence
Starting with easy beginner embroidery projects provides quick wins and tangible results. Consider a small hoop ornament with a single motif, a bookmark with a minimal border, or a tiny fabric patch that uses just 2–3 stitches. These beginner embroidery projects help you apply your new stitches without overwhelming you with complexity.
As you complete each project, reflect on what you enjoyed—color choices, stitch density, or how the design sits on the fabric. This reflection helps you identify your preferences and areas to improve while still delivering satisfying finished pieces. When you’re ready for more, you can explore easy embroidery ideas that expand your skill set without sacrificing fun.
4) Materials and Setup: Selecting Embroidery Tools Essential and Fabrics
Choosing the right materials makes a big difference in your learning curve. Start with even-weave fabrics like Aida, cotton lawn, or linen, which make stitches look neat and predictable. Pair these fabrics with a modest color palette so you can focus on mastering tension and spacing before getting adventurous with color blending.
In addition to fabric, assemble a few bobbins or cards to keep floss organized, and invest in a sturdy hoop or frame to maintain fabric tautness. Regular maintenance—cleaning hoops and scissors after sessions and storing floss properly—keeps your tools in top condition and reduces frustration as you tackle more complicated projects.
5) Troubleshooting the Stitches: Common Mistakes and Fixes
New embroiderers often run into tension and alignment issues. If your stitches pull the fabric or cause puckers, loosen the fabric slightly in the hoop and recheck your thread path. Practicing on scrap fabric can help you standardize stitch length and avoid uneven lines as you progress.
Other frequent snags include frayed threads and tangled floss, which slow you down. Use a sharp pair of scissors and thread the needle with smooth motions. Testing color combinations on a scrap before applying them to your main piece also helps you avoid unwanted surprises in your finished embroidery.
6) From First Stitches to Finished Pieces: Easy Embroidery Ideas and a One-Week Plan
With core techniques in hand, you can begin turning practice into real projects. The week-long plan introduces gentle challenges that reinforce what you’ve learned, while the included easy embroidery ideas keep motivation high. Each day focuses on a specific stitch or simple design so you can see progress quickly.
As you complete your daily sessions, broaden your scope to more elaborate motifs—like simple floral clusters or geometric borders—while still adhering to your comfortable pace. The combination of a structured plan and inspiring ideas will help you build a growing portfolio of finished pieces and a confident, enjoyable embroidery practice.
Frequently Asked Questions
How to start embroidery: what embroidery tools are essential for beginners?
Embroidery tools essential for beginners include an embroidery hoop or frame to keep fabric taut, sharp scissors for clean cuts, embroidery needles suited to your fabric, and six-strand embroidery floss. Choose even-weave fabric such as cotton or linen. A threader, needle organizer, and a marker pen are handy extras. With the right tools and a calm workspace, you’ll be on your way to learning how to start embroidery.
How to start embroidery: which basic embroidery stitches should I learn first?
Core stitches to learn first are running stitch, backstitch, satin stitch, stem stitch, and French knot. Practice on scrap fabric to get comfortable with tension and stitch length, and you’ll be ready to build more complex designs as you continue how to start embroidery.
How to start embroidery: what beginner embroidery projects are best to build confidence?
Beginner embroidery projects to build confidence include a small hoop ornament, a simple bookmark, a fabric tag or mini sampler, a napkin corner motif, or a decorative zipper pull. These beginner embroidery projects let you focus on one or two stitches at a time while gradually adding color and complexity.
How to start embroidery: where can I find easy embroidery ideas for beginners?
Easy embroidery ideas for beginners can be found by starting with simple motifs you love—leaves, hearts, or stars. Look for easy embroidery ideas that use few colors and a small stitched area, and gradually expand as you gain confidence.
How to start embroidery: how should I set up my workspace and choose fabric and floss?
Set up a well-lit workspace and choose fabric that’s easy to stitch, such as even-weave cotton or linen. Use a small color palette and organize floss to prevent tangling. Keep the fabric taut in a hoop and keep the embroidery tools essential (hoop, scissors, needles) within reach to support a smooth start.
How to start embroidery: what common mistakes should beginners avoid and how can I fix them quickly?
Common mistakes include tension problems (fabric puckers), uneven stitches, thread fraying or tangling, and color management issues. Fixes: loosen the fabric slightly in the hoop, practice with a stitch guide on scrap fabric, trim threads cleanly, and test your color palette on scrap before applying it to your project.
| Section | Key Points | Notes / Examples |
|---|---|---|
| Introduction | Embroidery is a timeless craft; beginner-friendly approach; start with a small kit, a few basic stitches, and practice; goal is to move from first thread to finished piece. | Audience: absolute beginners; guide covers tools, stitches, and simple projects. |
| Tools for Beginners | Starter tools include hoop/frame, scissors, embroidery needles, embroidery floss (six-strand cotton), and fabric (even-weave like Aida, cotton lawn, or linen). | Quality and simplicity matter; a calm workspace helps learning; optional extras: thimble, needle organizer, marker pen. |
| Basic Stitches | Running stitch, Backstitch, Satin stitch, Stem stitch, French knot. | Use these stitches to outline, fill, and add texture; practice tension and stitch length on scrap fabric. |
| Starter Projects | Small hoop ornament, bookmark, fabric tag or mini sampler, napkin/handkerchief motif, decorative zipper pull or pin accent. | Choose designs that reinforce 1–2 stitches at a time and allow color experiments. |
| One-Week Starter Plan | A practical 7-day plan focusing on core stitches and finishing a tiny project. | Day-by-day tasks: practice stitches, then build to a small project with color coordination. |
| Materials, Workspace, and Maintenance | Dedicated well-lit space; even-weave fabrics for easier stitching; color charts to track floss; keep tools clean and floss wound to prevent tangles. | Grain/weave considerations; store floss on bobbins/cards; regular tool maintenance. |
| Common Mistakes and Fixes | Tension problems, uneven stitches, thread fraying/tangling, and color mismanagement. | Loosen fabric in the hoop, practice on scrap, cut with sharp scissors, test color palettes first. |
| Advanced Tips and Growing Your Skillset | Explore longer-and-shorter fills, lazy daisy, colonial knots; gradually expand toolkit and consider embroidery as meditative or a small side business. | Progressively add techniques and fabrics to grow your designs. |
| Where to Go from Here | Easy embroidery ideas and projects that reflect personal interests; document progress; adapt designs to different scales and fabrics. | Build confidence by selecting patterns, threads, and fabrics that suit style. |
| Conclusion | A concise wrap-up of the guide’s core message. | Encourages practice, patience, and ongoing exploration of stitches and projects. |
Summary
For those curious about how to start embroidery, begin with a small starter kit, a few simple stitches, and the patience to practice. This journey blends creativity with a calm, focused rhythm as you learn to tension threads, master basic stitches, and complete tiny projects. Start by selecting a hoop, needles, floss, and fabric, then follow a simple, progressive plan—practice on scraps, try one-stitch-at-a-time projects, and gradually build up to more complex designs. With consistency and curiosity, you’ll transform a single thread into finished pieces you can be proud of.