
3D embroidered letters bring a tactile charm that flat fonts simply cannot match. This effect blends raised typography embroidery with fabric, turning ordinary projects into eye-catching focal points. From jackets to totes, caps to wall art, the look adds depth, personality, and a premium finish using 3D embroidery techniques. Deliberate design, padding choices, and careful stitching create letters that stay legible and durable, a hallmark of stitched typography. With color depth tips and the right padding, you’ll achieve puffy letter embroidery while picking up embroidery lettering tips for lasting results.
Beyond the literal phrase, this technique reads as dimensional texture on fabric, a form of textile typography that blends craft with design. Think of raised lettering achieved through layered materials, padding, and backing, creating depth without sacrificing wearability. LSI-friendly terms such as dimensional stitching, tactile typography, and decorative embroidery help describe the same effect from different angles. Whether you call it raised lettering on fabric, sculpted typography, or enhanced stitching, the result is a bold, durable feature that enhances garments and home decor. Understanding these related terms makes content more discoverable and guides readers toward practical 3D embroidery outcomes.
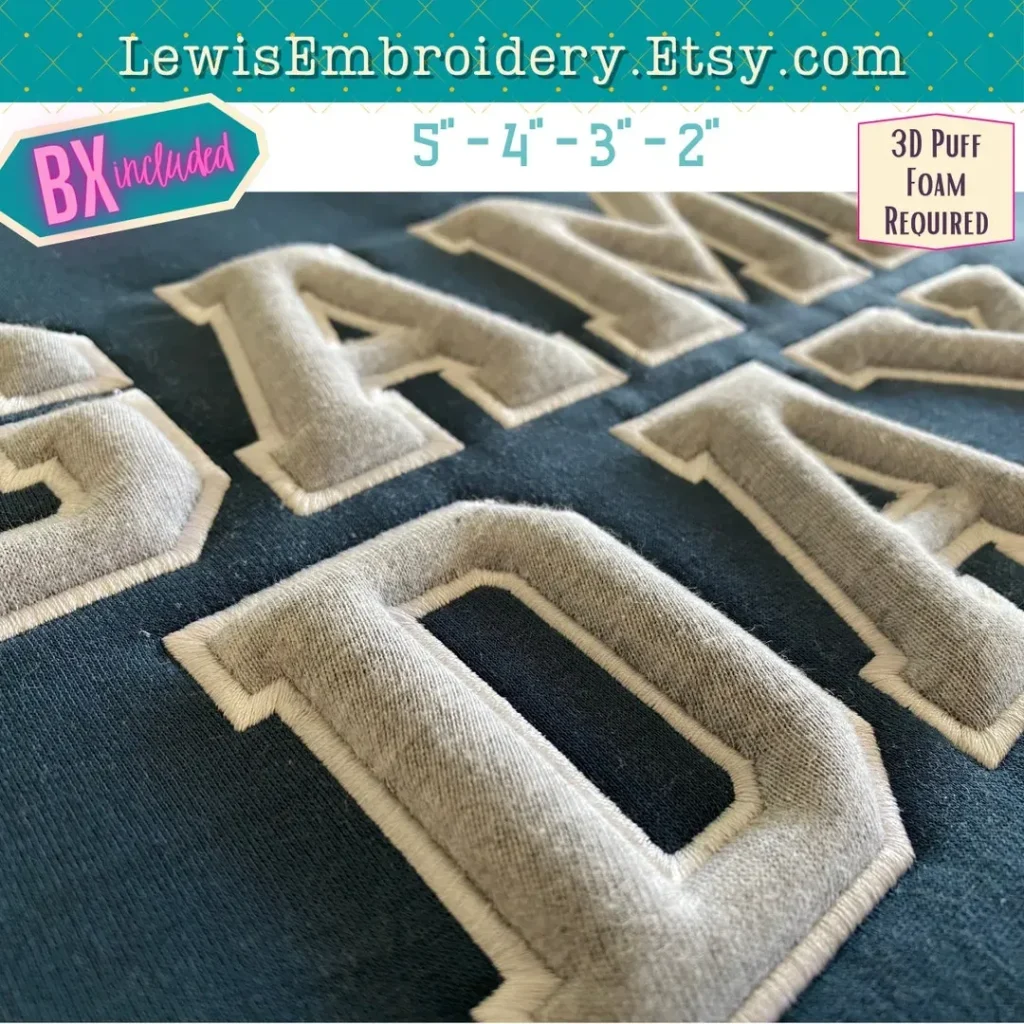
1. Understanding 3D Embroidered Letters: From Raised Typography to Texture
3D embroidered letters bring typography to life by adding dimension and tactile appeal that flat lettering cannot match. This concept sits at the heart of raised typography embroidery, where fabric layers, padding, or foam push the stitches outward to create shadow and depth. The result is a bold focal point that invites touch and rewards closer inspection, whether on a jacket, bag, cap, or wall hanging. By embracing the principles of stitched typography and dimensional stitching, crafters can craft lettering that feels constructed and premium rather than flat.
Effective raised lettering relies on deliberate design decisions and careful material choices. The height and texture come from padding strategies combined with thoughtful stitch selection, producing a durable, visible 3D effect. When you plan for 3D embroidery techniques from the start, you ensure legibility at a distance while preserving intricate details for close-up appreciation.
2. Design Principles for Readable Raised Lettering
Choosing the right font, spacing, and layout is essential for readable raised lettering. Bold, high-contrast letterforms with clear shapes translate more reliably into 3D effects, while script or display fonts may require extra spacing, kerning, or adjusted stroke width. This planning step aligns with embroidery lettering tips that help your design remain legible as height increases and padding adds bulk.
Beyond font choice, test your design at the target size on scrap fabric before committing. Spacing between letters becomes more critical in raised typography, as crowded letters can merge visually and reduce readability. By planning spacing and alignment carefully, you harness the power of stitched typography to communicate clearly and stylishly.
3. Materials and Tools for Bold 3D Typography
A strong result begins with the right materials. Stable base fabrics like denim, canvas, or heavy cotton provide a solid foundation for 3D letters, while stabilizers minimize puckering during dense stitching. Padding materials such as foam or felt give the letter height and a soft buoyancy that defines the 3D look, and high-quality polyester or rayon threads add color depth and durability.
Tools matter just as much as fabric. You’ll need a sharp needle suited to your fabric weight, a hoop or frame to hold everything taut, and design tools—from grid paper to digitizing software—that help you plan precise lettering. Mastery of padding strategies and secure edge finishing are essential parts of embroidery lettering tips that lead to consistent results.
4. Step-by-Step Techniques to Build 3D Embroidered Letters
A core technique is padding first, then stitching. By layering padding under the embroidery layer, you push the stitches outward to create height, with foam offering the most structure and felt providing softer volume. This approach is a staple of 3D embroidery techniques and lays the groundwork for durable, dimensional letters.
Next, use layered stitching to define edges and smooth surfaces. Start with a base fill or outline, then add a second layer with satin or long-and-short stitches to refine borders and texture. Subtle shading, using slightly lighter or darker threads along the top or inner edges, helps simulate light and shadow and enhances the lifelike depth of puffy letter embroidery.
5. Color, Depth, and Shading for Puffy Letter Embroidery
Color strategy is critical for depth. Choose a palette with enough contrast to cast believable shadows and highlights without clashing with the fabric. Using a slightly lighter color on the top edge and a darker shade along the base creates a natural sense of depth, which is especially effective for puffy letter embroidery where the surface is raised.
Depth is further enhanced by careful shading along curves and edges, and by blending colors across layers to mimic light fall. This nuanced approach to color depth aligns with raised typography embroidery goals, helping letters appear more dimensional and visually engaging while preserving readability.
6. Projects, Care, and Creative Applications of Raised Lettering
3D embroidered letters work beautifully on wearables, home decor, and personal accessories. Jackets, hoodies, backpacks, caps, and pillows become focal points when adorned with raised typography that catches the eye from a distance and rewards closer inspection. The versatility of stitched typography makes it a strong option for branding, personalization, and custom gifts.
Care and maintenance are important to preserve the impact of raised lettering. Follow gentle washing guidelines and air-dry to protect padding and stitches. When ironing, use a pressing cloth to avoid flattening the texture, and consider backing or finishing methods that reduce abrasion. With proper care, 3D embroidery lettering remains vibrant and durable for everyday wear and display.
Frequently Asked Questions
What makes 3D embroidered letters stand out on fabrics, and how does raised typography embroidery contribute to their appeal?
3D embroidered letters offer tactile depth, with raised typography embroidery creating shadows and highlights that catch the eye. The height comes from padding or foam under the stitch layer, giving a bold, premium look that flat fonts can’t match. They work well on jackets, bags, caps, and wall art to add personality.
Which fabrics and stabilizers are best suited for 3D embroidery techniques when creating puffy letter embroidery?
Use stable fabrics like denim, canvas, twill, or heavyweight cotton. Add a backing stabilizer (tear-away for dense stitching or cut-away for thicker padding) to prevent distortion. Padding such as foam or felt creates the puff that defines 3D embroidery techniques.
When planning stitched typography for 3D embroidered letters, how should font choice and spacing be handled?
When planning stitched typography for 3D embroidered letters, choose bold, high-contrast fonts for legibility. Test a few letters at the target size on scrap fabric, and allow extra spacing or kerning to accommodate padding and 3D height.
What is the practical step-by-step process for building height with padding in 3D embroidered letters?
Practical steps: design layout and font choice, stabilize the fabric, place padding under the letter area, outline and fill with satin or long-and-short stitches, add shading for depth, then trim padding and finish.
What common embroidery lettering tips help avoid puckering and padding issues in 3D embroidered letters?
Common embroidery lettering tips include using appropriate stabilizers, avoiding puckering, cutting padding to exact letter outlines, layering padding for even height, and finishing with a dense satin border to hide the padding.
What versatile applications can you achieve with 3D embroidered letters on jackets, bags, and home decor?
3D embroidered letters suit wearables (jackets, backpacks, caps), home decor (pillows, wall art), and accessories (bags, wallets). They provide a focal point with tactile texture and a premium handmade feel.
| Aspect | Key Points |
|---|---|
| Definition | 3D embroidered letters are raised typography created by layering padding under stitches to push the embroidery outward, forming depth and a tactile effect. |
| Core Techniques | Padding-first height; layered stitching; satin and long‑and‑short stitches; color depth and shading; backing and edge finishing to secure padding and crisp edges. |
| Materials & Tools | Stable base fabric (e.g., denim, canvas); Stabilizer (tear-away or cut-away); Padding/foam or felt; Threads (polyester/rayon); Needle and hoop; Design tools or software. |
| Design Planning | Font selection and spacing matter; bold sans-serif often preserves legibility in 3D, while script fonts may work with extra spacing and kerning. |
| Step-by-Step Overview | 1) Design/layout; 2) Stabilize fabric; 3) Attach padding; 4) Outline and fill; 5) Add depth with shading; 6) Finish and trim padding. |
| Color Depth & Shading | Use slightly lighter tops and darker bases to create depth; consider subtle shading along edges for lifelike dimension. |
| Projects & Applications | Wearables (jackets, hoodies, caps), home decor (pillows, wall art), accessories (bags, wallets), branding/personalization. |
| Care & Maintenance | Gentle washing, cold water; air dry; avoid high heat; consider backing or protective finishing for longevity. |
| Common Pitfalls | Puckering, uneven padding, cracking stitches, padding visible through stitches; fixes include stabilizers, precise padding, multiple lighter layers, and denser satin borders. |
| Inspiration & Next Steps | Experiment with multi-layer lettering, mix textures (felt, foam, ribbon), and add decorative edge stitches to expand 3D embroidery possibilities. |
Summary
3D embroidered letters bring typography to life by adding depth and tactile texture to fabric projects. These raised letters are created by layering padding under the embroidery stitches to lift the design off the surface, casting subtle shadows and creating a bold, dimensional look. Mastery comes from thoughtful design planning, choice of padding, and stitching techniques—padding first, layering stitches, and using satin or long-and-short stitches to define edges. With the right materials—stable base fabric, backing stabilizers, padding, threads, and a clean finishing approach—you can craft durable, eye-catching lettering for jackets, bags, home decor, and branding. Caring for 3D embroidered letters means gentle washing, air drying, and avoiding high heat to preserve padding and shape. Whether you’re personalizing apparel or creating wall art, 3D embroidered letters offer a premium, tactile expression that stands out in any project.