
Custom Embroidered Patches offer a versatile way to express brand identity and add personality to clothing and accessories. Whether you’re a fashion designer or a community group, mastering designing embroidered patches helps translate your vision into tangible, durable fabric cues. Understanding the patch production process is essential to keep timelines, costs, and quality aligned as you move from concept to finished product. Strategic placement on apparel, including considerations for placing patches on apparel, ensures maximum visibility while preserving garment aesthetics. This guide also covers ideas for embroidery patch ideas and return on investment when choosing options like custom patches for apparel.
Beyond traditional patches, designers often refer to embroidered badges, stitched emblems, or fabric insignias as versatile branding tools. Understanding the badge manufacturing workflow—the journey from artwork and digitizing to finished patch—helps teams forecast lead times and production costs. Strategies for applying these textile emblems on jackets, hats, and bags ensure a cohesive look across collections and channels. Whether you call them embroidered badges, stitched patches, or decorative emblems, the core ideas remain the same: clear storytelling, durable construction, and scalable customization.
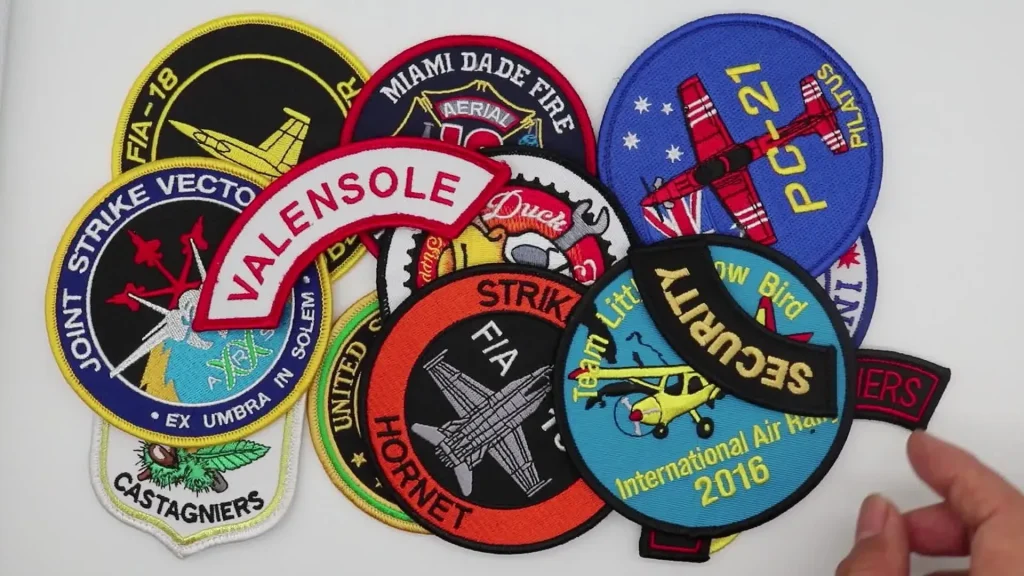
Custom Embroidered Patches: From Design Inspiration to Brand Identity
Custom Embroidered Patches serve as tangible markers of brand identity, achievements, or personal style. They enable a story to unfold on fabric, turning clothing and accessories into portable billboards that communicate values, culture, and mood. When you begin with a clear design brief and a compelling narrative, the patch becomes more than decoration—it becomes a badge that wearers are proud to display. This is especially true for custom patches for apparel, where consistent messaging across items strengthens recognition and loyalty.
To translate this story into a patch, you’ll need a thoughtful ideation process that aligns visuals with function. In the planning phase, consider the patch’s audience, the garment type, and how the patch will live on the fabric. Collaboration between brand designers and digitizers helps ensure the artwork can be faithfully reproduced in stitch, while color decisions—often guided by Pantone matches—keep the patch visually coherent across production runs.
Designing Embroidered Patches: Practical Guidelines for Readability and Stitching
Designing embroidered patches starts with practical constraints: size, shape, and legibility. A patch that is too small can lose detail, while something too large may overwhelm the garment. A common starting range is 1.5 to 4 inches in diameter for round patches, with irregular shapes scaled to maintain legibility. This stage also involves choosing shapes that communicate the brand’s tone—shield shapes for tradition, or freeform silhouettes for a modern edge.
A successful design hinges on collaboration: the artist provides artwork, and the digitizer translates it into a stitch file optimized for durability and crisp detail. During this phase, you’ll decide on thread palette, stitch types (satin, fill, backstitch), density, and underlay. The goal is a readable, color-accurate patch that reads well from a distance, which often means strong contrast and clean lettering paired with appropriate typefaces.
The Patch Production Process: Turning Artwork into Finished Patches
The patch production process is a coordinated sequence that bridges art, engineering, and finishing. It typically begins with artwork approval and prep, where size, shape, and color palette are locked in. This is followed by digitizing—the step that converts artwork into a stitch file and defines stitch direction, density, and underlay, crucial for durability.
Prototyping then tests color accuracy, stitching, backing, and border quality, revealing adjustments before full production. Production planning sets quantities and timelines, while finishing choices like backing (iron-on, sew-on, Velcro) and border finishing (Merrow, laser-cut, or heat-sealed edges) determine wearability and aesthetics. Finally, patches are cut, quality-checked, and packaged, ensuring consistent performance across uniforms, bags, hats, and jackets.
Materials, Finishes, and Durability: Choosing Borders, Backing, and Threads
Material selection anchors both look and longevity. Most patches start with a sturdy twill or felt backing and use polyester or rayon threads. Polyester offers excellent colorfastness and wash durability, which matters for patches that will be laundered frequently. The border finish isn’t just decoration—it reinforces edge stability and fray resistance, with Merrow borders remaining a popular choice for a clean, professional look.
Backing options match how patches will be applied: iron-on for easy DIY use, sew-on for higher-wear reliability, and Velcro for removable configurations on jackets or bags. Careful material matching is essential: heavier fabrics like denim may require denser stitching and a stronger border, while lighter fabrics benefit from streamlined density and subtler borders. If safety is a concern for kids’ clothing, avoid tiny detachable elements and ensure thread security for long-term wear.
Placing Patches on Apparel: Placement Strategies for Maximum Impact
Placement strategy dramatically influences visibility and brand impact. Common approaches include placing patches on the chest for a subtle, brand-centric look, or along sleeves for athletic teams and clubs that need high visibility without overpowering the garment. Hats and bags offer placement opportunities that energize fan engagement, while the back of a jacket can deliver a bold statement in a crowd.
When planning placement, consider orientation, symmetry, and scale to create a cohesive design language. Align patches with natural garment lines and create clusters that feel deliberate rather than random. For uniforms or corporate wear, consistency across items reinforces brand identity, so establish placement standards and reference guides that help teams apply patches uniformly across product lines.
Embroidery Patch Ideas, Variations, and Cost-Effective Production for Garments
Exploring embroidery patch ideas goes beyond a simple logo; emblematic shapes, text paired with icons, and layered color stories can tell a richer brand narrative. Designers experiment with color palettes aligned to brand guidelines, using high-contrast combinations to maximize legibility on apparel or accessories. Specialty threads, such as metallics, can elevate premium designs, while legible typography ensures recognition from a distance.
Budget and lead time shape every project. Short runs and prototypes move quickly, but larger orders require careful planning and clear vendor communication. Seek pre-production samples, discuss minimum quantities, stitch counts, and color matching processes, and ensure the patch production process is transparent. With robust vendor relationships, you can scale patches across product lines, pursue ongoing embroidery patch ideas, and maintain consistency without sacrificing quality.
Frequently Asked Questions
What are Custom Embroidered Patches and how can they benefit your brand?
Custom Embroidered Patches are fabric badges stitched with decorative thread to display logos, artwork, or text. They are durable and versatile for apparel and accessories, and can feature iron-on, sew-on, or Velcro backings. They help brands tell a tangible story, celebrate achievements, and add personality to clothing. For inspiration, consider embroidery patch ideas that fit your brand voice and garment type.
How do you approach designing embroidered patches for apparel?
In designing embroidered patches, start with practical guidelines: size, shape, and legibility. Typical patches range from 1.5 to 4 inches for round shapes, with irregular shapes scaled to stay readable. Collaborate with a digitizer to convert artwork into a stitch file, and decide on thread palette, stitch types (satin, fill), and density. Use Pantone color matches to ensure color fidelity across production.
What is the patch production process for Custom Embroidered Patches?
The patch production process usually includes: 1) artwork approval, 2) digitizing into a stitch file, 3) prototyping, 4) production planning, 5) backing and finishing, 6) cutting and packaging, and 7) quality control. Prototyping verifies color accuracy, stitching, and border quality before full runs. Understanding this process helps you estimate lead times and costs and ensures durability in the final patches.
Where should patches be placed on apparel to maximize impact?
Placement strategies include the chest (left chest) for subtle branding, sleeves for visibility on sport teams, and hats or bags for accessory-driven branding. Back-of-jacket placement makes a bold statement at events. Ensure alignment with garment lines, use appropriate scale, and maintain symmetry when using multiple patches for a cohesive look.
What materials and finishes make Custom Embroidered Patches stand out and last?
Most patches start with a twill or felt backing and use polyester threads for colorfastness. Border finishes like Merrow edges prevent fraying and add durability, while laser-cut or heat-sealed edges offer a cleaner look. Backing options include iron-on, sew-on, or Velcro, depending on how the patches will be worn. Heavier fabrics may require denser stitching and stronger borders; lighter fabrics need careful density control to avoid bulk.
How can I control cost and lead times when ordering custom patches for apparel?
Plan with vendors on minimum order quantities, unit costs, and the maximum stitch count per patch. Request a pre-production sample to confirm color, size, and density before full production. Choose a vendor experienced with your patch type and color matching process to minimize revisions. Prepare early for launches or events to manage lead times and delivery schedules.
| Topic / Aspect | Key Points | Why It Matters |
|---|---|---|
| What Are Custom Embroidered Patches | Small fabric badges stitched with decorative thread; range from tiny one-color to complex multi-color designs; used to tell a story about brand, achievement, or personality; durable and tangible branding | Defines purpose and communicates brand or message on apparel and accessories |
| Design Considerations: Size & Shape | Aim for legibility; avoid patches that are too tiny or too large; typical round patches 1.5 to 4 inches in diameter; choose shapes (shield/crest for tradition, freeform for modern) that suit the artwork. | Affects readability, aesthetics, and production feasibility |
| Artwork to Production: Digitizing & Prototyping | Artwork converted to stitch file; select stitch types and density; create prototypes to verify color, stitching, backing, and border | Ensures durability, color accuracy, and clean stitch read at distance |
| Patch Production Process (Workflow) | Artwork approval → Digitizing → Prototyping → Production planning → Backing & finishing → Cutting & packaging → Quality control | Structured workflow helps estimate lead times and control costs |
| Materials, Finishes & Durability | Backing options (twill/felt), threads (polyester or rayon), border options (Merrow, laser-cut, heat-seal), backings (iron-on, sew-on, Velcro) | Affects look, wash durability, and ease of application |
| Placement on Apparel | Common placements: chest, sleeves, hats/bags, back; orientation, scale, clustering for visual balance | Influences visibility, brand impact, and garment aesthetics |
| Designing for Placement | Use emblematic shapes, combine text and iconography, follow brand colors, consider texture with stitch patterns | Ensures patches read well on various garments and formats |
| Cost, Lead Time & Vendors | Consider minimums, unit costs, stitch limits; plan proofing, production, delivery; choose experienced vendors with color matching and clear communication | Drives budgeting and delivery timelines; quality and consistency depend on vendor |
| From Concept to Commercial Success | Blend design with engineering; ensure readability, durability, and brand coherence; placement strategy enhances garment read | Turns patches into a scalable branding asset |
| Practical Tips | Clear briefs, consistent color palette, pre-production samples, appropriate finish options, varied backings, documented placement standards, plan for expansions | Improves outcomes, consistency, and future flexibility |
Summary
Conclusion: Custom Embroidered Patches are more than decorative badges; they fuse color, texture, and narrative to strengthen brand identity across garments. A well-planned patch program—from clear design briefs and thoughtful size/shape decisions to precise digitization, durable materials, strategic placement, and reliable vendor partnerships—creates patches that endure through wear and wash while consistently reinforcing recognition and loyalty. By aligning artwork with production realities and design-for-placement principles, organizations can unleash the full storytelling potential of Custom Embroidered Patches, turning small stitched emblems into lasting branding assets across collections, teams, and events.