
DTF transfers workflow reshapes how brands decorate textiles, delivering vibrant color, a soft hand, and a scalable path from concept to garment for both small labels and large apparel houses alike. This article explains the DTF transfer design process and how a robust direct-to-fabric printing workflow underpins consistent, high-quality results across fabrics and run sizes. You’ll discover practical tips aligned with DTF printing best practices, from substrate prep and color management to adhesive selection, curing, and post-press care that minimize waste and reprints. We break down the steps from initial concept and artwork through to final application, detailing how each stage—design, print, powdering, curing, and heat pressing—impacts adhesion, hand feel, and durability, and highlighting how the DTF transfer steps from concept to garment play out in real production. To help you decide the best path for your line, we also provide a concise DTF vs screen printing comparison, outlining where each method excels in color fidelity, flexibility, cost, and turnaround.
From a terminology perspective, the topic can also be framed as digital textile printing on fabric via a film-based transfer method, a process that relies on printer, ink, and powder chemistry for durable results. In practical terms, this means emphasizing the workflow, including design optimization, color management, substrate selection, and controlled curing, so operators can replicate results at scale. By using LSI-informed terms like fabric-ink transfer pipelines, garment decoration workflows, and adhesive-backed print techniques, readers gain a broader understanding of how modern decoration methods compare and why many brands choose this route for short runs and intricate designs.
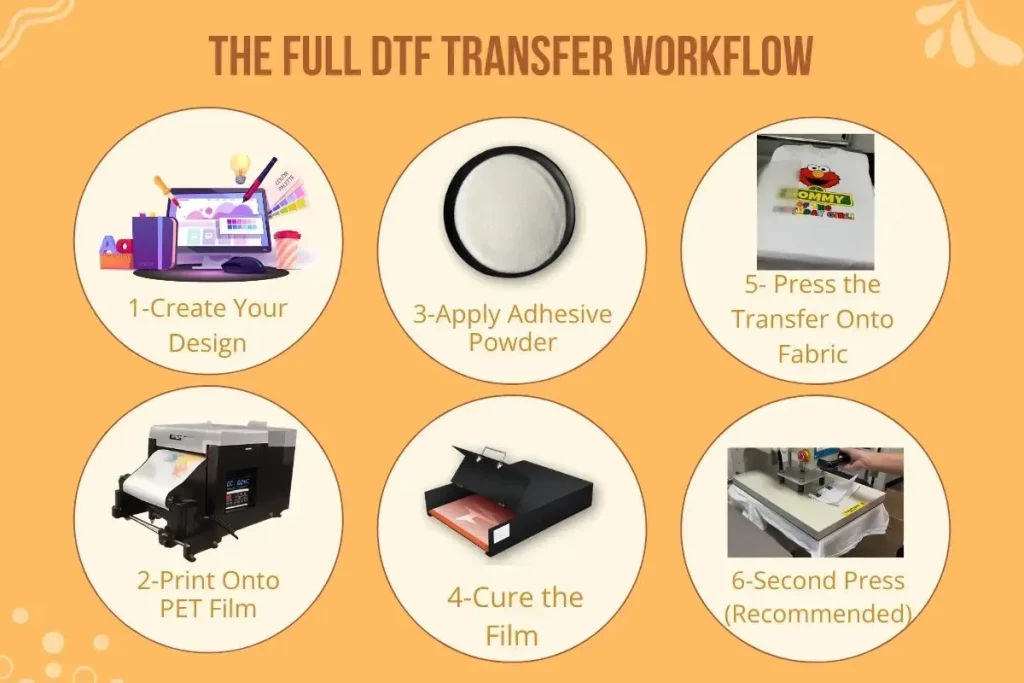
1) Concept and Artwork Development within the DTF transfer design process
The journey starts with a clear concept that considers the target audience, garment color, fabric composition, and end-use. Framing questions about where the artwork will appear, the mood of the design, and how colors will translate for different fabrics helps shape a practical DTF transfer design process from the outset. By aligning creative intent with the capabilities of direct-to-fabric printing, designers can anticipate how details, color richness, and edge clarity will perform in production.
Early decisions about color placement, scale, and potential text elements set up downstream efficiency. Because DTF relies on film, adhesive, and precise alignment, it’s important to plan with the DTF transfer steps from concept to garment in mind. This preparation drives better proofs, reduces reprints, and creates a smoother path through the rest of the direct-to-fabric printing workflow.
2) Artwork Preparation, File Management, and Color Control in the Direct-to-Fabric Printing Workflow
With a concept in hand, export print-ready artwork that preserves color information and edge sharpness. Vector graphics excel for logos and typography, while high-resolution raster images (300–600 dpi at final output size) ensure crisp photographic elements. This setup supports a reliable DTF transfer design process by maintaining fidelity through the printing stage.
Color management is essential for consistent results, especially when switching fabrics. Calibrate monitors to a standard ICC profile and, where possible, use color-managed workflows within RIP software or printer drivers. Build fabric-specific test swatches and proofs to guide color decisions, layer order, and transparency effects so the direct-to-fabric printing workflow delivers predictable outcomes.
3) Printing Preparation, Film, Adhesive, and Color Calibration for Consistent DTF transfer steps from concept to garment
Printing onto PET film designed for DTF transfers requires careful setup: apply the adhesive powder after printing and ensure curing parameters are aligned with the film and powder manufacturer specs. Regular printer maintenance—cleaning print heads, checking nozzle alignment, and substituting worn parts—helps preserve color accuracy and overall print quality for the DTF transfer steps from concept to garment.
Pre-print checks matter: inspect film sheets for bubbles or debris, verify design orientation, and confirm color calibration against target fabrics. Maintain a consistent workflow with the same batch materials for each run, including film sheets, adhesive powder, and curing parameters. These steps lock in a repeatable direct-to-fabric printing workflow that supports high-quality transfers.
4) Powdering, Curing, and Adhesive Consistency: Following DTF Printing Best Practices
After printing, uniform adhesive powder application and proper curing are essential to form a durable transfer. Calibrated powder dispensers should lay down a light, even coat that covers all inks without clumping. A consistent powder layer minimizes texture issues and helps ensure the final hand feel remains soft on the garment.
Curing stabilizes the adhesive and reduces powder shedding during the heat-press stage. Follow manufacturer guidelines for duration and temperature, and perform small batch tests to dial in settings for different films and fabrics. Adhering to these DTF printing best practices helps maintain durability, color vibrancy, and a comfortable hand feel across runs.
5) The Transfer Stage: Heat Press Parameters, Alignment, and the DTF Transfers Workflow
The transfer stage is the core of the process, where heat-press temperature, time, and pressure are tuned to fabric type and the adhesive film used. A common starting point is around 160–170°C (320–340°F) for 10–15 seconds with medium to firm pressure, but adjustments are often needed for delicate blends or synthetic fabrics.
Positioning and alignment are critical for multi-color designs. Use transfer-sheet alignment marks to center the artwork and avoid seams or pockets. For complex designs, plan the application order in steps and document the press intervals. This disciplined approach keeps the direct-to-fabric printing workflow predictable and helps ensure clean edges, minimal ghosting, and consistent results across batches, reinforcing the DTF transfers workflow.
6) Quality Control, Troubleshooting, and a DTF vs Screen Printing Comparison
Quality control is the backbone of reliable production. Develop a checklist that covers print alignment, color accuracy, film adhesion, and surface texture, and compare test prints to approved proofs on each fabric. Maintaining a log of settings for different materials helps quickly identify drifts, whether due to ink flow, powder distribution, or heat-press changes.
Common issues and remedies include ghosting, white spots, ink smear after curing, or stiffness on dark fabrics. When evaluating methods, compare DTF printing best practices with alternative approaches such as screen printing. The DTF vs screen printing comparison should consider fabric type, color count, durability, and order quantity to determine the most efficient and cost-effective method for a given run.
Frequently Asked Questions
What is the DTF transfers workflow and how does the DTF transfer design process fit into it?
DTF transfers workflow is the end-to-end process—from concept and artwork to the final heat-pressed garment—integrating film printing, powdering, curing, and pressing. The DTF transfer design process focuses on planning color, margins, bleed, and layer order to ensure the downstream direct-to-fabric printing workflow runs smoothly and consistently.
What are the DTF transfer steps from concept to garment, and how should you plan the workflow?
Follow the standard steps: 1) concept and artwork development, 2) artwork preparation, 3) printing preparation, 4) powdering and curing, 5) transfer stage, 6) finishing and care, and 7) quality control. A solid plan—using the DTF transfer steps from concept to garment—reduces misalignment, improves color accuracy, and makes the direct-to-fabric printing workflow repeatable across batches.
What are some DTF printing best practices for a reliable direct-to-fabric printing workflow?
Key DTF printing best practices include robust color management, test swatches on target fabrics, consistent batch materials, and timing and curing guidelines from your film and powder suppliers. Maintain printer maintenance, verify white ink accuracy on dark fabrics, and use the same RIP or printer settings across runs to support the direct-to-fabric printing workflow.
How can you optimize color management in the DTF transfer design process for the direct-to-fabric printing workflow?
Optimize color management by calibrating monitors with ICC profiles, using a color-managed workflow in RIP software, and building proofs on actual garments. In the DTF transfer design process, plan color separations and underbases carefully to ensure consistent results in the direct-to-fabric printing workflow.
DTF vs screen printing: how does the DTF transfers workflow compare for different applications?
DTF transfers workflow excels at multi-color designs, gradients, and small runs with flexible setup compared to screen printing, which shines in high-volume production and lower per-unit costs. When choosing between DTF and screen printing, consider fabric type, durability, color count, and order quantity within the DTF transfers workflow.
What quality control checks and troubleshooting tips are essential in the DTF transfers workflow to ensure consistency?
Quality control should cover print alignment, color accuracy, film adhesion, and surface texture, with a running log of settings for different fabrics. Common issues like ghosting, white spots, or cracking after washing have simple remedies related to registration, ink flow, powder adhesion, and curing; implement troubleshooting steps within the DTF transfers workflow.
| Aspect | Key Points |
|---|---|
| DTF transfers workflow overview | A vibrant, scalable process from concept to garment that delivers color-rich prints with a soft hand and consistent quality across runs. |
| Step 1 — Concept and artwork development | Define design scope by considering target audience, garment color, fabric, placement, mood, and margins. Plan color placement and scale early to save time later. |
| Step 2 — Artwork preparation | Export print-ready files; use vector for scalable elements and high-resolution raster for photos. Manage color with ICC profiles, test on fabric, and prepare proofs showing final result on the garment color. |
| Step 3 — Printing preparation | Print on PET film with DTF ink, apply adhesive powder, and cure. Maintain printer health, use manufacturer-recommended inks, and verify white ink accuracy for dark fabrics. |
| Step 4 — Powdering and curing | Disperse a uniform light powder coat, cure according to film guidelines to stabilize adhesive and prevent powder shedding or ink smearing. |
| Step 5 — The transfer stage | Heat-press with fabric-type-aware settings (typical start: 160–170°C for 10–15s, medium–firm pressure). Decide hot/cold/warm peel based on adhesive/film and allow proper cooling before peeling. |
| Step 6 — Finishing and post-press care | Inspect for edge lifts and color uniformity, consider a second press, and provide washing/care guidance to customers to sustain durability and hand feel. |
| Step 7 — Quality control and troubleshooting | Use a QC checklist for alignment, color, adhesion, and texture. Log settings by fabric and address issues like ghosting, white spots, cracking, and stiffness with targeted remedies. |
| Step 8 — DTF transfers workflow vs other methods | DTF offers flexibility for multi-color designs and small runs, with advantages in gradients and detail over some methods, balanced by fabric choice, color count, durability needs, and order quantity. |
| Step 9 — Best-practice tips for different fabrics and applications | Tailor temps and dwell times by fabric: cotton performs well with standard settings; synthetics may need lower heat; dark fabrics benefit from strong white underbases; test finishes on blends/polyesters for durability and drape. |
| Note | A structured, repeatable DTF transfers workflow helps you optimize for waste reduction, consistency, and scalable production across batches. |
Summary
DTF transfers workflow is a comprehensive, repeatable system that guides the end-to-end process from concept to garment, ensuring consistent quality, durability, and efficient production.