
UV DTF transfer opens a world of design flexibility for designers, small shops, and hobbyists alike, enabling bold personalization and durable results across a wide range of fabrics. By focusing on three core pillars—DTF materials, DTF settings, and DTF care—you can reduce trial-and-error time, improve consistency, and extend the life of your prints, while heat press tips and substrates compatibility guide reliable outcomes. Whether you’re aiming for vibrant full-color designs or crisp, durable text, mastering these essentials helps you deliver professional results straight off the press, with predictable color, adhesion, and wash performance across batches. Throughout this guide, related keywords are woven into practical advice to optimize content, product pages, and tutorials for search engines while delivering real value to readers and helping you compare options across brands. With careful planning and repeated testing, you can scale UV printing workflows and maintain consistent quality across batches, ultimately supporting growth, customer satisfaction, and repeat orders.
Think of this technique as a UV-curable, film-based digital textile transfer that bonds vivid graphics to fabrics through controlled heat and pressure. In practice, designers describe the process with terms like UV-activated printer inks, adhesive films, and heat-pressed garment graphics, which helps connect the topic to related ideas such as substrates compatibility and wash durability. This approach delivers durable color on cotton, blends, and synthetics alike, supporting fast turnaround and scalable merchandising in online shops. By exploring terms such as digital fabric transfer, UV-ink transfers, and adhesive-backed prints, you tap into broader topics around ink chemistry, substrate behavior, color accuracy, and post-press care.
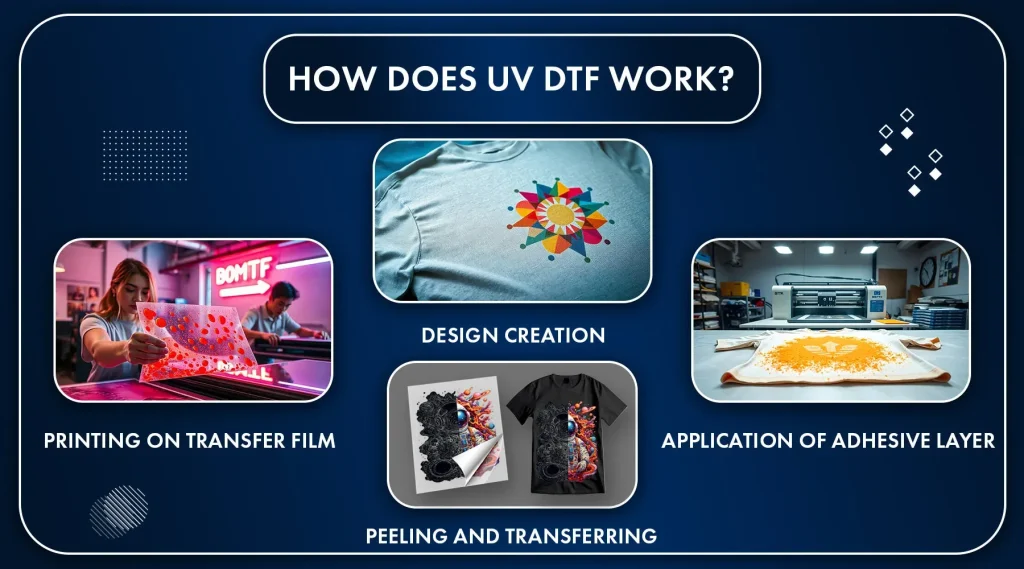
UV DTF transfer: materials, setup, and outcomes
UV DTF transfer bundles design flexibility with durable finishes. At the core are high-quality DTF materials: UV DTF transfer film, adhesive, UV-curable inks, and a reliable powder. Choosing a consistent film thickness and smooth release reduces pinholes and ensures clean edges. In this section, you’ll learn how material choices affect color reproduction, adhesion, and wash durability, so you can build reliable transfer workflows from the start.
Beyond films and inks, aligning substrates and heat press setup matters. A well-structured UV DTF transfer workflow uses compatible substrates—cotton, blends, and synthetics—and a calibrated heat press to deliver predictable results. The right combination of DTF materials and proper setup minimizes issues like cracking or edge lifting and helps you realize the full potential of your designs across batches.
Selecting quality DTF materials for vibrant, durable UV prints
Material choice directly impacts color accuracy and long-term durability. Look for UV DTF transfer film with uniform thickness, a reliable adhesive, and inks formulated for UV workflows. Calibrate color profiles to preserve skin tones, greens, and teals, reducing color shifts in the final print and improving repeatability across runs.
Test swatches on your typical fabrics to gauge adhesion, stretch, and wash performance. Document substrate compatibility across cotton, blends, and synthetics, so you can confidently expand offerings without surprises.
Mastering DTF settings for consistent results
Settings define the bridge between on-screen design and real-world wear. Start with general ranges: 160-170°C (320-338°F), 10-20 seconds, and medium to firm pressure. Adjust for fabric weight and color depth, and run controlled tests on similar textiles to map precise values for each product line.
Include pre-press and post-press steps in your workflow. Decide on peel method based on product guidelines, and consistently monitor temperature, pressure, and timing to maintain repeatable DTF results across batches. Regularly recalibrate color profiles to match your press environment.
Heat press tips for UV DTF transfers
Heat press tips help ensure even contact and durable adhesion. Use a clean platen, protective sheets, and a brief pre-press to flatten fibers and remove moisture. Maintain steady temperature control and apply even pressure across the entire design to avoid hot spots or edge lifting.
During production, track hotspots and clamp pressure, and document any deviations. Run test transfers on similar fabrics to catch issues early, then adjust time or temperature as needed. A repeatable press routine reduces variation and improves overall quality.
Testing substrates compatibility for UV DTF transfers
Testing substrates compatibility is essential for durable UV DTF transfers. Build a small library of test garments across cotton, blends, and synthetics to observe adhesion, color fidelity, and wash performance under real conditions.
Track results with notes on substrate type, ink density, temperature, time, pressure, peel method, and wash outcomes after several cycles. This data informs DTF materials choices and setting adjustments to deliver consistent results across batches.
Caring for UV DTF prints to maximize wash-fastness
DTF care starts with careful handling and washing practices to preserve vibrancy and adhesion. Follow standard washing guidelines—inside-out garments, cold water, and gentle cycles—and avoid chlorine bleach or high heat that can degrade the print.
Drying, storage, and routine press maintenance extend print life. Air drying is ideal; if using a dryer, choose a low heat setting and remove promptly. Regular cleaning of the press and workspace helps prevent residue that could affect future transfers and keep quality consistent (DTF care).
Frequently Asked Questions
What UV DTF transfer materials do I need and how do I choose the best DTF materials for a project?
Core UV DTF transfer materials include UV DTF transfer film with adhesive, UV-curable inks, transfer powder, and compatible garments. Choose materials with consistent thickness, reliable adhesion, and strong wash durability, then test different films and inks on representative substrates to confirm color accuracy and substrate compatibility.
How should I configure UV DTF transfer settings for reliable results across different fabrics?
Start with general ranges: 160–170°C (320–338°F), 10–20 seconds, and medium to firm pressure. Include a 3–5 second pre-press and a 2–5 second post-press interval, using a warm or room-temperature peel per product guidelines. Always run substrate tests and adjust for fabric weight and color.
What care steps are essential for UV DTF transfers to maintain color and adhesion over time?
Follow DTF care guidelines: wash cold, inside-out on gentle cycles; avoid chlorine bleach and high heat. Prefer air drying, and use a brief post-press cooldown if needed. Regularly clean the press and workspace to prevent transfer issues and verify basic performance through periodic checks.
What heat press tips can improve adhesion and prevent edge lifting on UV DTF transfer?
Ensure even platen contact with medium to firm pressure, and perform a brief pre-press to flatten fibers. Follow substrate compatibility guidance, avoid overheating, and use protective sheets to prevent edge distortion. Recheck temperature, time, and pressure after any material change.
How can I test substrate compatibility for UV DTF transfer before a production run?
Create test swatches on the most common substrates (cotton, blends, synthetics). Log substrate type, weight, ink density, and the temperature/time/pressure used, along with peel method. Assess adhesion and wash outcomes after a few cycles to build a reliable substrates compatibility library.
What are common issues with UV DTF transfer and how can I troubleshoot using DTF materials and settings?
Common issues include peeling edges, color fading, halos, and cracking. Address them by checking adhesive quality, confirming substrate compatibility, recalibrating color profiles, and adjusting temperature, time, or pressure. If needed, test alternative DTF materials and review care guidelines to maintain performance.
| Topic | Key Points |
|---|---|
| What is UV DTF transfer and why it matters |
|
| Materials and tools for UV DTF transfer (DTF materials) |
|
| Setting up for success: UV DTF transfer settings (DTF settings) |
|
| Care and maintenance for long-lasting results (DTF care) |
|
| Design-to-product workflow: applying UV DTF transfer with confidence (DTF settings, materials, care) |
|
| Troubleshooting and optimization (DTF care, DT F materials, and settings) |
|
| Test, measure, and iterate (substrates compatibility and consistency) |
|
| Long-term tips for maintaining quality across batches (DTF care and settings) |
|
| Conclusion |
|
Summary
HTML table presented with key points about UV DTF transfer and a concluding descriptive summary emphasizing SEO-friendly guidance.