
3D embroidered tutorials open a doorway to tactile, dimensional art that draws the eye and invites touch, making complex textures feel accessible to makers of all levels worldwide, including hobbyists, students, and seasoned stitchers. These 3D embroidery techniques use padding, layering, and careful stitching to build volume that stands up from the fabric, catching light and inviting closer inspection, a balance of consistency with creative experimentation and patience throughout the process. In this guide, you’ll learn how to move from an outline to plush embroidery, turning a simple sketch into plush texture embroidery that pops from the fabric and endows your piece with character. We’ll cover core techniques such as padding and 3D embroidery stitches and explain how each stitch adds dimensional depth, helping you plan density, scale, and the placement of raised elements. Whether you’re a total beginner or looking for a beginner 3D embroidery tutorial, these tips help you plan, execute, and finish a textured piece with confidence, patience, and a sense of playful discovery.
Viewed through an SEO-friendly lens, this topic reads as three-dimensional stitching guides that emphasize tactile texture and sculptural form across fabrics. Related concepts such as plush texture embroidery, padding techniques, contouring, and raised motifs broaden the relevance and connect to search terms readers might use. Using alternative terms like dimensional embroidery, raised embroidery, tactile surface design, outline to plush embroidery, and 3D stitches helps learners discover the same techniques through different search paths. This approach keeps content discoverable while focusing on the practical steps of outlining, padding, and finishing to achieve lasting texture.
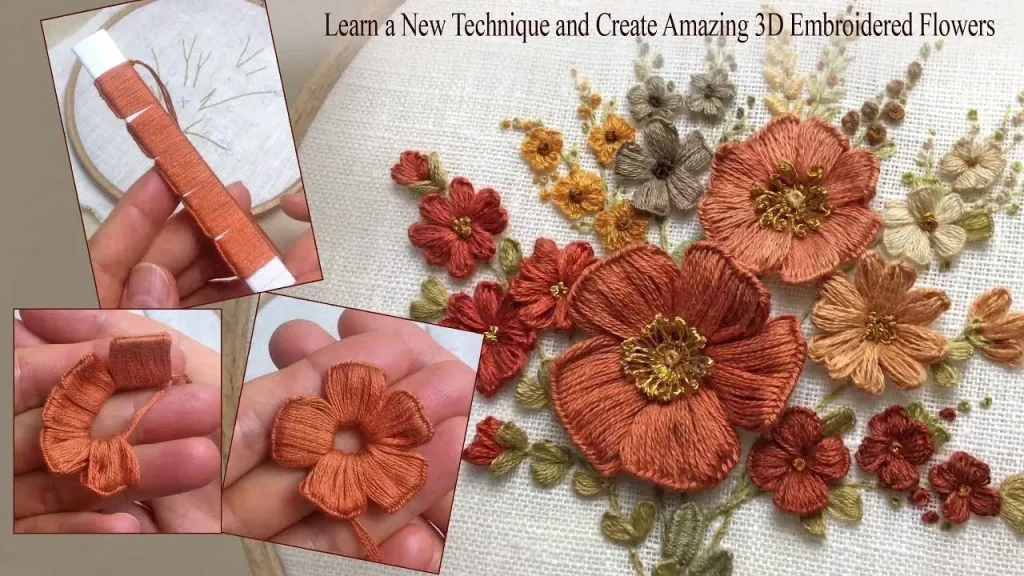
3D embroidered tutorials: From Outline to Plush Texture
3D embroidered tutorials teach a journey from a simple, flat outline to a plush, dimensional surface. By focusing on planning, padding, and careful stitching, you can transform a two-dimensional sketch into a tactile artwork that catches light and invites a closer look. This approach anchors your project in foundational concepts like outline structure, stabilizer choice, and fabric compatibility, ensuring your texture reads clearly from the first glance.
As you progress, you’ll explore the core mechanics of 3D embroidery stitches and other 3D embroidery techniques. With each stitch rise, you gain lift and form, turning thin lines into raised features that stand apart from the background. The result is an organic, sculpted piece that remains durable through thoughtful layering and finishing, while still allowing room for experimentation and personal style.
Understanding 3D Embroidery Techniques for Depth and Dimension
The heart of 3D embroidery lies in techniques that create depth. Classic padding stitches, along with raised elements formed by French knots, bullion stitches, and separate chains, give dimension to petals, eyes, or geometric motifs. Mastery comes from balancing height with softness so the surface reads as a cohesive sculpture rather than a collection of bulky stitches.
Key principles such as layering, contouring, and careful trimming help maintain a plush, dimensional appearance. By stacking padding thoughtfully and shaping threads to follow natural curves, you can avoid a stiff or flat result. Understanding these 3D embroidery techniques empowers you to design pieces that catch the light and invite tactile exploration.
Achieving Plush Texture: Materials and Padding Methods
Plush texture embroidery thrives on the right materials and padding strategy. A stable base fabric like cotton or linen, paired with tear-away or cut-away stabilizers, supports the weight of raised shapes without warping. Lightweight batting or soft fiberfill tucked beneath the top layer creates the cushiony volume that defines plush texture embroidery.
Selecting threads—whether stranded cotton, mouliné, or a touch of rayon—along with the appropriate needles helps you control tension and height. Padding materials are layered gradually, allowing you to sculpt gentle domes and rounded forms rather than rigid blocks. The result is a tactile surface that remains approachable for beginners while offering depth for experienced stitchers.
From Outline to Plush Embroidery: A Step-by-Step Workflow
Effective outline-to-plush embroidery starts with a clear, bold outline that guides where padding will rise. Design decisions, stabilizer choice, and fabric selection all feed into a workflow that emphasizes modular building blocks—plan, transfer, stitch, pad, and layer. This structured approach keeps edges crisp and ensures the plush areas read as intentional depth rather than accidental bulk.
A practical path to follow includes transferring the outline, anchoring with a clean base stitch, and gradually adding padding in layers. Building dimensional shapes step by step—then refining with targeted stitches—lets you translate any design into a plush, dimensional piece. As confidence grows, you can experiment with more complex forms while retaining a solid foundation in outline to plush embroidery.
Tools, Techniques, and a beginner 3D embroidery tutorial: Starter Tips
Choosing the right tools sets the stage for successful 3D embroidery stitches. Sharps or embroidery needles, assorted threads, and appropriate padding options create a versatile toolkit for tackling 3D embroidery techniques. A well-organized workspace helps you maintain control as you build height and shape, reducing snags and frayed edges while you practice.
For beginners, a structured start with a beginner 3D embroidery tutorial provides clear, incremental steps. Begin with a simple motif to master padding, layering, and contouring before expanding to more intricate designs. Focus on small, repeatable techniques—such as a row of satin stitches over padding or a cluster of French knots—to steadily grow your confidence and skill.
Troubleshooting, Finishing, and Display for Durable 3D Embroidery
Even seasoned stitchers encounter challenges with dimensional textures. Common fixes include adjusting padding if areas become uneven, reinforcing edges with a stronger outline, and resecuring the backing to prevent distortion during handling. Lightly pressing from the back and trimming excess stabilizer help preserve plush volume without flattening the raised features.
Finishing and care turn a stitched piece into a lasting display. Consider framing your panel, backing it for durability, or transforming it into a soft sculpture for display. Proper storage, away from direct sunlight and moisture, protects color and structure, ensuring the plush texture and 3D effects endure through time.
Frequently Asked Questions
What are 3D embroidered tutorials and how do they teach 3D embroidery techniques?
3D embroidered tutorials are guided projects that teach you how to add dimension to fabric using padding, layering, and contouring. They cover core 3D embroidery techniques and stitches, with a beginner 3D embroidery tutorial serving as a gentle introduction to outlining, padding, and finishing.
How can I go from an outline to plush embroidery in a 3D embroidered tutorial?
From outline to plush embroidery, these tutorials guide you step-by-step: transfer the design outline, secure it with a base stitch, build padding in layers, then add plush texture with careful stitching. The process emphasizes turning a flat outline into raised, plush elements using 3D embroidery techniques and the right 3D embroidery stitches.
Which stitches are most common in 3D embroidery stitches used in 3D embroidered tutorials?
Common stitches you’ll encounter in 3D embroidery stitches used in tutorials include padding stitches, French knots, bullion stitches, and detached chain stitches. These stitches are used strategically along the outlines to create raised features and plush forms, showcasing essential 3D embroidery techniques.
What is plush texture embroidery and how do tutorials help me achieve it?
Plush texture embroidery refers to creating soft, cushioned surfaces that feel tactile and appear dimensional. Tutorials teach how to pad under shapes, layer stitches, and trim edges to achieve a plush finish, closely following the outline to plush embroidery approach.
What materials and tools should beginners gather for 3D embroidered tutorials?
For beginners, gather a stable fabric (cotton or linen), tear-away or cut-away stabilizer, a selection of embroidery threads, appropriate needles, light padding materials, scissors, and marking tools. A beginner 3D embroidery tutorial often walks you through required supplies and setup before starting.
What are common troubleshooting tips when following 3D embroidered tutorials?
Troubleshooting tips: uneven padding, which you fix by reseating padding; texture that flattens after washing, try lighter padding and gentler finishing; distorted outlines—re-stitch the base outline; thread showing through—add a backing or reduce padding. These tips draw on general 3D embroidery techniques and underline the outline to plush embroidery workflow.
| Aspect | Key Points | Details |
|---|---|---|
| What it is | Creates dimension using padding, layering, contouring; uses specialized stitches to form raised features | Aims for plush, tactile surface that stands off the base fabric. |
| Outline to Plush Planning | Outline acts as skeleton; follows steps from design to padding and building plush texture | Involves steps 1-6: design outline, stabilizer/fabric choice, transferring design, initial stitching, padding and layering, building plush texture with appropriate stitches |
| Materials & Tools | Fabric, Stabilizer, Threads, Needles, Padding, Scissors, Marking tools | Stable base like cotton/linen; tear-away or cut-away stabilizers; mix of stranded cotton, mouliné, or polyester threads; padding materials; small scissors; marking tools |
| Core Techniques | Padding stitches; 3D stitches; Contoured stitching; Layering & trimming | Padding uses small, even stitches; 3D stitches include French knots, bullion stitches, detached chain stitches; stitches follow design contour; layers added gradually and trimmed as needed |
| Beginner Path | Begin with simple motifs; follow a short sequence; practice to build confidence | Steps include transfer outline, backstitch, padding, French knots, finishing stitches, remove stabilizer, press |
| Troubleshooting | Uneven padding; Flattened texture after washing; Distorted outlines; Thread showing through | Reseat padding and re-stitch with even tension; lighter padding and finishing care; re-stitch base outline; use fabric backing or thinner padding to hide bulk |
| Finishing & Care | Pressing, backing/framing, storage | Light press from the back with a pressing cloth; frame or display; store away from direct sunlight to preserve plush texture over time |
Summary
3D embroidered tutorials reveal how a simple outline blossoms into plush texture through thoughtful planning, padding, layering, and careful stitching. This descriptive guide highlights 3D embroidery techniques that add dimension to fabric, from outline to plush embroidery, and demonstrates how to select materials, stitches, and finishing steps that enhance depth. Beginners can follow a gentle path with a starter 3D embroidery tutorial, and seasoned crafters will find troubleshooting tips and finishing care to preserve the plush look. With patience and practice, 3D embroidered tutorials turn fabric into a tactile canvas that invites both the eye and the touch.