
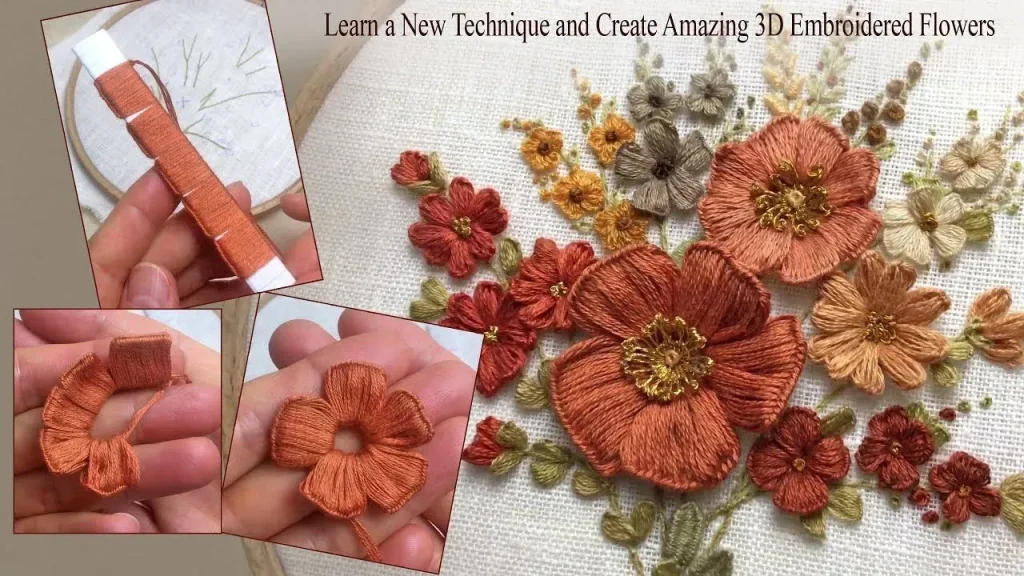
3D embroidery techniques have transformed fabric art, turning flat textiles into tactile, gallery-worthy pieces. This approach lifts threads from the surface to create dimensional shapes that catch light and invite hands to explore. For beginners and seasoned stitchers alike, mastering tension, stitch density, and color layering opens up a world of texture and depth. While many projects start with a simple motif, the real magic comes from layering threads and allowing shadows to form subtly. With the right tools and a patient mindset, you can turn ordinary fabric into wearable art that engages both the eye and the sense of touch.
In more general terms, this craft can be described as raised or dimensional stitching, often used to add sculpture to textiles. Practitioners explore techniques such as floating thread embroidery to lift threads perpendicularly from the fabric, creating airy silhouettes and subtle highlights. When seeking smooth, glossy surfaces alongside volume, satin stitch embroidery paired with padding methods like padded satin stitch can push shapes outward and add tactile contrast. The idea is to layer stitches, adjust tension, and vary density to emulate light, shadow, and texture across a surface. In short, this approach—embroidery stitches texture brought to life with careful technique—invites closer inspection and hands-on appreciation.
Understanding 3D Embroidery Techniques: Depth, Texture, and Dimension
3D embroidery techniques transform flat fabric into dimensional art by lifting threads from the surface and layering color and texture. The result is pieces that invite touch, with shadows and highlights that read like sculpture on cloth.
As you design, balance tension, padding, and stitch density to avoid flat spots. In this toolkit, floating thread embroidery and satin stitch embroidery stand out for their ability to build raised lines and glossy fields that catch the eye and the light.
Floating Thread Embroidery: Elevating Threads for Light, Airy Projections
Floating thread embroidery threads float above the fabric, anchored at intervals to create a delicate, airy surface. This technique excels in botanical silhouettes, abstract motifs, and decorative accents where light reflects off the thread as it moves with a breeze of color.
Control is the secret: keep tension mindful, work in small areas, and consider a water-soluble stabilizer when stitching on delicate fabrics. Layer color gradually to sculpt depth—start with pale threads on a dark ground and build shadows with slightly deeper hues.
Satin Stitch Embroidery: Smooth Surfaces with Dimensional Shine
Satin stitch embroidery yields smooth, glossy fields that read as real surfaces under light. Long, uninterrupted stitches are laid parallel to fill shapes, creating a clean, reflective plane that can become the centerpiece of a 3D-inspired motif.
To push dimension, combine satin stitches with padding or underlay stitches so certain areas lift outward. Practice neat, evenly spaced lines and hide starting ends under adjacent stitches to keep the surface pristine.
Padded Satin Stitch: Adding Volume and Sculptural Form
Padded satin stitch builds volume by backing the stitch area with a small pad of fabric or fiber before laying satin stitches over it. This creates a subtle three-dimensional bump that reads as physical form rather than flat color.
Use padding strategically to lift key elements a petal center, a leaf vein, or a creature outline—and pair with satin stitches to emphasize light and shadow. Experiment with different padding thicknesses to achieve varied heights.
Embroidery Stitches Texture: Crafting Rich, Tactile Surfaces
Embroidery stitches texture is the heartbeat of dimensional work, achieved by mixing stitches, densities, and thread choices to create tactile surfaces you can almost feel. Layering a floating thread stem with satin-filled details adds complexity and realistic texture.
Try combining techniques from the main methods: floating thread embroidery, satin stitch embroidery, and padded satin stitch to develop texture that moves with light. Subtle adjustments to length, twist, and direction yield patterns that read as fabric sculpture.
Tools, Care, and Execution: A Practical Guide to Mastery
Tools and materials set the stage for successful 3D embroidery techniques. Choose stabilizers matched to fabric weight, from light tear-away to cut-away, and select a spectrum of needles, threads, and padding options to support dimensional work.
Care and preservation ensure your raised stitches stay vibrant. Wash gently, press with a cloth, and store away from direct sunlight; re-use stabilizers when reworking elements to maintain the dimensional quality.
Frequently Asked Questions
What are 3D embroidery techniques and how does floating thread embroidery create dimension?
3D embroidery techniques lift threads off the fabric to form dimensional shapes. Floating thread embroidery anchors threads to the base but keeps them elevated to create a raised texture. Balance tension and density—start light, use a water-soluble stabilizer on delicate fabrics, and work in small areas. Layer colors and vary thread lengths, using tiny fly stitches to create subtle curves and depth.
How does satin stitch embroidery enhance dimensionality in 3D embroidery techniques?
Satin stitch embroidery produces smooth, glossy surfaces that read as dimensional when layered with padding or underlay stitches. In 3D embroidery techniques, use neat, evenly spaced stitches and avoid excessively long lengths that snag. Anchor starting and ending threads under adjacent stitches to hide them, and layer areas with different satin stitch densities to simulate light and shadow on the form.
What is padded satin stitch in 3D embroidery techniques and when should you use it?
Padded satin stitch adds volume by backing the stitch area with a small pad of fabric or fiber before stitching, creating a subtle three-dimensional bump. It’s ideal for petals, geometric forms, or any element you want to lift from the surface. Use padding judiciously and pair with satin stitches to maintain a balanced, tactile lift without over-bulking.
How can embroidery stitches texture be achieved in 3D embroidery techniques through layering and mixed stitches?
Embroidery stitches texture comes from layering color and density and combining stitches such as floating thread stems, satin-filled buds, and couching. Build depth gradually, use different thread types, and vary heights to mimic natural texture. Layering across a motif creates nuanced shadows and highlights that read as dimensional.
Which tools and materials optimize floating thread embroidery for dimensional effects in 3D embroidery techniques?
Choose stabilizers appropriate for your fabric weight (light tear-away for delicate fabrics, cut-away for heavier textiles). Use a range of needles and threads (silk cotton, cotton perlé, metallics, novelty threads) plus padding materials (felt or batting) and a small hoop. For floating thread embroidery, use a water-soluble stabilizer on delicate fabrics, maintain a light hand to balance tension, and anchor threads with light backstitches to prevent sagging.
What are best practices for tension and finishing in satin stitch embroidery within 3D embroidery techniques?
Maintain balanced tension: too tight flattens satin stitches, too loose creates gaps. Work in small sections with neat, evenly spaced stitches. Secure starting and ending threads covertly under adjacent stitches. Use padding or underlay to control lift, keep the fabric taut in the hoop, and test on a scraps to keep consistent results across the 3D embroidery techniques.
| Topic | Key Points |
|---|---|
| Introduction | 3D embroidery techniques transform fabric art and fashion by lifting threads from the surface, building dimensional shapes, and layering colors and textures for depth. |
| Floating Thread Embroidery | Raised, airy texture anchored to base fabric; suited for botanical silhouettes and decorative elements; balance tension and density; use a light hand and water-soluble stabilizer on delicate fabrics; color layering adds depth; vary thread lengths to create curves. |
| Satin Stitch Embroidery | Long, smooth stitches fill shapes; can be combined with padding or underlay to push shapes outward; practice neat, evenly spaced stitches; hide starting/ending threads; works well on petals and geometric forms; vary density to mimic light variation. |
| Breathing Life Into 3D Embroidered Elements | Padded satin stitch, couching, and layering add volume; combine stitches for dramatic effects (floating stems with split stitches, satin-filled buds, padded centers with French knots). |
| Materials and Tools | Stabilizers (light tear-away, cut-away); needles for embroidery and beading; threads from silk cotton to cotton perlé, metallics, and novelty; padding like felt or cotton batting; small hoop or frame; beginners: start with simple motif and limited colors. |
| Step-by-Step Quick Guide | 1) Choose a simple motif; 2) Plan layout; 3) Hoop fabric; 4) Anchor lines and begin with floating thread; 5) Add satin stitch areas; 6) Pad areas and cover with satin stitches or couching; 7) Layer colors for shading; 8) Press from the back to finish. |
| Color and Texture Combinations | Color play: matte bases with metallics; use gradients across a shape; example: petal transition pale pink to rose; for floating thread, layer lighter threads toward edges and deepen the center for a natural glow. |
| Care and Preservation | Care: stabilize before laundering; dry-clean or hand-wash with mild detergent; iron on low heat with a pressing cloth; store away from direct sunlight; reuse stabilizer sheets to maintain raised elements. |
| Inspiration and Resources | Seek inspiration from contemporary textile artists, craft magazines, online forums; study embroidery basics and project tutorials; join communities for feedback and tips. |
| Conclusion | 3D embroidery techniques open a world of tactile possibilities. By combining floating thread embroidery, satin stitch embroidery, and padding techniques, you can craft projects that invite touch and admiration. Begin with simple experiments, grow your toolkit, and layer elements to achieve depth and texture that stand off the fabric. |
Summary
3D embroidery techniques open a world of tactile textile art, inviting touch and exploration. These methods turn flat fabrics into dimensional surfaces by layering threads, padding, and satin stitches to capture light, shadow, and form. Start with simple motifs, balance tension and density, and gradually build complex, dimensional pieces that invite admiration. With patience and experimentation, you can master a versatile suite of techniques that elevate embroidery beyond a flat surface into textured, gallery-worthy textile art.