
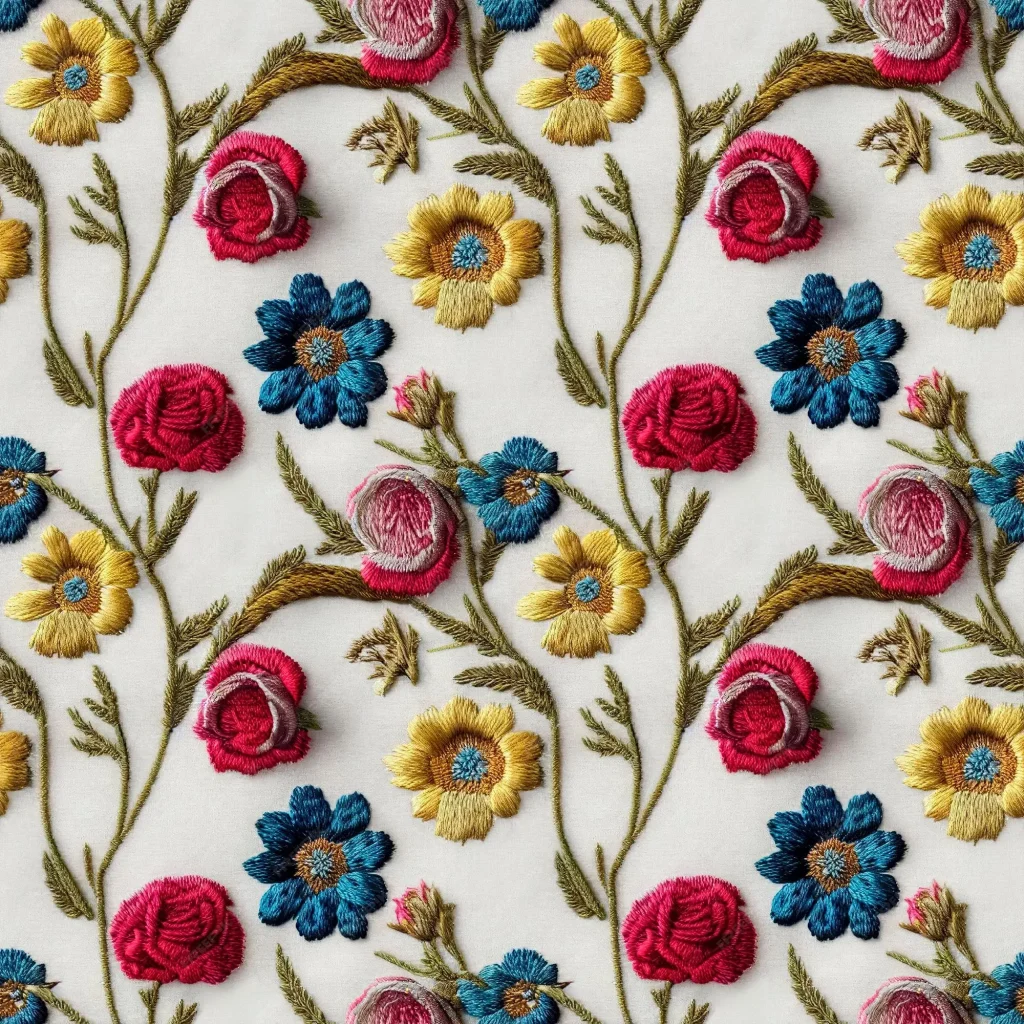
3D embroidered textures transform flat fabric into tactile, lifelike surfaces, inviting touch and close inspection. By layering stitches, padding, and careful thread choices, designers can achieve depth that reads as real dimension and movement. For those exploring raised embroidery techniques, these methods extend beyond simple decoration to create tangible volume while maintaining fabric integrity and comfort. This guide introduces proven techniques, practical tips, and a step-by-step approach you can apply to a variety of fabrics and projects, at home or in a studio. Whether you’re working on fashion, accessories, or home decor, mastering 3D embroidery methods opens new possibilities for depth, shading, and tactile impact in your upcoming collections.
In other words, three-dimensional stitching and raised relief work transform fabric by building volume through carefully placed padding and layered stitches. Discussions of dimensional textile techniques often use terms like lifted stitches, embossed embroidery, and stitched relief to describe how light and shadow sculpt surfaces. If you’re exploring how to create depth, consider this broader vocabulary of techniques that supports the same visual goals without relying on the exact phrase.
1. Mastering 3D Embroidered Textures: Height, Shadow, and Realism
3D embroidered textures bring fabric to life by introducing deliberate height variations that catch light and cast subtle shadows. This approach relies on raised embroidery techniques to create volumes that read as real dimension, transforming flat motifs into tactile surfaces. By blending padding, layered stitches, and carefully chosen threads, designers can achieve realistic embroidery textures that stand out with depth and nuance—whether on fashion accessories or home decor items.
To get there, you’ll need a clear design plan focused on elevation, edge definition, and light behavior. Understanding how height interacts with surrounding fabric helps you decide where to emphasize texture and where to keep transitions smooth. This awareness aligns with the broader concept of 3D embroidery methods, enabling you to craft texture embroidery that reads as three-dimensional from different viewing angles.
2. Planning for Raised Embroidery Techniques: Mapping Elevation and Contour
Effective raised embroidery begins with deliberate planning. Map the zones you want to elevate, determine the number of elevation levels, and sketch how padding will support each raised area. Thoughtful planning prevents over-padding and ensures that scale, proportion, and contour feel natural on the chosen fabric.
Consider fabric behavior and project use as you plan. For example, a home decor piece may tolerate slightly stiffer textures, while wearable garments benefit from softer, more flexible relief. This stage sets the foundation for successful texture embroidery by aligning design intent with material capabilities and care considerations.
3. Layering Stitches and Padding to Build Realistic Embroidery Textures
Realistic texture emerges from the smart combination of stitches and padding. Start with a foundation stitch to stabilize the area, then layer satin fills or long-and-short stitches to build volume. Padding—whether soft foam, fusible foam, or lightweight batting—is placed beneath raised zones to push fabric upward, creating the rounded, sculpted look that characterizes 3D embroidery.
Edges benefit from careful definition: a denser outline around raised zones helps maintain crisp boundaries and prevents a flat silhouette. The texture is enhanced by varying stitch length and density, using matte threads for natural shading and a touch of sheen to mimic the way light interacts with raised surfaces. This approach epitomizes 3D embroidery methods and contributes to the overall realism of the work.
4. Materials and Tools for 3D Embroidery: Stabilizers, Pads, and Threads
Selecting the right materials is essential for durable, professional results. Use a stable base fabric and appropriate stabilizers—light tear-away for hand embroidery or cutaway for machine projects with dense padding—to prevent puckering and distortion during stitching. Padding options like soft foam sheets or lightweight batting provide the backbone for volume without overwhelming the design.
Thread choices influence texture and realism. A blend of cotton, rayon, and polyester threads offers a range of finishes, from matte to slightly shiny, which helps simulate natural fibers. Pairing threads with different sheens can create gentle shading, while the right needle and hoop setup keeps fabric taut without introducing distortion, ensuring the texture embroidery remains consistent across the entire motif.
5. How to Create 3D Embroidered Textures: A Step-by-Step Workflow
This step-by-step workflow guides you through turning a flat design into three-dimensional embroidery. Begin by planning the design and laying out elevation zones, then prepare the base and stabilize the fabric to minimize puckering during padding.
Next, create the foundation with a light underlay and place padding shapes under the raised areas. Build up base layers with satin or long-and-short fills, then define edges with a denser stitch to preserve crisp boundaries. Finish by trimming stabilizers and securing padding, ensuring the raised zones sit evenly and transitions between layers are seamless for a believable 3D effect.
6. Troubleshooting and Finishing: Depth, Edges, and Light Play
Even experienced embroiderers encounter challenges when working with raised textures. Common issues include puckering near edges, gaps between padding layers, and overly stiff results from excessive padding. Address these by adjusting padding thickness, tapering edges more gradually, and rebalancing stitch density to maintain flexibility while preserving depth.
Finishing touches matter for a polished look. Remove temporary stabilizers, secure padding edges, and assess how light interacts with the texture—enhancing subtle shading with thoughtful thread choices. Consistency across motifs is key when producing a set, so maintain uniform padding thickness and stitching density to achieve cohesive, realistic embroidery textures.
Frequently Asked Questions
What are 3D embroidered textures and how do raised embroidery techniques help create them?
3D embroidered textures are fabric surfaces with deliberate height variation created by raised stitches and padding. Raised embroidery techniques, including padding, layering, and edge definition, push areas of the design away from the base fabric to read as dimensional, catching light and inviting touch.
Which stitches and methods are most effective for realistic embroidery textures in 3D embroidery methods?
Realistic embroidery textures in 3D embroidery methods rely on a mix of satin stitches, long-and-short fills, and couching, combined with underlay padding and careful edge definition. Use varied thread weights and sheens to simulate natural shading and form, while keeping edges crisp for believable depth.
How do I plan and prepare to achieve 3D embroidered textures using texture embroidery in a project?
Start with a clear design plan that marks raised zones and elevation levels. Decide where padding will go, choose a stable base fabric and stabilizer, and lay out layers so transitions look natural when you apply texture embroidery.
What materials and tools are essential to produce convincing 3D embroidered textures?
Choose a stable base fabric and appropriate stabilizers (tear-away for handwork, cutaway for machine work), padding options (foam, batting), and a mix of matte and slightly shiny embroidery threads. Have suitable needles and a frame or hoop, plus finishing supplies to secure padding and prevent shadowing.
What is a practical step-by-step workflow to create 3D embroidered textures?
Follow a practical workflow: Step 1 plan the design and elevation levels; Step 2 hoop and stabilize the fabric; Step 3 stitch a light foundation; Step 4 apply padding under raised zones; Step 5 add base layers over padding; Step 6 define edges and add top textures; Step 7 finish by removing stabilizers and securing threads, ensuring smooth transitions between layers.
What common challenges and troubleshooting tips apply to 3D embroidered textures?
Common issues include puckering near raised edges, gaps between layers, stiffness from excess padding, and inconsistent height. Address them by adjusting padding thickness and shape, adding a light underlay to bridge transitions, balancing thread tensions, and keeping padding consistent across motifs.
| Topic | Key Points |
|---|---|
| Introduction | Defines 3D embroidered textures as raised, dimensional surfaces created by layering stitches, padding, and thread choices to add depth and tactile dimension. |
| Core Elements | Height from stitches, padding/foam, and layering; clean edges help readability of three‑dimensional form. |
| Techniques for Realistic Raised Embroidery | Padding/foam underlays, layered stitching, edge definition, thread sheen, and varied stitches to create depth and contour. |
| Materials, Tools, and Prep | Fabrics and stabilizers; padding options (soft foam, fusible foam, batting); threads/weights; needles/equipment; finishing touches. |
| Step-by-Step Guide (Overview) | Plan design and elevation; prepare base and stabilize; create foundation; apply padding; add base layers; define edges; finish and secure. |
| Practical Tips | Pattern precision; match light and color; test on scrap; balance padding; consistency across motifs. |
| Applications | Fashion/accessories; home decor; branding/logos; consider care and washability. |
| Common Challenges & Troubleshooting | Puckering near raised edges; gaps between layers; stiffness from excessive padding; inconsistent height; fixes include padding adjustments, edge definition, and tension balance. |
| Inspiration and Design Tips | Study natural textures; use shading and varied stitch lengths; contrast textures; mix thread weights for realism. |
Summary
3D embroidered textures transform ordinary fabric into tactile, lifelike surfaces that invite touch. By planning elevation zones, using padding to build volume, and selecting the right stitches and threads, you can achieve textures that read as three-dimensional from both up close and at a distance. These techniques enhance fashion pieces, home decor, and branding with depth, dimension, and refined detail. With patience, experimentation, and careful execution, your 3D embroidered textures will elevate projects from ordinary to extraordinary.