
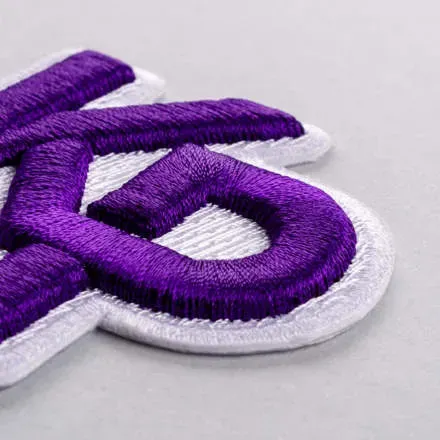
3D embroidered patches turn fabric into tiny sculptures, adding dimension and personality to jackets, bags, and hats, and they invite touch as well as sight. Unlike traditional flat patches, they gain height from padding, layered stitching, and sometimes soft foam, producing a raised, tactile surface that catches the light and stands out on busy textures. If you’re curious about adding depth to your textile accents or expanding your embroidery repertoire, this guide dives into easy patch projects, practical design ideas, and starter-friendly techniques. From bold silhouettes to delicate, formed textures, 3D embroidered patches patterns can spark new approaches while remaining accessible to hobbyists and designers alike. Whether you stitch by hand or with a machine, the craft rewards patience, experimentation, and a playful eye for contrast and color, inviting you to explore color, scale, and texture across garments and accessories.
Put simply, three-dimensional embroidery translates to relief patches, raised badges, and textured fabric insignia that lift the look of a garment without sacrificing wearability. This is where LSI-friendly language helps: talk about raised embroidery techniques, padding, applique layers, and dimensional design accents so readers and search engines connect the dots between method and result. You can think of these as padded elements and silhouette-driven patches that preserve legibility when the design is seen from a distance, while rewarding close inspection with subtle shading and texture. By framing the topic through related terms such as raised embroidery, padded patches, and textured badges, you invite designers of all levels to trial simple projects before tackling more complex scenes. In short, these approaches turn ordinary fabric into expressive, durable wearable art that can be customized for bags, jackets, or hats.
Frequently Asked Questions
What are 3D embroidered patches and how do they create dimension on fabric?
3D embroidered patches are patches with raised elements created by padding, layering, or soft foam under the stitching, giving depth and a tactile feel. They differ from traditional flat patches because they use 3D patch embroidery techniques to build height, making the design catch light and stand out on clothing, bags, or accessories.
Which 3D embroidered patches patterns tend to read best for beginners in 3D embroidered patches patterns?
Patterns with strong silhouettes, bold outlines, and a clear focal point read well in relief. Good options among 3D embroidered patches patterns include animals with distinctive shapes, logos or monograms with clean lines, emblems with a central motif, nature motifs like leaves and mountains, and cartoonish characters. Start with a simple shape and build up layers using easy patch projects.
What are some DIY embroidered patches ideas to kick off 3D patch embroidery techniques?
For DIY embroidered patches ideas to practice 3D patch embroidery techniques, begin with a beginner-friendly motif such as a single-letter monogram with a raised border; then try an animal silhouette with a raised nose or eye and a few layered features; finally attempt a multi-layer landscape or character to test padding and texture.
What tools and materials are essential for mastering 3D patch embroidery techniques?
Essential tools and materials include stabilizer (tear-away or cut-away), a sturdy base fabric (denim, twill, canvas), padding (foam or felt), a stable hoop, a variety of threads, and a durable backing. These items support 3D patch embroidery techniques and help keep layers neat and durable.
Can you outline a simple workflow for a 3D embroidered patches project from idea to finished patch?
Yes. Choose a bold shape, plan layering for height, trace onto base fabric and secure with stabilizer, outline the main shape with a dense stitch, build raised features with padding, add texture with different stitches and threads, and finish with a backing for a clean, durable patch.
How can I find patch design inspiration for 3D embroidered patches patterns and keep ideas organized?
Look to street fashion, nature, geometry, and pop culture for patch design inspiration. Keep a sketchbook or digital.notes of 3D embroidered patches patterns you want to translate, and create small thumbnails to compare options before committing to a final design.
| Topic | Key Points |
|---|---|
| Introduction | 3D embroidered patches are more than fabric accents; they’re miniature art pieces that add dimension, texture, and personality to clothes, bags, and accessories. They achieve a raised, tactile effect through padding, layered stitching, and sometimes foam, unlike flat patches. |
| Basics of 3D embroidery | Dimension is the core; build height by layering stitches, padding, foam/backings, and careful planning to create patches that catch light and feel tactile, more dynamic than flat patches. |
| Patterns for relief | Choose designs with strong shapes and clear focal points. Good 3D results come from bold outlines and central motifs; ideas include animals, logos/monograms, emblems, nature motifs, and whimsical characters; consider legibility with height and padding. |
| DIY patch ideas (beg to advanced) | Begin with simple motifs (e.g., monogram with a raised embellishment). Progress to bold silhouettes with raised features, and finally multi-layer landscapes or characters using several padding levels and mixed materials. |
| Techniques to master | Key methods include padding/layering, raised satin stitches, textured counted stitches, couching/edge finishing, and appliqué layering to add depth and secure raised areas. |
| Tools, materials, and prep | Essential items: stabilizer, sturdy base fabric, padding (foam, felt, batting), hoops, a variety of threads, backing (iron-on or sew-on), and pattern templates for guiding layering. |
| Workflow: simple 3D project | Choose a bold shape, plan layers, trace onto base fabric, secure with stabilizer, outline main shape, build raised features with padding, add texture, finish with backing. |
| Inspiration and design ideas | Draw from street fashion, nature, geometric art, and personal motifs. Sources include streetwear logo patches, leaves/mountains, pop culture icons, abstract patterns; maintain a sketchbook or notes to compare ideas. |
| Finishes and durability | Stabilize edges with tight satin stitches, use padding only where needed, choose fabric with minimal stretch, heat-set or use fabric glue for non-sewn patches, and test on scrap fabric first. |
| Common challenges | Puckering: use firmer stabilizer; uneven padding: layer gradually; loose edges: denser edge stitches; color bleeding: choose colorfast threads and pre-wash fabrics. |
| Conclusion (base content) | 3D patches offer a rewarding path toward creative, tactile embroidery; by combining patterns, inspirations, and techniques, patches become durable, wearable, and visually striking. |
Summary
3D embroidered patches offer a rewarding path toward creative, tactile embroidery that pops with personality. By combining patterns, inspirations, and practical techniques, you can craft patches that are not only visually striking but also durable and wearable. Start with simple ideas and gradually tackle more complex projects as your confidence grows. Whether pursuing DIY embroidered patches ideas for personal use or aiming to sell handmade patches, the world of 3D patches awaits with endless possibilities. Remember to practice with patterns that suit your skill level, embrace different textures for depth, and keep a notebook of patch design inspiration to guide future creations. With patience and curiosity, your patches will tell stories that are uniquely yours, all through the art of raised embroidery.