
3D embroidery patches bring a tactile, dimensional flair to any outfit or accessory, turning ordinary pieces into eye-catching statements. They enjoy wide appeal because they fuse durability with playful texture, and they work particularly well as embroidered patches for jeans and other denim items. If you’re seeking patch ideas for bags, these raised designs add color, character, and structure to totes, backpacks, and purses. For creators, the process is inviting and creative, offering DIY patch customization through layered embroidery, foam padding, and selective backing to achieve the desired 3D effect. When you start planning, try these practical 3D patch sewing tips to ensure clean edges, secure adhesion, and long-lasting wear.
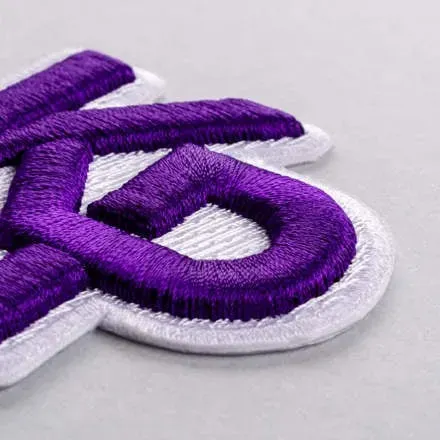
Three-dimensional patches, also known as raised embroidery badges, bring depth and texture to fabrics by stacking stitches, foam, or felt. Thanks to their versatility, these tactile accents suit a wide range of items—from jackets and backpacks to handbags and soft accessories. LSI-based design often pairs bold focal motifs with supporting outlines and negative space, creating a balanced composition that reads well at a glance and up close. The practical side includes selecting durable backing, choosing sturdy threads, and planning secure attachment methods that endure daily wear, weather, and frequent washing. Inspiration can come from nature, travel, hobbies, or corporate branding, and the right combination of texture, color, and placement can transform modest pieces into conversation-starting statements.
Enhancing Denim with 3D Embroidered Patches: Techniques and Tips
3D embroidered patches bring denim to life by adding dimensional texture that catches light as you move. A combination of layered embroidery, foam padding, or felt accents creates a raised motif that stands out against the blue of jeans. This tactile depth makes even simple pockets or seams feel curated and intentional.
To apply on jeans, consider patches with the right backing and stitching to withstand daily wear. Use 3D patch sewing tips like tight satin edges and edge stitching to ensure durability, and experiment with patch ideas for jeans that mix scale and color. For DIY patch customization, start with a small focal patch and build a cohesive set across the garment.
Choosing the Right Patches for Jeans: Sizing, Color, and Placement
Choosing the right patches for jeans means balancing size, color, and placement to avoid crowding the fabric. Smaller patches work well on pockets or along the hem, while larger pieces can anchor a knee reinforcement or back pocket cluster. Consider the fabric weight of your denims to determine how much foam or padding you can comfortably support.
Think of embroidered patches for jeans as a visual story you tell with color. Start from a color palette that complements your denim shade, and use patch ideas for bags as a quick cross-application concept: if a design looks good on a tote, it can anchor a denim look too. When you do DIY patch customization, test several layouts before sewing, and choose a backing that withstands regular washing.
Creative Patch Ideas for Bags: From Tote to Backpack
Bags and totes are ideal targets for 3D embroidery patches because their fabrics accept thicker patches without sagging. Outer bag panels benefit from bold, high-contrast designs that read from a distance, while smaller patches on straps add quiet personality. Experiment with stacked shapes to create a capsule look that ties multiple bags together.
Patch ideas for bags can reflect travel, hobbies, or favorite motifs, turning everyday carry into a personal diary. Pair foam-backed patches with high-contrast threads to maximize depth, and remember to secure edges with dense stitching so they endure daily use. The result is a carryall that feels curated rather than decorated, thanks to intentional layering and color harmony.
DIY Patch Customization: From Concept to Finished Patch
DIY patch customization starts with concept, then moves to material choice and construction. Begin with a sketch or digital mockup to map where each patch will sit on jeans or a bag. Decide whether you want a single focal piece or a small cluster that builds story as you add more patches.
Choose a patch backing that suits your fabric—felt or twill for durability—and pick embroidery threads in a cohesive palette. For 3D dimensions, add foam padding between layers and finish with a sturdy edge seam. As you work, keep a notebook of your ideas and dimensions to streamline future DIY patch customization projects and maintain consistency across pieces.
Sewing and Attaching 3D Patches: 3D Patch Sewing Tips and Backing Choices
When it’s time to sew on patches, use 3D patch sewing tips to maximize longevity. A tight satin border around the edge helps the patch lay flat and resist fraying, especially on denim or canvas. Test several needles, threads, and stitches on scraps to avoid puckering or stiffness.
Backings matter just as much as stitch choice. For thicker fabrics, stabilize the area with a light stabilizer and consider a zigzag or blanket stitch that secures weighty patches without sinking the design. After washing, inspect edges and resew any loose corners to preserve the 3D texture over time.
Care, Maintenance, and Sustainable Sourcing of 3D Patches
Care and maintenance extend the life of 3D patches. Turn garments inside out before washing and air dry whenever possible to protect foam padding and embroidery. Spot clean and avoid high heat; this helps preserve the raised textures that give patches their distinctive look.
Sustainability matters: look for ethically sourced designs and consider upcycling scraps into patch ideas for bags or jeans. Choosing durable backings and reusable patches means you can refresh your wardrobe without material waste. By using 3D embroidery patches thoughtfully, you maintain style while supporting responsible crafting.
Frequently Asked Questions
What are 3D embroidered patches and how do they differ from flat patches?
3D embroidered patches are fabric badges with raised elements created through layered embroidery, foam padding, or felt accents. This 3D effect adds texture and depth, making them visually distinctive compared with flat patches. The difference often comes down to design density, backing, and whether the patch is subtle or bold on heavier fabrics like denim and canvas.
How can I apply 3D embroidery patches to jeans, and what are some patch ideas for jeans?
On jeans, use 3D embroidered patches for pocket accents, knee reinforcement, or monogram highlights. Patch ideas for jeans include a small emblem on a back pocket, a larger focal patch on the thigh, or a layered cluster near the hip. Attach with a dense zigzag stitch or sewing plus a stabilizer for durability, ensuring the patches sit flat and integrate with the denim.
What are some patch ideas for bags using 3D embroidered patches?
For bags, try bold outer front-panel patches that pop against the bag color, strap or handle accents for subtle personality, and zipper or pocket trims for detailed flair. You can also create a travel-themed capsule set with compass or code motifs across multiple bags to tell a visual story while maintaining cohesion.
How do I start with DIY patch customization for 3D patches?
DIY patch customization starts with a concept: sketch or design a focal patch or a small collection. Choose backing fabric, stable materials, and threads, then add foam padding for the 3D effect. Embroider the base, build up layers for dimension, finish with a stabilizer, and finally attach the patch to your garment or bag with a dense stitch, testing on scrap fabric first.
What are the best 3D patch sewing tips to ensure durability?
Key 3D patch sewing tips include using a tight, dense stitch around the edge, stabilizing the fabric behind the patch, and testing tension on scrap fabric before final sewing. Prefer sew-on methods with a zigzag or satin stitch for denim or canvas, and avoid bulky backing that could cause puckering or stiffness.
How should I care for 3D embroidered patches on jeans or bags to keep them looking fresh?
Care tips: minimize washing frequency for heavily padded patches; if washing is needed, use a cold to warm gentle cycle and a mild detergent. Turn garments inside out, air-dry when possible, and spot-clean foam areas to preserve the raised texture. Periodically inspect edges and resew any fraying to maintain durability.
| Section | Key Points |
|---|---|
| What are 3D embroidered patches? | Raised elements created through layered embroidery, foam padding, or felt accents; provide a tactile, dimensional look. Works best on heavier fabrics like denim and canvas; offers subtle to bold 3D effects depending on design, density, and backing. |
| Why use on jeans and bags? | Personalization, durability with proper backing, strong visual impact, easy updates, and opportunities for storytelling. |
| Creative uses for jeans | Pocket accents, knee reinforcement, logo/monogram highlights, denim jacket coordination, and themed outfits. |
| Creative uses for bags | Outer panel patches, strap accents, zipper/pocket trims, travel-memory signs, and cohesive capsule sets across multiple bags. |
| Sourcing and selecting patches | Consider backing and attachment (iron-on vs sewing), material compatibility, color/design, and size balance. |
| DIY patch customization | Design concept, choose backing material, select threads and padding, build up layers, and finish with stabilizer and secure attachment. |
| 3D patch sewing tips | Use tight satin or backstitch around edges, stabilize fabric, test on scrap fabric, and follow care basics to preserve foam padding. |
| Design considerations and safety | Color harmony, layering strategies, theme coherence, and ethical/sustainable options (upcycling scraps) to keep projects stylish and responsible. |
| Care and maintenance | Minimize washing for heavily padded patches; if washing, use cold/warm gentle cycles; dry flat; inspect and resew edges as needed. |
| Inspiration and where to find ideas | Look to fashion blogs, patch galleries, and social media for ideas; save and analyze color, padding, and edge finishes to adapt concepts. |