
3D embroidered embellishments transform the way we personalize bags and accessories, adding depth and luxury with layered stitches, foam petals, beads, and rich textures. These dimensional elements bring tactile interest to everyday items and help them stand out in a crowded market. This guide explores what 3D embroidery is, why it’s a powerful technique for fashion and accessories, and how to master it from concept to finished piece. You’ll find practical tips, project ideas, and a step-by-step approach to creating standout textures and shapes that work beautifully on totes, handbags, wallets, pouches, and other accessories. If you’re looking to level up your craft, search terms like 3D embroidery techniques, embellished bag ideas, 3D embroidery for accessories, how to do 3D embroidery, and hand embroidery for bags will guide you toward durable, showroom-worthy results.
Beyond traditional stitching, this elevated surface decoration uses layered fabric, foam cores, and beadwork to create raised motifs that catch light and invite touch. Think of it as a sculpted form of hand embroidery for bags, where stitched petals and geometric shapes sit in gentle relief on leather, canvas, or denim. Using terms like three-dimensional embroidery, raised patchwork, and volume-rich applique, crafters can describe the same idea from different angles while retaining semantic relevance. Whether you’re planning a tote, clutch, or wallet, these semantic approaches help search engines connect related concepts such as stitched texture, dimensional embellishment, and decorative stitching.
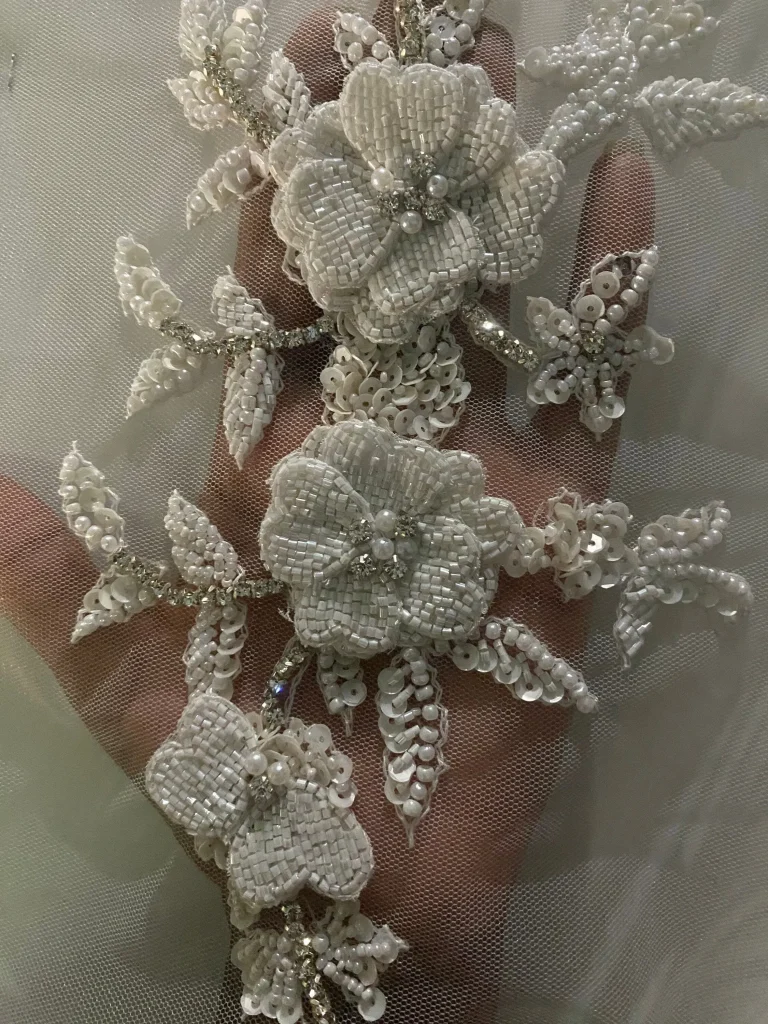
3D Embroidered Embellishments on Bags: From Concept to Couture
3D embroidered embellishments layer fabric, stabilizers, foam, beads, and stitches to create depth and tactile interest on bags and accessories. This approach hinges on 3D embroidery techniques that push beyond flat surface decoration, allowing motifs to pop and cast subtle shadows as light moves across the piece. By crafting dimensional petals, leaves, or geometric forms, designers can transform totes, handbags, wallets, and pouches into wearable art, while keeping the final item durable for daily use. These techniques also align with popular embellished bag ideas that emphasize texture and movement.
On a practical level, 3D embroidery for accessories delivers a premium, handmade vibe that helps pieces stand out in a crowded market. If you’re curious about how to do 3D embroidery, this route provides a clear path from concept to finished embellishment, with emphasis on planning, materials, and technique. Embracing this method invites experimentation with layering, texture, and light interaction, making each bag a unique statement piece.
Choosing Fabrics and Stabilizers for Durable 3D Embroidery
The base fabric you choose sets the foundation for successful 3D embroidery. Heavier textiles such as canvas, denim, and faux leather tolerate foam cores and dense stitching much better than delicate silks or chiffons. Start with simple shapes—flowers, leaves, or geometric motifs—to minimize puckering on curved surfaces like bag flaps or straps. Using the right stabilizer, such as a cut-away underlay or a lightweight tear-away with foam, helps maintain form without sacrificing flexibility.
Foam or felt provides the volume that gives 3D elements their signature lift. Foam is especially effective for petals and three-dimensional shapes, while felt offers structure and easier trimming. Pair these with the appropriate stabilizer, and balance density with the fabric’s weight to avoid stiffness. For hand embroidery projects on bags, consider how to fuse traditional hand embroidery for bags techniques with foam-backed pieces to achieve both durability and flexibility.
Tools, Materials, and Setup: The 3D Embroidery Toolkit for Bags
A successful 3D embroidered embellishment starts with the right toolkit. Key items include stabilizers (cut-away for sturdiness, tear-away for softer fabrics), foam or felt for volume, polyester machine embroidery threads for durability, and hand embroidery threads for a softer finish. Choose needles suited to your fabric—sharp for woven textiles and ballpoint for knits—and keep adhesives or temporary spray glues on hand to hold pieces in place during stitching.
Beads, sequins, and micro-embellishments add subtle sparkle without overwhelming the design. When finishing, remove excess stabilizer, and secure all edges to prevent shifting. If you’re blending machine and hand techniques, plan your workflow so the groundwork is stable enough for machine stitching while allowing hand-stitched details to read clearly on the surface.
Step-by-Step Guide: Creating 3D Embroidered Embellishments on Bags
Step 1 focuses on design concept and placement. Sketch the motif, select its size, and decide where it will live on the bag, considering hardware, seams, and closures. If you’re testing a large 3D piece for a strap or flap, try a substitute swatch first to verify that the final piece won’t pull or distort over time. This aligns with how to do 3D embroidery by planning layers and volumes before stitching.
Step 2 covers base preparation and stabilizer setup. Attach foam to the stabilizer with a light adhesive, and ensure the surface remains stable throughout stitching. Step 3 involves shaping the base—cut the fabric or felt shape and secure it to the foam so it sits flat. Step 4 brings the stitching into play, typically with contour outlines and layered fills to build depth without flattening.
Design Ideas: 3D Embroidery Motifs for Hand Embroidery and Bags
Explore floral motifs, leaves, and geometric forms that spring from the surface with layered petals and raised edges. These designs can be crafted using a combination of hand embroidery for bags techniques and machine stitches to balance precision with texture. For those seeking readily adaptable options, “embellished bag ideas” provide a wealth of inspiration—from garden-inspired florals to architectural shapes that complement modern silhouettes.
As you experiment, consider how to pair 3D elements with hand embroidery for bags to create a tactile narrative. Layering different materials—foam, fabric, and beads—adds dimension and color depth, making each motif feel sculptural. This approach supports a versatile repertoire of accents suitable for totes, crossbody straps, and wallet panels, enriching your collection of embellished bag ideas.
Care, Longevity, and Maintenance of 3D Embroidered Accessories
Durability comes from quality materials and careful finishing. Handle 3D embroidered embellishments with gentle care to preserve the foam core and stitching. When washing, prefer spot cleaning and, if machine washing is necessary, turn the bag inside out and place it in a mesh bag to protect the dimensional elements. Air-drying helps retain the shape and prevents foam from warping over time, ensuring your investment stays vibrant.
Longevity also depends on regular inspection of threads and beads. Look for loose stitches or bead migration and re-secure as needed. Test colorfastness on a swatch before applying color-heavy designs, especially when layering multiple threads. Proper care supports the longevity of 3D embroidery for accessories and helps maintain the premium look of embellished bag ideas over repeated use.
Frequently Asked Questions
What are 3D embroidered embellishments, and how do 3D embroidery techniques create depth on bags?
3D embroidered embellishments are raised, textured elements created by layering foam, fabric, stabilizers, and stitches. In 3D embroidery techniques, foam or felt forms the base while dense satin stitches and layered stitching push parts outward, creating petals, leaves, or shapes that cast shadows and catch light. This depth adds luxury and tactile interest to bags, straps, and pockets, making the design stand out. They work especially well on sturdy bag surfaces that can support thicker layers.
Which fabrics, stabilizers, and foam work best for 3D embroidery for accessories on bags?
For bags, choose heavier bases like canvas, denim, or faux leather that tolerate dense stitching. Use a cut-away stabilizer with foam to add volume, adjusting foam density to the motif size. Pair polyester machine embroidery thread for durability with foam or felt to maintain the 3D structure. This setup supports long-lasting 3D embroidery for accessories and minimizes distortion.
How to do 3D embroidery on a tote: a simple step-by-step guide for beginners?
How to do 3D embroidery starts with a clear concept, then follows a practical workflow: 1) design the motif and decide placement, 2) prepare the base and stabilizer, 3) cut and mount the base shape, 4) stitch the foundation with dense satin stitches, 5) add texture by layering foam and additional shapes, 6) finish with edge lines and optional beads before attaching the piece to the bag.
What are some popular embellished bag ideas using 3D embroidery for accessories?
Embellished bag ideas using 3D embroidery for accessories include floral motifs on totes with a beaded center, raised geometric accents on crossbody straps for texture, and patch-like panels on wallets or pouches for a modern designer vibe. You can tailor seasonal motifs (stars, leaves) to switch between bags, or combine leather bases with fabric 3D elements for contrast. These ideas leverage texture and depth to create standout yet wearable pieces.
What common challenges arise with 3D embroidered embellishments on bags, and how can you troubleshoot puckering and bead migration?
Common challenges include puckering and distortion on curved surfaces, thick threads that stiffen the piece, and bead migration or color bleed. Troubleshoot by choosing an appropriate stabilizer for the fabric weight, stabilizing both sides on curves, reducing machine tension, and using foam with suitable density. For beads, sew with dense backstitches and anchor them securely to prevent movement and ensure clean edges.
How should you care for bags with 3D embroidered embellishments to preserve color and shape?
Care for these embellishments by avoiding harsh washing; spot clean when possible. If machine washing is necessary, turn the bag inside out and place it in a mesh bag, then air-dry to protect the foam core. Use durable fabrics and stabilizers that resist wear, and store bags away from direct pressure to maintain the 3D shapes and color integrity.
| Aspect | Description |
|---|---|
| What 3D embroidered embellishments are | Raised, tactile elements created by layering fabric, stabilizers, foam, yarns, and stitches to build volume and dimension; they pop from the surface unlike flat embroidery. |
| Why it works well on bags and accessories | Bags provide sturdy fabrics that can support foam or stabilizers; raised motifs create tactile interest and function as focal points on straps, flaps, pockets, or edges. |
| Tools, materials, and setup | Stabilizers, foam or felt, threads, needles, adhesives; optional beads; include tear-away or cut-away stabilizers; foam for volume; adhesives to position pieces. |
| Choosing fabrics and base shapes | Heavier fabrics support dense stitches; start with simple shapes like flowers, leaves, or geometric motifs; place 3D elements along seams for wearable detail. |
| Techniques to master | Layering stitches for depth; dense satin/long-and-short stitches; sashing and couching for outlines; applique with foam; beading for texture. |
| Step-by-step guide (overview) | Design and planning; prepare base; create base shape; stitch foundation; add texture; finishing touches; attach to bag. |
| Practical ideas and projects | Floral motifs on tote bags; geometric accents on crossbody straps; patch-like panels on wallets; seasonal embellishments; leather bases with fabric flowers. |
| Common challenges and troubleshooting | Puckering; thick threads; bead migration; color bleed; test color fastness; stabilize both sides; adjust tension and foam density. |
| Care and longevity | Spot cleaning preferred; if machine washing is necessary, use a mesh bag; air-dry; choose durable stabilizers to withstand multiple cleanings. |
| Inspiration and advanced projects | Combine 3D elements with flat embroidery; modular motifs; collaborations; designs suitable for shops or galleries. |
| Final tips for getting started | Start simple; practice on scrap; photograph from multiple angles; keep diverse foam thicknesses; document process for learning and refinement. |
Summary
3D embroidered embellishments transform bags and accessories by adding texture, depth, and a tactile sense of luxury. From planning your motif to selecting stabilizers and foam, a thoughtful workflow helps you build durable, eye-catching pieces. By layering stitches, using appropriate fabrics, and applying finishing touches like beads or subtle couching, you create designs that stand out in a crowded market. With practice, these embellishments become signature details that elevate both everyday totes and statement bags, while remaining practical for wear. This approach supports creativity, craftsmanship, and consistent results you can showcase in portfolios, shops, or galleries.